
To deliver a good quality of work creating a robust software testing framework is a very important task. Every tester has his/her own approach or method to create a testing framework but the most common and important thing is creating a framework in such a manner that the other testers with minimal knowledge of automation testing can easily utilize the framework. While creating a framework there are some key points that we should consider you will find these points mentioned below.
A good tester is one who has the ability to create a good testing framework. In this blog, I have explained how to create an automation testing framework. Even a beginner with minimal knowledge of automation testing can use this approach to create his own testing framework. There are many more things that you can implement in this explained framework so feel free to comment on it.
When I started my journey as an SDET creating a framework was my first task assigned in my training so I can understand how important it is to create your own framework. Together in this blog, we will see the guidelines I have described which will help us to create a testing framework.
Before we jump into the main topic of our discussion let’s just quickly see the steps we will be following while creating our own framework.
Key Considerations When Creating an Automation Testing Framework:
- Understanding the Requirements
- Selecting a Testing Framework
- Designing Test Cases
- Implementing Test Cases
- Executing Tests
- Maintaining and Improving the Framework
Among the various frameworks present one of the most popular frameworks used for automation testing i.e. the combination of python’s behave library and selenium. In this blog, we are going to explore how to build and use this framework for our automation testing.
As everyone is familiar with Selenium which is an open source and one of the widely used tools for web automation testing along with Playwright and Cypress. Behave is a python library that is used for the BDD (Behavior Driven Development). Let’s just quickly explore what are the different frameworks present out there for automation testing.
A software automation testing framework is designed to make the process of testing software more efficient and easy to use. Every framework has its own advantages and disadvantages as per the given requirement it is most important for us to choose the right framework for automation. Below you will find some of the most commonly used and popular automation frameworks.
Types of Test Automation Frameworks:
- Linear Scription Framework.
- Modular Testing Framework.
- Data-Driven Framework.
- Keyword Driven Framework.
- Hybrid Framework
- Behavior Driven Development Framework.
- Test Driven Development Framework.

In this blog, we will be building a BDD framework using Python’s behave library and selenium. In BDD we use the natural language to describe our test scenario divided into steps using the Gherkin language. These test scenarios are present in a feature file and because of the use of natural language, the behavior of the application is easily understandable by all. So, we can say that while creating a BDD framework one of the key components we should consider to use of the feature files and the step files.
As described earlier a feature file is written in natural language with the help of Gherkin language by following a set format. While a step file is an implementation of the steps present in the feature file. Here, a step file is a python file and we can see that it is full of a set of functions where those functions correspond to the steps described in the feature file. Now that we have seen what is feature file and step file let’s see what is the use of python’s behave library here, so basically once the steps and feature file are ready the behave will start automatically matching the steps present in the feature file with its corresponding implementation in the step file and will also check for any assertion errors present.
Prerequisites for creating a framework:
- Python: https://www.python.org/downloads/ visit the site to download and install python in your system if it is not there.
- Install Selenium and Behave using:
pip install selenium
Pip install behave
For more details please visit: https://pypi.org/project/behave/ & https://pypi.org/project/selenium/
3. Pycharm IDE (Professional or Community): https://www.jetbrains.com/pycharm/download/
4. Install allure for report generating using:
pip install allure-behave
For more details please visit: https://pypi.org/project/allure-behave/
5. We can also install all the required packages using the requirement.txt file using the below command.
pip install -r requirement.txt
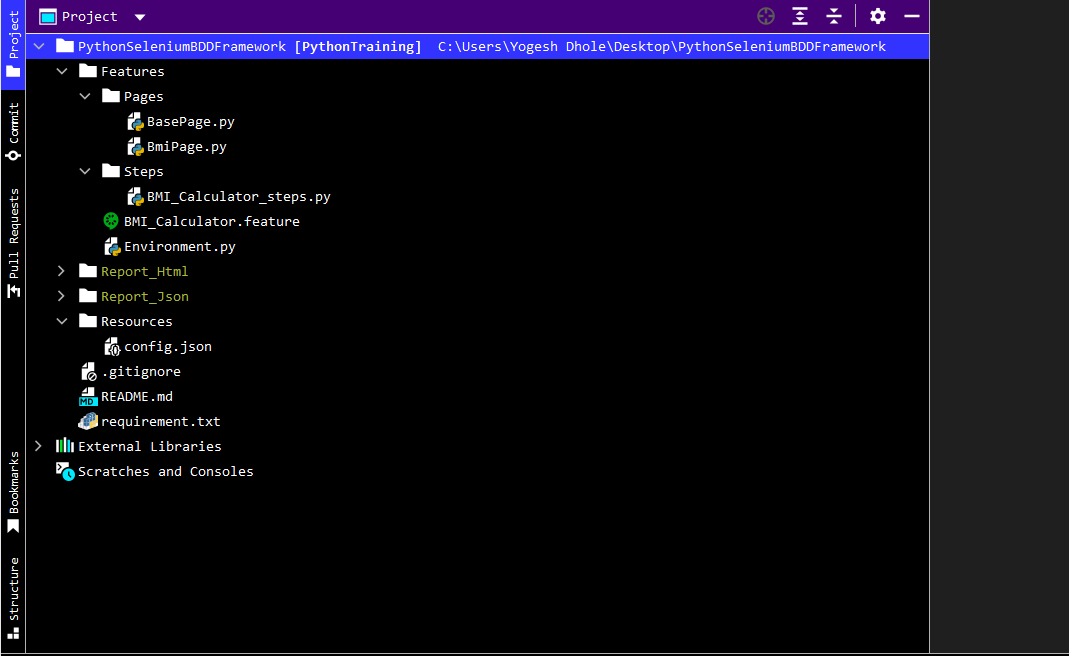
Framework Structure Overview:
Here is the overview of our python selenium behave BDD framework.
As a beginning, we are going to start with creating a simple framework using one scenario outline. In the next blog, we are going to see how to create an API testing framework using python. To understand both of them please read the blog carefully as I am explaining all the points here in natural language, without wasting any time let’s dive into the main topic of our discussion i.e. how to create python selenium behave BDD automation testing framework.
For this, we will follow some guidelines which I have described as steps.
Step 1:
Create a project in Pycharm (here I am using Pycharm professional) and as mentioned in the prerequisites install the packages.
It is not compulsory to use pycharm professional we can use pycharm community as well.
Step 2:
In this step, we will be creating a Features folder in which we will be creating our feature files for different scenarios. A feature file is something that holds your test cases in the form of a scenario and scenario outline. In this framework, we are using a scenario outline. Both scenario and scenario outline contain steps that are easy to understand for non-technical persons. We can also assign tags for the feature files and for the scenarios present in that file. Note that the feature file should end with a .feature extension.
Feature: Create test cases using Selenium with Python to automate below BMI calculator tests


#  We are using Scenario Outline in this feature as we can add multiple input data using examples.

  Scenario Outline: Calculating BMI value by passing multiple inputs
    Given I enter the "<Age>"
    When I Click on "<Gender>"
    And  I Enter a "<Height>"
    And  I Enter the "<Weight>"
    And  I Click on Calculate btn
    And  I Verify Result with "<Expected Result>"
    Examples:

      | Age | Gender  | Height  | Weight  | Expected Result |
      | 20  | Male    |  180    |  60     | BMI = 18.5 kg/m2|
      | 35  | Female  |  160    |  55     | BMI = 21.5 kg/m2|
      | 50  | Male    |  175    |  65     | BMI = 21.2 kg/m2|
      | 45  | Female  |  150    |  52     | BMI = 23.1 kg/m2|
Step 3:
Now, we have our feature file let’s create a step file to implement the steps described in the feature file. In order to recognize the step file we are adding step work after the name so that behavior will come to know the step file for that particular feature file. Both feature files and step files are essential parts of the BDD framework. We have to be careful while describing the steps in the feature file because we have to use the same steps in the step file so that behavior will understand and map the step implementation.
from behave import *

# The step file contains the implementation of the steps that we have described in the feature file.

@given('I enter the "{Age}"')
def step_impl(context, Age):
    context.bmipage.age_input(Age)

@when('I Click on "{Gender}"')
def step_impl(context, Gender):
    context.bmipage.gender_radio(Gender)

@step('I Enter a "{height}"')
def step_impl(context, height):
    context.bmipage.height_input(height)

@step('I Enter the "{weight}"')
def step_impl(context, weight):
    context.bmipage.weight_input(weight)

@step("I Click on Calculate btn")
def step_impl(context):
    context.bmipage.calculatebtn_click()

@step('I Verify Result with "{expresult}"')
def step_impl(context, expresult):
    context.bmipage.result_validation(expresult)
Step 4:
In step 4 we will be creating a page file that contains all the locators and the action methods to perform the particular action on the web element. We are going to add all the locators at the class level only and will be using them in the respective methods. The reason behind doing so is it is a good practice to declare your locators at the class level as when the locators get changed it is effortless to replace them and we don’t have to go through the whole code again.
from selenium.webdriver.common.by import By
import time
from Features.Pages.BasePage import BasePage


# The page contains all the locators and the actions to perform on that web element.
# In this page file we have declared all the locators at the class level and we are using them in the respective methods.

class BmiPage (BasePage):
    def __init__(self, context):
        BasePage.__init__(self, context.driver)
        self.context = context
        self.age_xpath = "//input[@id='cage']"
        self.height_xpath = "//input[@id='cheightmeter']"
        self.weight_xpath = "//input[@id='ckg']"
        self.calculatebtn_xpath = "//input[@value='Calculate']"
        self.actual_result_xpath = "//body[1]/div[3]/div[1]/div[4]/div[1]/b[1]"

    def age_input(self, Age):
        AgeInput = self.driver.find_element(By.XPATH, self.age_xpath)
        AgeInput.clear()
        AgeInput.send_keys(Age)
        time.sleep(2)

    def gender_radio(self, Gender):
       SelectGender = self.driver.find_element(By.XPATH, "//label[normalize-space()='" + Gender+"']")
        SelectGender.click()
        time.sleep(2)


    def height_input(self, height):
        HeightInput = self.driver.find_element(By.XPATH, self.height_xpath)
        HeightInput.clear()
        HeightInput.send_keys(height)
        time.sleep(3)

    def weight_input(self, weight):
        WeightInput = self.driver.find_element(By.XPATH, self.weight_xpath)
        WeightInput.clear()
        WeightInput.send_keys(weight)
        time.sleep(3)

    def calculatebtn_click(self):
        Calculatebtn = self.driver.find_element(By.XPATH, "//input[@value='Calculate']")
        Calculatebtn.click()
        time.sleep(3)

    def result_validation(self, expresult):
        try:
            Result = self.driver.find_element(By.XPATH, "//body[1]/div[3]/div[1]/div[4]/div[1]/b[1]")
            Actualresult = Result.text
            Expectedresult = expresult
            assert Actualresult == Expectedresult, "Expected Result Matched"
            time.sleep(5)
        except:
            self.driver.close()
            assert False, "Expected Result mismatched"
The next one is the base page file. We are creating a base page file to make an object of the driver so that we can easily use that for our page and environment file.
from selenium.webdriver.support.wait import WebDriverWait


# In the base page we are creating an object of driver.
# We are using this driver in the other pages and environment page.


class BasePage(object):
    def __init__(self, driver):
        self.driver = driver
        self.wait = WebDriverWait(self.driver, 30)
        self.implicit_wait = 25
Step 5:
This step is very important because we will be creating an environment file (i.e. Hooks file). This file contains hooks for before and after scenarios to start and close the browser. Also if you want you can add after-step hooks for capturing screenshots for reporting. We have added a method to capture screenshots after every step and will attach them to the allure report.
import json
import time

from allure_commons._allure import attach
from allure_commons.types import AttachmentType
from selenium import webdriver
from webdriver_manager.chrome import ChromeDriverManager
from Pages.BasePage import BasePage
from Pages.BmiPage import BmiPage

data = json.load(open("Resources/config.json"))


# This environment page is used as hooks page. Here we can notice that we have used before, after hooks along side with some step hooks.


def before_scenario(context, scenario):
    context.driver = webdriver.Chrome(ChromeDriverManager().install())
    time.sleep(5)
    basepage = BasePage(context.driver)
    context.bmipage = BmiPage(basepage)
    context.stepid = 1
    context.driver.get(data['BMIWEBURL'])
    context.driver.maximize_window()
    context.driver.implicitly_wait(3)


def after_step(context, step):
    attach(context.driver.get_screenshot_as_png(), name=context.stepid, attachment_type=AttachmentType.PNG)
    context.stepid = context.stepid + 1


def after_scenario(context, scenario):
    context.driver.close()
Step 6:
It is a good practice to store all our common data and files in a resource folder. So, whenever we need to make changes it will be easy to implement them for the whole framework. For now, we are adding a config.json file in the resource folder. This file contains the web URL used before the scenario to launch the web page for the specified tag in the feature file. The file is written in JSON format.
“BMIWEBURL”: “https://www.calculator.net/bmi-calculator.html?ctype=metric”
Congratulations, finally we have created our own Python Selenium Behave BDD framework. As I mentioned earlier we will be using Allure for reporting the test result. For this use the below command in the terminal and it will generate the result folder for you.
behave Features/BMICalculator.feature -f allure_behave.formatter:AllureFormatter -o Report_JsonTo convert the JSON file into readable HTML format use the below command.
allure generate Report_Json -o Report_Html –clean


I am adding a GitHub repository link so that if anyone has any issues while building it, you can go through the source code here: https://github.com/ydhole-spurqlabs/SeleniumPython
Conclusion:
Creating a testing framework is very important as well as feels like a tedious task but with the right guidelines, everyone can create a testing framework. I hope in this blog I have provided all the answers related to the python selenium behavior automation testing framework. Here, we choose a BDD framework over other existing frameworks because of its better understanding, easy to adapt, and easy to understand for end users. If you still have any issues related to what we have seen earlier feel free to comment them down we will solve them together. There are many more things we can add to this existing framework but to get started I feel this framework is enough and will cover most of the requirements.
19Top-Tier SDET | Advanced in Manual & Automated Testing | Skilled in Full-Spectrum Testing & CI/CD | API & Mobile Automation | Desktop App Automation | ISTQB Certified