How to use cy.prompt in Cypress; this blog introduces cy.prompt, an experimental tool from Cypress designed to simplify web automation by allowing users to write tests using natural language descriptions rather than complex CSS selectors. By leveraging artificial intelligence, the platform enables self-healing capabilities; as a result, tests automatically adapt to UI changes like renamed buttons without failing the entire build. This innovation significantly accelerates test authoring and maintenance, empowering team members without deep coding knowledge to participate in the quality assurance process. Furthermore, the system avoids the limitations of typical AI “black boxes” by providing transparent debugging logs and the option to export AI-generated steps into standard code for long-term stability and peer review.Ultimately, this technology promotes broader team participation by allowing non-technical members to contribute to the testing process without deep knowledge of JavaScript.
In 2025, the release of cy.prompt() fundamentally shifted how teams approach end-to-end testing by introducing a native, AI-powered way to write tests in plain English. This experimental feature, introduced in Cypress 15.4.0, allows you to describe user journeys in natural language, which Cypress then translates into executable commands.
Why use cy.prompt()?
Reduced Maintenance: If a UI change (like a renamed ID) breaks a test, cy.prompt() can automatically regenerate selectors through its self-healing capability.
Faster Test Creation: As a result, you can go from a business requirement to a running test in seconds without writing manual JavaScript or hunting for selectors.
Democratized Testing: Consequently, product managers and non-technical stakeholders are empowered to contribute to automation through Gherkin-style steps in the test suite.
Generate and Eject (For Stable Apps):To start, use cy.prompt() to scaffold your test. Once generated, click the “Code” button in the Command Log and save the static code to your spec file; this approach is ideal for CI/CD pipelines that require strictly deterministic, frozen code.
Continuous Self-Healing (For Fast-Paced Development): Keep the cy.prompt() commands in your repository. Cypress will use intelligent caching to run at near-native speeds on subsequent runs, only re-calling the AI if the UI changes significantly.
Why it’s “Smart”:
Self-Healing: If a developer changes a class to a test-id, cy.prompt() won’t fail; it re-evaluates the page to find the most logical element.
Speed: It uses Intelligent Caching. The AI is only invoked on the first run; subsequent runs use the cached selector paths, maintaining the lightning-fast speed Cypress is known for.
How to Get Started? How to use cy.prompt in Cypress?
1. Prerequisites and Setup
How to use cy.prompt in Cypress? for AI-driven end-to-end testing with self-healing selectors and faster test creation. Before you can run a program with cy.prompt(), you must configure your environment:
Version Requirement: Ensure you are using Cypress 15.4.0 or newer.
Enable the Feature: Open your cypress.config.js (or .ts) file and set the experimentalPromptCommand flag to true within the e2e configuration.
Authenticate with Cypress Cloud: cy.prompt() requires a connection to Cypress Cloud to access the AI models.
Local development: Log in to Cypress Cloud directly within the cypress app.
CI/CD: Use your record key with the –record –key flag.
2. Writing Your First Test
The command accepts an array of strings representing your test steps.
describe('Prompt command test', () => {
  it('runs prompt sequence', () => {
    cy.prompt([
      "Visit https://aicotravel.co",
      "Type 'Paris' in the destination field",
      "Click on the first search result",
      "Select 4 days from the duration dropdown",
      "Press the **Create Itinerary** button"
    ])
  })
})
The “smart” way to use cy.prompt() is to combine it with standard commands for a hybrid, high-reliability approach.
describe('User Checkout Flow', () => {
  it('should complete a purchase using AI prompts', () => {
    cy.visit('/store');
    // Simple natural language commands
    cy.prompt('Search for "Wireless Headphones" and click the first result');
    // Using placeholders for sensitive data to ensure privacy
    cy.prompt('Log in with {{email}} and {{password}}', {
      placeholders: {
        email: 'testuser@example.com',
        password: 'SuperSecretPassword123'
      }
    });
    // Verify UI state without complex assertions
    cy.prompt('Ensure the "Add to Cart" button is visible and green');
    cy.get('.cart-btn').click();
  });
});
3. The “Smart” Workflow: Prompt-to-Code
Most professional way to use cy.prompt() is as a code generator.
Drafting: Write your test using cy.prompt().
Execution: Run the test in the Cypress Open mode.
Conversion: Once the AI successfully finds the elements, use the “Convert to Code” button in the Command Log.
Save to File: Copy the generated code and replace your cy.prompt() call with it. Consequently, this turns the AI-generated test into a stable, version-controlled test that runs without AI dependency.
Commit: However cypress will generate the standard .get().click() code based on the AI’s findings. You can then commit this hard-coded version to your repository to avoid unnecessary AI calls in your CI/CD pipeline.
4. Best Practices:
Imperative Verbs: Start prompts with “Click,” “Type,” “Select,” or “Verify.”
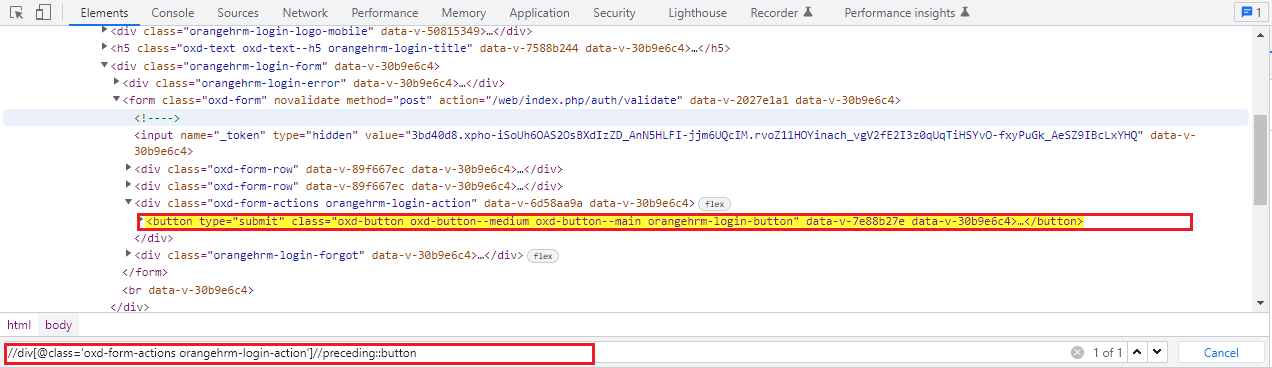
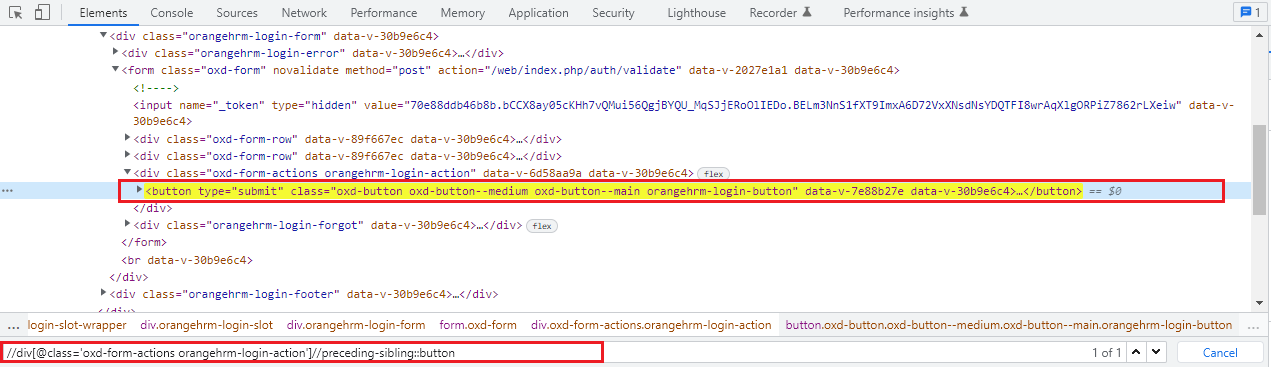
Contextual Accuracy: If a page has two “Submit” buttons, be specific: cy.prompt(‘Click the “Submit” button inside the Newsletter section’).
Security First: However, never pass raw passwords into the prompt string. Therefore, always use the placeholders configuration to keep sensitive strings out of the AI logs.
Hybrid Strategy: Ultimately, use cy.prompt() where flexibility is needed for complex UI interactions, and fall back to standard cy.get() for stable elements like navigation links.
The introduction of cy.prompt() marks the end of “selector hell.” By treating AI as a pair-programmer that handles the tedious task of DOM traversing, we can write tests that are more readable, easier to maintain, and significantly more resilient to UI changes.
Jyotsna is a Jr SDET which have expertise in manual and automation testing for web and mobile both. She has worked on Python, Selenium, Mysql, BDD, Git, HTML & CSS. She loves to explore new technologies and products which put impact on future technologies.
Introduction to Cypress and TypeScript Automation:
Nowadays, the TypeScript programming language is becoming popular in the field of testing and test automation. Testers should know how to automate web applications using this new, trending programming language. Cypress and TypeScript automation can be integrated with Playwright and Cypress to enhance testing efficiency. In this blog, we are going to see how we can play with TypeScript and Cypress along with Cucumber for a BDD approach.
TypeScript’s strong typing and enhanced code quality address the issues of brittle tests and improve overall code maintainability. Cypress, with its real-time feedback, developer-friendly API, and robust testing capabilities, helps in creating reliable and efficient test suites for web applications.
Additionally, adopting a BDD approach with tools like Cucumber enhances collaboration between development, testing, and business teams by providing a common language for writing tests in a natural language format, making test scenarios more accessible and understandable by non-technical stakeholders.
In this blog, we will build a test automation framework from scratch, so even if you have never used Cypress, Typescript, or Cucumber, there are no issues. Together, we will learn from scratch, and in the end, I am sure you will be able to build your test automation framework.
Before we start building the framework and start with our discussion on the technology stack we are going to use, let’s first complete the environment setup we need for this project. Follow the steps below sequentially and let me know in the comments if you face any issues. Additionally, I am sharing the official website links just in case you want to take a look at the information on the tools we are using. Check here,
The first thing we need to make this framework work is Node.js, so ensure you have a node installed on the system. The very next thing to do is to have all the packages mentioned above installed on the system. How can you install them? Don’t worry; use the below commands.
So far, we have covered and installed all we need to make this automation work for us. Now, let’s move to the next step and understand the framework structure.
Framework Structure:
Let’s now understand some of the main players of this framework. As we are using the BDD approach assisted by the cucumber tool, the two most important players are the feature file and the step definition file. To make this more robust, flexible and reliable, we will include the page object model (POM). Let’s look at each file and its importance in the framework.
Feature File:
Feature files are an essential part of Behavior-Driven Development (BDD) frameworks like Cucumber. They describe the application’s expected behavior using a simple, human-readable format. These files serve as a bridge between business requirements and automation scripts, ensuring clear communication among developers, testers, and stakeholders.
Key Components of Feature Files
Feature Description:
A high-level summary of the functionality being tested.
Helps in understanding the purpose of the test.
Scenarios:
Each scenario represents a specific test case.
Follows a structured Given-When-Then format for clarity.
Scenario Outlines (Parameterized Tests):
Used when multiple test cases follow the same pattern but with different inputs.
Allows for better test coverage with minimal duplication.
Tags for Organization:
Tags like @smoke, @regression, or @critical help in organizing and running selective tests.
Makes it easier to filter and execute relevant scenarios.
Web App Automation Feature File:
Feature: Perform basic calculator operations

    Background:
        Given I visit calculator web page

    @smoke
    Scenario Outline: Verify the calculator operations for scientific calculator
        When I click on number "<num1>"
        And I click on operator "<Op>"
        And I click on number "<num2>"
        Then I see the result as "<res>"
        Examples:
            | num1 | Op | num2 | res |
            | 6    | /  | 2    | 3   |
            | 3    | *  | 2    | 6   |

    @smoke1
    Scenario: Verify the basic calculator operations with parameter
        When I click on number "7"
        And I click on operator "+"
        And I click on number "5"
        Then I see the result as "12"
API Automation Feature File:
Feature: API Feature

    @api
    Scenario: Verify the GET call for dummy website
        When I send a 'GET' request to 'api/users?page=2' endpoint
        Then I Verify that a 'GET' request to 'api/users?page=2' endpoint returns status

    @api
    Scenario: Verify the DELETE call for dummy website
        When I send 'POST' request to endpoint 'api/users/2'
            | name     | job    |
            | morpheus | leader |
        Then I verify the POST call
            | req  | endpoint  | name     | job           | status |
            | POST | api/users | morpheus | zion resident | 200    |

    @api
    Scenario: I send POST Request call and Verify the POST call Using Step Reusablity
         When I send 'POST' request to endpoint 'api/users/2'
            | req  | endpoint  | name     | job           |
            | POST | api/users | morpheus | zion resident |
        Then I verify the POST call
            | req  | endpoint  | name     | job           | status |
            | POST | api/users | morpheus | zion resident | 200    |
Step Definition File:
Step definition files act as the implementation layer for feature files. They contain the actual automation logic that executes each step in a scenario. These files ensure that feature files remain human-readable while the automation logic is managed separately.
Key Components of Step Definition Files
Mapping Steps to Code:
Each Given, When, and Then step in a feature file is linked to a function in the step definition file.
Ensures test steps execute the corresponding automation actions.
Reusability and Modularity:
Common steps can be reused across multiple scenarios.
Avoid duplication and improve maintainability.
Data Handling:
Step definitions can take parameters from feature files to execute dynamic tests.
Enhances flexibility and test coverage.
Error Handling & Assertions:
Verifies expected outcomes and reports failures accurately.
Helps in debugging test failures efficiently.
Web App Step Definition File:
import { When, Then, Given } from '@badeball/cypress-cucumber-preprocessor'
import { CalPage } from '../../../page-objects/CalPage'
const calPage = new CalPage()

Given('I visit calculator web page', () => {
  calPage.visitCalPage()
  cy.wait(6000)
})

Then('I see the result as {string}', (result) => {
  calPage.getCalculationResult(result)
  calPage.scrollToHeader()
})

When('I click on number {string}', (num1) => {
  calPage.clickOnNumber(num1)
  calPage.scrollToHeader()
})

When('I click on operator {string}', (Op) => {
  calPage.clickOnOperator(Op)
  calPage.scrollToHeader()
})
API Step Definition File:
import { Given, When, Then } from '@badeball/cypress-cucumber-preprocessor'
import { APIUtility } from '../../../../Utility/APIUtility'

const apiPage = new APIUtility()

When('I send a {string} request to {string} endpoint', (req, endpoint) => {
  apiPage.getQuery(req, endpoint)
})

Then(
  'I Verify that a {string} request to {string} endpoint returns status',
  (req, endpoint) => {
    apiPage.iVerifyGETRequest(req, endpoint)
  },
)

Then('I verify that {string} request to {string} endpoint', (datatable) =>
  apiPage.postQueryCreate(datatable)
})

Then('I verify the POST call', (datatable) => {
  apiPage.postQueryCreate(datatable)
})

When('I send {string} request to endpoint {string}', (req, endpoint) => {
  apiPage.delQueryReq(req, endpoint)
})

Then(
  'I verify {string} request to endpoint {string} returns status',
  (req, endpoint) => {
    apiPage.delQueryReq(req, endpoint)
  },
)
Page File:
Page files in test automation frameworks serve as a structured way to interact with web pages while keeping test scripts clean and maintainable. These files typically encapsulate locators and actions related to a specific page or component within the application under test.
Key Components of Page Files in Test Automation Frameworks
Navigation Methods:
Functions to visit the required page using a URL or base configuration.
Ensures tests always start from the correct application state.
Element Interaction Methods:
Functions to interact with buttons, input fields, dropdowns, and other UI elements.
Encapsulates actions like clicking, typing, or selecting options to maintain reusability.
Assertions and Validations:
Methods to verify expected outcomes, such as checking if an element is visible or a value is displayed correctly.
Helps in ensuring the application behaves as expected.
Reusability and Modularity:
Each function is designed to be reusable across multiple test cases.
Keeps automation scripts clean by avoiding redundant code.
Handling Dynamic Elements:
Includes waits, scrolling, or retries to ensure elements are available before interaction.
Reduces flakiness in tests.
Test Data Handling:
Functions to pass dynamic test data and execute actions accordingly.
API utility files are essential in automated testing as they provide reusable methods to interact with APIs. These files help testers perform API requests, validate responses, and maintain structured automation scripts.
By centralizing API interactions in a dedicated utility, we can improve test maintainability, reduce duplication, and ensure consistent validation of API responses.
Key Components of an API Utility File:
Making API Requests Efficiently:
Functions for sending GET, POST, PUT, and DELETE requests.
Uses dynamic parameters to handle different endpoints and request types.
Response Validation & Assertions:
Ensures correct HTTP status codes are returned.
Validates response bodies for expected data formats.
Logging & Debugging:
Captures API request and response details for debugging.
Provides meaningful logs to assist in troubleshooting failures.
Handling Dynamic Data:
Supports dynamic payloads using external test data sources.
Allows testing multiple scenarios without modifying the core test script.
Error Handling & Retry Mechanism:
Implements error handling to manage unexpected API failures.
Can include automatic retries for transient errors (e.g., 429 rate limiting).
Security & Authentication Handling:
Supports authentication headers (e.g., tokens, API keys).
Ensures tests adhere to security best practices like encrypting sensitive data.
Currently, the base URL is fetched from Cypress.env(‘api_URL’), but we can extend it to support multiple environments (e.g., dev, staging, prod).
Enhance Error Handling & Retry Logic:
Implement a retry mechanism for APIs that occasionally fail due to network issues.
Improve error messages by logging API response details when failures occur.
Support Query Parameters & Headers:
Modify functions to accept optional query parameters and custom headers for better flexibility.
Improve Response Validation:
Extend validation beyond just checking the status code (e.g., validating response schema using JSON schema validation).
Use Utility Functions for Reusability:
Extract common assertions (e.g., checking response status, verifying keys in the response) into separate utility functions to avoid redundancy.
Implement Rate Limiting Controls:
Introduce a delay between API requests in case of rate-limited endpoints to prevent hitting request limits.
Better Logging & Reporting:
Enhance logging to provide detailed information about API requests and responses.
Integrate with test reporting tools to generate detailed API test reports.
Configuration Files:
Cypress.config.ts:
The Cypress configuration file (cypress.config.ts) is essential for defining the setup, plugins, and global settings for test execution. It helps in configuring test execution parameters, setting up plugins, and customizing Cypress behavior to suit the project’s needs.
This file ensures that Cypress is properly integrated with necessary preprocessor plugins (like Cucumber and Allure) while defining critical environment variables and paths.
Key Components of the Configuration File:
Importing Required Modules & Plugins:
Cypress needs additional plugins for Cucumber support and reporting.
@badeball/cypress-cucumber-preprocessor is used for running .feature files with Gherkin syntax.
@shelex/cypress-allure-plugin/writer helps in generating test execution reports using Allure.
@esbuild-plugins/node-modules-polyfill ensures compatibility with Node.js modules.
Setting Up Event Listeners & Preprocessors:
The setupNodeEvents function is responsible for handling plugins and configuring Cypress behavior dynamically.
The Cucumber preprocessor generates JSON reports and processes Gherkin-based test cases.
Browserify is used as the file preprocessor, allowing TypeScript support in tests.
Environment Variables & Custom Configurations:
api_URL: Stores the base API URL used for API testing.
screenshotsFolder: Defines the folder where Cypress will save screenshots in case of failures.
Defining E2E Testing Behavior:
setupNodeEvents: Attaches the preprocessor and other event listeners.
excludeSpecPattern: Ensures Cypress does not pick unwanted file types (*.js, *.md, *.ts).
specPattern: Specifies that Cypress should look for .feature files in cypress/e2e/.
baseUrl: Defines the website URL where tests will be executed (https://www.calculator.net/).
import { defineConfig } from 'cypress'
import { addCucumberPreprocessorPlugin } from '@badeball/cypress-cucumber-preprocessor'
import browserify from '@badeball/cypress-cucumber-preprocessor/browserify'

import allureWriter from '@shelex/cypress-allure-plugin/writer'
const {
  NodeModulesPolyfillPlugin,
} = require('@esbuild-plugins/node-modules-polyfill')

async function setupNodeEvents(
  on: Cypress.PluginEvents,
  config: Cypress.PluginConfigOptions,
): Promise<Cypress.PluginConfigOptions> {
  // This is required for the preprocessor to be able to generate JSON reports after each run, and more,
  await addCucumberPreprocessorPlugin(on, config)
  allureWriter(on, config),
    on(
      'file:preprocessor',
      browserify(config, {
        typescript: require.resolve('typescript'),
      }),
    )

  // Make sure to return the config object as it might have been modified by the plugin.
  return config
}
export default defineConfig({
  env: {
    api_URL: 'https://reqres.in/',
    screenshotsFolder: 'cypress/screenshots',
  },

  e2e: {
    // We've imported your old cypress plugins here.
    // You may want to clean this up later by importing these.

    setupNodeEvents,

    excludeSpecPattern: ['*.js', '*.md', '*.ts'],
    specPattern: 'cypress/e2e/**/*.feature',
    baseUrl: 'https://www.calculator.net/',
  },
})
Tsconfig.json:
The tsconfig.json file is a TypeScript configuration file that defines how TypeScript code is compiled and interpreted in a Cypress test automation framework. It ensures that Cypress and Node.js types are correctly recognized, allowing TypeScript-based test scripts to function smoothly.
Key Components oftsconfig.json:
compilerOptions (Compiler Settings)
“esModuleInterop”: true
Allows interoperability between ES6 modules and CommonJS modules, enabling seamless imports.
“target”: “es5”
Specifies that the compiled JavaScript should be compatible with ECMAScript 5 (older browsers and environments).
“lib”: [“es5”, “dom”]
Includes support for ES5 and browser-specific APIs (DOM), ensuring compatibility with Cypress test scripts.
“types”: [“cypress”, “node”]
Adds TypeScript definitions for Cypress and Node.js, preventing type errors in test scripts.
include (Files Included for Compilation)
**/*.ts
Ensures that all TypeScript files in the project directory are included in compilation.
The package.json file is a key component of a Cypress-based test automation framework that defines project metadata, dependencies, scripts, and configurations. It helps manage all the required libraries and tools needed for running, reporting, and processing test cases efficiently.
Key Components of package.json:
Project Metadata
“name”: “spurtype” → Defines the project name.
“version”: “1.0.0” → Specifies the current project version.
“description”: “Cypress With TypeScript” → Describes the purpose of the project.
Scripts (Commands for Running Tests & Reports)
“scr”: “node cucumber-html-report.js”
Runs a script to generate a Cucumber HTML report.
“coms”: “cucumber-json-formatter –help”
Displays help information for Cucumber JSON formatter.
“api”: “./node_modules/.bin/cypress-tags run -e TAGS=@api”
Executes Cypress tests tagged as API tests (@api).
“smoke”: “./node_modules/.bin/cypress-tags run -e TAGS=@smoke”
Executes smoke tests (@smoke) using Cypress.
“smoke4”: “cypress run –env allure=true,TAGS=@smoke1”
Runs a specific set of smoke tests (@smoke1) while enabling Allure reporting.
This script generates a Cucumber HTML report from JSON test results using the multiple-cucumber-html-reporter package. It extracts test execution details, including browser, platform, and environment metadata, and saves the output as an HTML file for easy visualization of test results in Cypress and TypeScript Automation.
The script requires the package to process JSON reports and generate an interactive HTML report.
Configuration Options
jsonDir → Specifies the location of Cucumber-generated JSON reports.
reportPath → Sets the directory where the HTML report will be saved.
reportName → Defines a custom name for the report file.
pageTitle → Sets the title of the generated HTML report page.
displayDuration → Enables duration display for each test case execution.
openReportInBrowser → Automatically opens the HTML report after generation.
Metadata Section
Browser: Specifies the test execution browser and version.
Device: Identifies the test execution machine.
Platform: Defines the operating system used for testing.
Custom Data Section
Provides additional test details such as Project Name, Test Environment, Execution Time, and Tester Information.
Cypress-cucumber-preprocessor.json
This JSON configuration file is primarily used to manage the Cypress Cucumber preprocessor settings. It enables JSON logging, message output, and HTML report generation, and it specifies the location of step definition files.
Specifies the directory where step definition files are located. These files contain the implementation for Gherkin feature file steps.
Conclusion:
Cypress and TypeScript together create a powerful and efficient framework for both web applications and API automation. By leveraging Cypress’s fast execution and robust automation capabilities alongside TypeScript’s strong typing and code scalability, we can build reliable, maintainable, and scalable test suites.
With features like Cucumber BDD integration, JSON reporting, HTML test reports, and API automation utilities, Cypress enables seamless test execution, while TypeScript enhances code quality, error handling, and developer productivity. The structured approach of defining page objects, API utilities, and configuration files ensures a well-organized framework that is both flexible and efficient.
As automation testing continues to evolve, integrating Cypress with TypeScript proves to be a future-ready solution for modern software testing needs. Whether it’s UI automation, API validation, or end-to-end testing, this dynamic combination offers speed, accuracy, and maintainability, making it an essential choice for testing high-quality web applications.
Tired of spending hours writing and maintaining complex test scripts? We get it. That’s why we’re excited to introduce the Cypress Cucumber Framework (Cypress BDD Automation) — a game changer for software testing. This combination makes testing more efficient, collaborative, and accessible.
Imagine a framework that speaks everyone’s language, from developers to product managers. With Cypress, Cucumber, and Behavior-Driven Development (BDD), you can therefore achieve tests that are robust, reliable, and easily understood. No more cryptic code or miscommunication!
In this post, we will first cover the fundamentals of Cypress and Cucumber BDD, then guide you through the setup process, and finally share best practices for automation. Get ready to boost productivity and streamline your testing!
By the end, readers will have gained a strong foundation in Cypress for UI automation, making them ready to implement effective automated testing in their projects.
In the current blog on the Cypress Cucumber Framework: A Complete Guide to BDD Automation for Efficient Testing, we will build upon this knowledge by integrating Cucumber for Behavior-Driven Development, enhancing test readability and collaboration among team members.
What is Behavior Driven Development (BDD)?
Behavior Driven Development (BDD) is an agile software development practice that enhances communication between stakeholders. It, in turn, encourages collaboration among developers, testers, and non-technical team members to define how an application should behave, all based on user requirements. The core philosophy is to define behavior in plain language, making it easily understandable for all parties involved.
What is Cucumber?
Cucumber is an open-source tool that supports BDD by allowing users to write tests in plain language. It, moreover, uses a domain-specific language (DSL) called Gherkin, which is designed to be human-readable. As a result, this means that even non-technical stakeholders can participate in the testing process, enhancing collaboration and ensuring that everyone is on the same page.
Key Features of Cucumber BDD
Readable Syntax: Cucumber uses Gherkin syntax, enabling test scenarios to be written in natural language. Each scenario follows the structure:
Given: Sets pre-conditions or context.
When: Specifies the user’s action.
Then: Defines the expected outcome.
Collaboration: Cucumber promotes teamwork by providing a common language, and reducing miscommunications between developers and stakeholders.
Automation Support: Integrates well with tools like Selenium, making it easier to automate tests based on defined behaviors.
CI/CD Integration: Cucumber can be seamlessly added to CI/CD pipelines, supporting automated testing and ensuring code quality throughout development.
Benefits of Using Cucumber BDD
Improved Communication: Encourages collaboration among all stakeholders, reducing misunderstandings.
Higher Test Coverage: Ensures that all user scenarios are considered by involving non-technical team members.
Living Documentation: Keeps documentation relevant and up to date with evolving application features.
Faster Feedback Loop: Automated tests provide quick feedback, accelerating development and iterations.
How to Get Started with Cucumber BDD
Set Up Your Environment
Define Features and Scenarios
Map Step Definitions
Write Script
Run Tests
Benefits of combining Cypress with Cucumber (Cypress Cucumber Framework)
While Cypress is powerful on its own, combining it with Cucumber takes our testing to a whole new level. Cucumber is a tool that supports Behavior-Driven Development (BDD), allowing us to write tests in a natural language that both technical and non-technical team members can understand.
Here are some key benefits of this combination:
Improved collaboration: By using Cucumber’s Gherkin syntax, we create a common language between developers, QA, and business stakeholders.
Enhanced test readability: Cucumber scenarios are written in plain English, making it easier for everyone to understand what’s being tested.
Reusable step definitions: We can create step definitions in Cypress that map to Cucumber scenarios, promoting code reuse and maintainability.
Living documentation: Our Cucumber features serve as both tests and documentation, ensuring our documentation stays up to date with the actual product behavior.
Scenario-driven development: We can focus on describing the desired behavior first, then implement the necessary code to make it work.
Here’s a comparison of traditional testing approaches versus BDD:
Aspect
Traditional Testing
Behavior-Driven Development (BDD)
Focus
Verifying functionality
Describing user behavior
Language
Technical jargon
Natural language
Collaboration
Limited to developers and testers
Extensive involvement of all stakeholders
Documentation
Separate from tests
Tests double as documentation
Test Creation
After development
Before or during development
User Involvement
Minimal
Continuous involvement
Feedback Cycle
Slower feedback
Rapid feedback loops
In the next phase of our exploration of the Cypress Cucumber Framework, we’ll learn the practicalities of setup and implementation. We’ll cover how to structure projects, write effective scenarios, and harness the strengths of both Cypress and Cucumber to build a comprehensive, maintainable test suite.
Cypress Cucumber Framework Folder Structure
When building a robust test automation framework with Cypress and Cucumber, the project structure plays a critical role in maintainability, scalability, and team collaboration. A well-organized project allows testers and developers to easily locate files, add new features, and scale the framework as the project grows. Here’s a suggested structure for setting up your Cypress Cucumber framework:
cypress/ – This is the main directory where all Cypress-related files are stored. It houses everything from test data to plugins and supporting scripts.
e2e/features/ – This is where our .feature files, written in Gherkin syntax are stored. Each .feature file describes test scenarios in a human-readable format, enabling BDD-style testing. For example: – Login.feature
e2e/step_definitions/ – This subfolder holds our JavaScript files where we define the actual step definitions corresponding to the steps in our .feature files. For example: – Login_steps.js
e2e/page_objects/ – This is a new folder for Page Object Model (POM) files. Page objects abstract the logic of interacting with different pages in our application. This separation keeps your tests clean, readable, and easier to maintain.
cypress.config.js – This configuration file allows us to manage and configure our Cypress environment. Here, we can set environment-specific configurations, manage base URLs, and define other test-related settings.
package.json – This is the standard Node.js configuration file. It lists the dependencies, scripts, and other essential settings needed for your Cypress Cucumber project. Here, we’ll define the testing dependencies like cypress, cypress-cucumber-preprocessor, and any other required libraries.
Based on the folder structure outlined above, let’s now proceed to create the structure in our project.
Setting Up the Automation Framework
Now we’ve covered the basics of Cypress and Cucumber BDD, let’s dive into setting up our automation framework. This crucial step will lay the foundation for our entire testing process, ensuring we have a robust and efficient system in place.
Install VS Code and create new project
Install & configure Cypress Automation Framework
To set up the Cypress Cucumber framework, the first step is to install Visual Studio Code (VS Code) and set up a basic Cypress JavaScript framework. I’ve outlined the detailed procedure for installing Cypress and creating the initial Cypress framework in my previous blog, “JavaScript and Cypress Framework for Modern UI Automation“. You can follow the steps from that guide to get your Cypress framework up and running. Once that’s done, we’ll move forward with installing and integrating Cucumber BDD in our project. We can also clone cypress framework from “JavaScript-Cypress-WebAutomation” repository.
By following the steps outlined in the “JavaScript and Cypress Framework for Modern UI Automation“ blog, we’ll now have a complete Cypress framework set up, including the package.json, cypress.config.js, and a cypress folder containing your tests, test data, and hooks. The next step is to upgrade this existing Cypress framework to a Cypress Cucumber framework for BDD integration.
@badeball/cypress-cucumber-preprocessoris a plugin that enables the use of Cucumber’s Behavior Driven Development (BDD) approach in Cypress testing. It allows you to write tests in Gherkin syntax (using feature files), making it easier to define scenarios in plain language that non-technical stakeholders can understand. This preprocessor translates Gherkin steps into Cypress commands, allowing smooth integration of BDD into your Cypress test suite.
@cypress/browserify-preprocessor is a plugin for Cypress that bundles JavaScript files using Browserify. It processes the files before Cypress executes them, allowing you to use CommonJS modules and other advanced JavaScript features in your test files. This preprocessor helps Cypress understand and run tests that include modern JavaScript or require module bundling, ensuring smooth execution of your test suite.
Configuring Installed Dependencies in cypress.config.js
When we install Cypress, the cypress.config.js file is automatically created at the root of our project. To configure Cypress with Cucumber, we need to add the following code to this file:
This configuration in the cypress.config.js file is required to enable the Cypress Cucumber Preprocessor and handle feature files written in Gherkin syntax.
These imports load the necessary preprocessor libraries to translate Gherkin syntax into Cypress test commands.
preprocessor.addCucumberPreprocessorPlugin: Adds Cucumber-specific functionalities, such as generating JSON reports after test runs.
on(“file:preprocessor”, browserify.default(config)): Uses Browserify to bundle the test files, ensuring the feature files and JavaScript modules are correctly processed before execution.
In summary, this configuration integrates the Cucumber framework with Cypress and ensures that feature files are preprocessed and executed correctly.
Hooks
Hooks are functions that allow you to run specific code before or after a scenario or feature in your Cucumber tests. These hooks help manage setup and teardown tasks, such as navigating to a webpage or resetting application state, before or after each test is executed.
Types of Hooks: Before: Runs before each scenario. After: Runs after each scenario. BeforeAll: Runs once before all scenarios in a feature. AfterAll: Runs once after all scenarios in a feature.
import { Before, After } from "@badeball/cypress-cucumber-preprocessor";
import selectors from "../../fixtures/Selectors.json";
Before(() => {
  cy.visit("https://www.calculator.net");
});
After(() => {
  cy.get(selectors.cancelButton).click();
});
Before Hook – This code runs before each scenario in the feature file. It navigates to the https://www.calculator.net website using the cy.visit() command. This ensures that every test starts from the calculator page.
After Hook – This code runs after each scenario. It clicks on the cancel button (specified in the Selectors.json file) to potentially reset any changes made during the test, ensuring a clean state for subsequent tests.
These hooks help ensure consistency and better test management by handling common setup and cleanup tasks efficiently.
Automating Scenario
Creating .Feature File
Before we begin creating the .feature file, let’s outline the functionalities we’ll be automating. We’ll be working with the Calculator.net web application, focusing on automating basic arithmetic operations: addition, subtraction, multiplication, and division.
Test Scenarios:
Verify user can perform addition
Verify user can perform subtraction
Verify user can perform multiplication
Verify user can perform division
Now we will follow below steps and create feature file
Launch Visual Studio Code and open your project folder.
Navigate to cypress/e2e create feature directory.
Right-click on the feature folder and select New File. – Name the file with the .feature extension, e.g., calculator.feature.
Write below code in calculator.feature with the Gherkin Syntax:
Feature: Calculator Operations

    @regression
    Scenario: Verify user is able to do addition
        When User clicks on number "2"
        And User clicks on operator "+"
        And User clicks on number "1"
        And User clicks on "="

    @regression
    Scenario: Verify user is able to do subtraction
        When User clicks on number "3"
        And User clicks on operator "-"
        And User clicks on number "1"
        And User clicks on "="
        Then The result should be "2"
What is a Feature File?
A feature file is a document written in plain language that outlines the behavior of a software feature or a set of related features. It is primarily used in Behavior Driven Development (BDD) frameworks like Cucumber to describe application behavior in a way that both technical and non-technical stakeholders can understand.
The structure of a feature file includes:
Feature
Scenario
Given-When-Then format
Feature files use the Gherkin language to describe these behaviors.
What is Gherkin?
Gherkin is a structured language used to write feature files in BDD. It uses simple syntax and plain English, making it easy for anyone, including non-developers, to understand the application’s expected behavior. Gherkin uses a specific set of keywords to define the structure of a feature file, including:
Feature: A high-level description of the functionality being tested.
Scenario: Individual test cases written to validate specific aspects of the feature.
Given: Describes the initial context or prerequisites (e.g., navigating to a webpage).
When: Specifies the action taken by the user or system (e.g., clicking a button).
Then: Describes the expected outcome (e.g., the result should be displayed).
And / But: Used to add additional steps to the scenario.
Gherkin’s key advantage is its readability and collaboration, as it helps bridge the communication gap between technical teams and non-technical stakeholders by providing a shared language for defining requirements.
Creating Step Definition file
In a Cypress project using @badeball/cypress-cucumber-preprocessor, feature file steps written in plain English are mapped to corresponding code in the step definition file. This mapping is crucial because it connects the behavioral steps defined in the feature file to the automation code that performs the actual actions and validations.
Now we will create step file and map with feature file
Open project in VS code.
Navigate to cypress/e2e. Right click on e2e and select New Folder and give name as “step_definition“.
Right-click on the step_definition folder and select New File. – Name the file with the .js extension, e.g. CalculatorStep.js.
import { When, Then } from "@badeball/cypress-cucumber-preprocessor";
import { CalculatorPage } from "../page/CalculatorPage.js";
const calculatorPage = new CalculatorPage();
When("User clicks on number {string}", (number) => {
  calculatorPage.clickNumber(number);
});
When("User clicks on operator {string}", (operator) => {
  calculatorPage.clickOperator(operator);
});
When('User clicks on "="', () => {
  calculatorPage.clickEquals();
});
Then("The result should be {string}", (expectedResult) => {
  calculatorPage.verifyResult(expectedResult);
});
Let’s now break down how this mapping works using the provided example:
The step_definition file contains JavaScript functions that implement the logic for each feature file step. These functions are mapped to the feature file steps based on matching text patterns.
Mapping Example:
Feature Step: When User clicks on number “2”
Step Definition:
When("User clicks on number {string}", (number) => {
  calculatorPage.clickNumber(number);
});
The text “User clicks on number {string}” matches the feature step text, where {string} is a placeholder for the number (“2” in this case).
The value “2” is passed as the number parameter to the function calculatorPage.clickNumber(number).
Feature Step: Then The result should be “3”
Step Definition:
Then("The result should be {string}", (expectedResult) => {
  calculatorPage.verifyResult(expectedResult);
});
The text “The result should be {string}” matches the step, and “3” is passed as the expectedResult parameter to verifyResult.
Dynamic Parameter Handling
The placeholders in the step definition {string} allow dynamic values from the feature file to be passed as parameters. This approach ensures that the same step definition can handle multiple scenarios with different inputs, making your tests more reusable.
Behind the Scenes: Automatic Mapping
The @badeball/cypress-cucumber-preprocessor automatically matches feature file steps to step definitions based on the matching text. As long as:
The text pattern in the step definition matches the feature file step.
The corresponding file is in the correct folder structure (e.g., step_definition).
We don’t need to do any additional configuration.
Why This Mapping is Useful
Readability: The feature file is easy to understand for non-technical stakeholders.
Reusability: A single step definition can be reused across multiple scenarios with different inputs.
Separation of Concerns: Keeps business logic (feature file) separate from automation code (step definitions).
Creating Page file
What is a Page Object Model (POM) File?
The Page Object Model (POM) is a design pattern in test automation that promotes the separation of test logic from the UI elements. It creates an object repository for web UI elements, making tests more maintainable, readable, and reusable. Each page of the application is represented by a corresponding class, which contains methods to interact with the elements on that page.
Benefits of Using POM:
Maintainability: Changes in UI require updates in only one place (the POM).
Readability: Tests are cleaner and more understandable.
Reusability: Common methods can be reused across different test cases.
Now let’s create Page Object Model (POM) file,
Open project in VS code.
Navigate to cypress/e2e Right click on e2e and select New Folder and give name as “page“.
Right-click on the page folder and select New File. – Name the file with the .js extension, e.g., CalculatorPage.js.
import selectors from "../../fixtures/Selectors.json";
export class CalculatorPage {
  clickNumber(number) {
    switch (number) {
      case "0":
        cy.get(selectors.zeroNumberButton).click();
        break;
      case "1":
        cy.get(selectors.oneNumberButton).click();
        break;
      case "2":
        cy.get(selectors.twoNumberButton).click();
        break;
      case "3":
        cy.get(selectors.threeNumberButton).click();
        break;
      case "4":
        cy.get(selectors.fourNumberButton).click();
        break;
      case "5":
        cy.get(selectors.fiveNumberButton).click();
        break;
      case "6":
        cy.get(selectors.sixNumberButton).click();
        break;
      case "7":
        cy.get(selectors.sevenNumberButton).click();
        break;
      case "8":
        cy.get(selectors.eightNumberButton).click();
        break;
      case "9":
        cy.get(selectors.nineNumberButton).click();
        break;
    }
  }
  clickOperator(operator) {
    switch (operator) {
      case "+":
        cy.get(selectors.plusOperatorButton).click();
        break;
      case "-":
        cy.get(selectors.minusOperatorButton).click();
        break;
      case "*":
        cy.get(selectors.multiplyOperatorButton).click();
        break;
      case "/":
        cy.get(selectors.divideOperatorButton).click();
        break;
    }
  }
  clickEquals() {
    cy.get(selectors.equalsOperatorButton).click();
  }
  verifyResult(expectedResult) {
    cy.get(selectors.result).should("contain.text", expectedResult);
  }
}
The CalculatorPage class uses the Page Object Model (POM) to manage interactions with a calculator’s UI.
Selectors Import:
Fetches locators from Selectors.json for buttons and result display.
Methods:
clickNumber(number): Clicks a number button (e.g., “2” clicks selectors.twoNumberButton).
clickOperator(operator): Clicks an operator button (+, -, *, /).
clickEquals(): Clicks the “=” button.
verifyResult(expectedResult): Validates the displayed result matches with the expected value.
Configuring Feature and Step Definition Paths
To seamlessly integrate feature files and step definitions in our Cypress project using the Cucumber preprocessor, we need to configure their paths. Here’s how we can set them up effectively:
Defining the Feature File Path and additional configuration
Start by defining where your feature files are located:
Open cypress.config.js.
Under the e2e section in module.exports, specify the path to your feature files and additional configuration.
package.json defines the setup for a Cypress framework with Cucumber integration for Behavior-Driven Development (BDD). Let’s breakdown:
Metadata:
name: “cypresscucumberframework” – The name of the project.
version: Version of the framework.
description: Describes the purpose of the project as a Cypress BDD framework using Cucumber.
author: The author of the project.
license: The license type.
keywords: A list of relevant keywords to describe the project.
Dependencies:
@badeball/cypress-cucumber-preprocessor: Used for integrating Cucumber feature files with Cypress.
cypress: Core Cypress testing library.
Dev Dependencies:
@cypress/browserify-preprocessor: Required to handle JavaScript files with Cucumber preprocessor.
Cypress Cucumber Preprocessor Configuration:
stepDefinitions: Specifies the path for step definition files (cypress/e2e/step-definition/*.js).
filterSpecs: Ensures only filtered specs (by tags) are run.
omitFiltered: Omits filtered tests from output results.
This ensures the Cucumber preprocessor can locate and execute the step definitions during testing.
Execute Test Cases in Cypress
Running Cypress Tests via Cypress Runner
Open VS Code terminal and type:
npx cypress open
The Cypress Runner will launch.
Select E2E Testing, then choose your desired browser.
A dashboard will appear with all feature files listed. Select a feature file to start execution.
Pro Tip: To run all test suites in one go instead of selecting them individually:
Edit package.json file under the “scripts” section as shown:
“scripts”: { “script”: “cypress run –browser chrome”, “test”: “npm run script” }
Now, execute the tests with:
npm run test
This command runs all tests in headless mode using Chrome. You can switch browsers if needed and even add pre-test or post-test configurations, like cleaning reports or screenshots.
Running Cypress Cucumber Tests with Tags
We can filter tests by tagging scenarios, such as @smoke, @sanity, or @regression. Here’s how:
Run specific tests by tag
npx cypress run –env tags=”@regression”
Ensure these settings are added under “cypress-cucumber-preprocessor” in package.json:
“filterSpecs”: true, “omitFiltered”: true
Run tests with either of two tags
npx cypress run –env tags=”@Smoke or @regression”
Run tests with both tags
npx cypress run –env tags=”@Smoke and @regression”
Test Execution Results
After execution, you’ll see a summary with details like total tests, passed, failed, and skipped. This makes it easy to analyze the run and debug issues efficiently.
By leveraging tags and custom scripts, Cypress lets us streamline test execution and manage complex scenarios with ease!
Conclusion
The Cypress Cucumber Framework is a powerful combination that brings together the efficiency of Cypress and the collaboration-driven approach of Cucumber’s Behavior-Driven Development (BDD). By leveraging this framework, teams can write tests in plain language, improving communication and collaboration between technical and non-technical stakeholders.
This approach ensures enhanced test readability, maintainability, and scalability through features like reusable step definitions, documentation, and integration with CI/CD pipelines. Additionally, its ability to manage complex scenarios using tags and a well-organized project structure makes it an excellent choice for modern automated testing. Adopting this framework enables faster feedback loops, higher test coverage, and user-focused application development.
I am an SDET Engineer proficient in manual, automation, API, Performance, and Security Testing. My expertise extends to technologies such as Selenium, Cypress, Cucumber, JMeter, OWASP ZAP, Postman, Maven, SQL, GitHub, Java, JavaScript, HTML, and CSS. Additionally, I possess hands-on experience in CI/CD, utilizing GitHub for continuous integration and delivery. My passion for technology drives me to constantly explore and adapt to new advancements in the field.
Ensuring smooth functionality and an excellent user experience for web applications is more important than ever in today’s digital world. As web applications become increasingly complex, however, traditional testing methods often struggle to meet the demands of modern development. Modern UI automation frameworks, therefore, offer powerful tools for comprehensive and reliable testing.
JavaScript, the backbone of web development, is central to many automation frameworks due to its versatility. Cypress, in fact, has gained popularity for its ease of use, powerful features, and developer-friendly approach, making it a standout in this space. It also streamlines the process of writing, executing, and maintaining automated tests, making it an essential tool for developers and testers alike.
In this blog, we’ll delve into Modern UI automation with JavaScript and Cypress, starting with the setup and then moving on to advanced features like real-time reloading and CI pipeline integration. By the end, you’ll have the knowledge to effectively automate UI testing for modern web applications, whether you’re a seasoned developer or new to automation.
Prerequisites for Modern UI Automation Framework
Before embarking on your journey with JavaScript and Cypress for Modern UI Automation, ensure you must have the following tools in your system and some basic understanding of the technologies i.e. Cypress, Automation, JavaScript and some coding knowledge.
Node.js and npm
Both Node.js and npm are essential for managing dependencies and running your Cypress tests.
VS Code offers a powerful and user-friendly environment for working with JavaScript but also seamlessly integrates with the Cypress framework for modern UI automation. It provides syntax highlighting, code completion, debugging tools, and extensions that can significantly enhance your development experience.
Familiarity with fundamental JavaScript concepts like variables, functions, and object-oriented programming will therefore crucial for writing automation scripts and interacting with the browser.
Cypress is the core framework for your end-to-end (E2E) tests; consequently, it offers a user-friendly interface and powerful capabilities for interacting with web elements.
Here, we’ve looked at the things we need before we start.
Installation for Modern UI Automation Framework
How to Install Node.js on Windows?
What is Node.js?
Node.js is a runtime environment that enables JavaScript to run outside of a web browser; consequently, it allows developers to build scalable and high-performance server-side applications. Originally, JavaScript was confined to client-side scripting in browsers, but with Node.js, it can now power the backend as well.
For testers, Node.js unlocks powerful automation capabilities but also supports tools and frameworks like WebDriver.io and Puppeteer, which automate browser interactions, manage test suites, and perform assertions. Node.js also facilitates custom test frameworks and seamless integration with testing tools. Additionally, it enables running tests in headless environments, ideal for continuous integration pipelines. Overall, Node.js enhances the effectiveness of JavaScript-based testing, improving software quality, speeding up development and UI Automation.
Key Features of Node.js
Asynchronous and Event-Driven: Node.js library APIs work asynchronously; consequently, they are non-blocking. The server moves to the next API call without waiting for the previous one to complete, therefore it using event mechanisms to handle responses efficiently.
High Speed: Built on Google Chrome’s V8 JavaScript engine, Node.js therefore executes code very quickly.
Single-Threaded but Highly Scalable: Node.js uses a single-threaded model with event looping. This event-driven architecture allows the server to respond without blocking, making it highly scalable compared to traditional servers. Unlike servers like Apache HTTP Server, which create limited threads to handle requests, Node.js can handle thousands of requests using a single-threaded program.
No Buffering: Node.js applications do not buffer data; instead they output data in chunks.
Steps to Install Node.js on Windows for UI Automation:
Double-click on the .msi installer to open the Node.js Setup Wizard.
Click “Next” on the Welcome to Node.js Setup Wizard screen.
Accept the End-User License Agreement (EULA) by checking “I accept the terms in the License Agreement” and click “Next.”
Choose the destination folder where you want to install Node.js and click “Next.”
Click “Next” on the Custom Setup screen.
When prompted to “Install tools for native modules,” click “Install.”
Wait for the installation to complete and click “Finish” when done.
Verify the Installation
Open the Command Prompt or Windows PowerShell.
Run the following command to check if Node.js was installed correctly:
node -v
If Node.js was installed successfully, the command prompt will print the version of Node.js installed.
By following these steps, you can install Node.js on your Windows system and start leveraging its capabilities for server-side scripting and automated testing.
How to Install Visual Studio Code (VS Code) on Windows?
What is Visual Studio Code (VS Code)?
Visual Studio Code (VS Code) is a free, open-source code editor developed by Microsoft. It features a user-friendly interface and powerful editing capabilities. VS Code supports a wide range of programming languages and comes with built-in features for debugging, syntax highlighting, code completion, and Git integration. It also offers a vast ecosystem of extensions to customize and extend its functionality.
Steps to Install VS Code for UI Automation
Visit the Official VS Code Website
Open any web browser like Google Chrome or Microsoft Edge.
Click the “Download for Windows” button on the website to start the download.
Open the Downloaded Installer
Once the download is complete, locate the Visual Studio Code installer in your downloads folder.
Double-click the installer icon to begin the installation process.
Accept the License Agreement
When the installer opens, you will be asked to accept the terms and conditions of Visual Studio Code.
Check “I accept the agreement” and then click the “Next” button.
Choose Installation Location
Select the destination folder where you want to install Visual Studio Code.
Click the “Next” button.
Select Additional Tasks
You may be prompted to select additional tasks, such as creating a desktop icon or adding VS Code to your PATH.
Select the options you prefer and click “Next.”
Install Visual Studio Code
Click the “Install” button to start the installation process.
The installation will take about a minute to complete.
Launch Visual Studio Code
After the installation is complete, a window will appear with a “Launch Visual Studio Code” checkbox.
Check this box and then click “Finish.”
Open Visual Studio Code
Visual Studio Code will open automatically.
You can now create a new file and start coding in your preferred programming language.
By following these steps, you have successfully installed Visual Studio Code on your Windows system. You are now ready to start your programming journey with VS Code.
Create Project for Modern UI Automation Framework
Creating a Cypress project in VS Code is straightforward. Follow these steps to get started:
Steps to Create a Cypress Project in VS Code
Open VS Code:
Launch VS Code on your computer.
Click on Files Tab:
Navigate to the top-left corner of the VS Code interface and click on the “Files” tab.
Select Open Folder Option:
From the dropdown menu, choose the “Open Folder” option. This action will prompt a pop-up file explorer window.
Choose Project Location:
Browse through the file explorer to select the location where you want to create your new Cypress project. For this example, create a new folder on the desktop and name it “CypressJavaScriptFramework”.
Open Selected Folder:
Once you’ve created the new folder, select it and click on the “Open” button. VS Code will now automatically navigate to the selected folder.
Congratulations! You’ve successfully created a new Cypress project in VS Code. On the left panel of VS Code, you’ll see your project name, and a welcome tab will appear in the editor.
Now, we are all set to start building your Cypress project in Visual Studio Code!
What is Cypress?
Cypress is a modern, open-source test automation framework designed specifically for web applications and used to UI automation also. Unlike many other testing tools that run outside of the browser and execute remote commands, Cypress operates directly within the browser. This unique architecture enables Cypress to offer fast, reliable, and easy-to-write tests, making it an invaluable tool for developers and testers.
Cypress’s architecture allows it to control the browser in real-time, providing access to every part of the application being tested. This direct control means that tests can interact with the DOM, make assertions, and simulate user interactions with unparalleled accuracy and speed.
Cypress Architecture for Modern UI Automation Framework:
Cypress automation testing operates on a NodeJS server. It uses the WebSocket protocol to create a connection between the browser and the Node.js server. WebSocket’s allow full-duplex communication, enabling Cypress to send commands and receive feedback in real time. This means Cypress can navigate URLs, interact with elements, and make assertions, while also receiving DOM snapshots, console logs, and other test-related information from the browser.
Let’s break down the components and how they interact:
User Interaction:
The process begins with a user interacting with the web application. This includes actions like clicking buttons, selecting values from drop-down menus, filling forms, or navigating through pages.
Cypress Test Scripts:
Developers write test scripts using JavaScript or TypeScript. These scripts simulate user interactions and verify that the application behaves as expected.
Cypress Runner:
The Cypress Runner executes the test scripts. It interacts with the web application, capturing screenshots and videos during the tests.
Proxy Server:
A proxy server sits between the Cypress Runner and the web application. It intercepts requests and responses, allowing developers to manipulate them.
Node.js:
Cypress runs on Node.js, providing a runtime environment for executing JavaScript or TypeScript code.
WebSocket:
The WebSocket protocol enables real-time communication between the Cypress Runner and the web application.
HTTP Requests/Responses:
HTTP requests (e.g., GET, POST) and responses are exchanged between the Cypress Runner and the application server, facilitating the testing process.
By understanding these components and their interactions, you can better appreciate how Cypress effectively automates testing for modern web applications and UI Automation.
Features of the Cypress
Time Travel: Cypress captures snapshots of your application as it runs, allowing you to hover over each command in the test runner to see what happened at every step.
Real-Time Reloads: Cypress automatically reloads tests in real-time as you make changes, providing instant feedback on your changes without restarting your test suite.
Debuggability: Cypress provides detailed error messages and stack traces, making it easier to debug failed tests. It also allows you to use browser developer tools for debugging purposes.
Automatic Waiting: Cypress automatically waits for commands and assertions before moving on, eliminating the need for explicit waits or sleeps in your test code.
Spies, Stubs, and Clocks: Cypress provides built-in support for spies, stubs, and clocks to verify and control the behavior of functions, timers, and other application features.
Network Traffic Control: Cypress allows you to control and stub network traffic, making it easier to test how your application behaves under various network conditions.
Consistent Results: Cypress runs in the same run-loop as your application, ensuring that tests produce consistent results without flaky behavior.
Cross-Browser Testing: Cypress supports testing across multiple browsers, including Chrome, Firefox, and Edge, ensuring your application works consistently across different environments.
CI/CD Integration: Cypress integrates seamlessly with continuous integration and continuous deployment (CI/CD) pipelines, enabling automated testing as part of your development workflow.
Advantages of Cypress
Easy Setup and Configuration: Cypress offers a simple setup process with minimal configuration, allowing you to start writing tests quickly without dealing with complex setup procedures.
Developer-Friendly: Cypress is designed with developers in mind, providing an intuitive API and detailed documentation that makes it easy to write and maintain tests.
Fast Test Execution: Cypress runs directly in the browser, resulting in faster test execution compared to traditional testing frameworks that operate outside the browser.
Reliable and Flake-Free: Cypress eliminates common sources of flakiness in tests by running in the same run-loop as your application, ensuring consistent and reliable test results.
Comprehensive Testing: Cypress supports a wide range of testing types, including end-to-end (E2E), integration, and unit tests, providing a comprehensive solution for testing web applications.
Rich Ecosystem: Cypress has a rich ecosystem of plugins and extensions that enhance its functionality and allow you to customize your testing setup to suit your specific needs.
Active Community and Support: Cypress has an active and growing community that provides support, shares best practices, and contributes to the development of the framework.
Seamless CI/CD Integration: Cypress integrates seamlessly with CI/CD pipelines, enabling automated testing as part of your development workflow. This integration ensures that tests are run consistently and reliably in different environments, improving the overall quality of your software.
Cypress’s unique features, reliability, and ease of use make it an ideal choice for developers and testers looking to ensure the quality and performance of their web applications.
By leveraging Cypress in your JavaScript projects, you can achieve efficient and effective UI automation, enhancing the overall development lifecycle.
Cypress Framework Structure
In a Cypress project, the folder structure is well-defined to help you organize your test code, configuration, plugins, and related files. Here’s a breakdown of the typical folders and files we will encounter:
1. cypress/ Directory
Purpose: This is the root directory where all Cypress-related files and folders reside.
2. cypress/e2e/ Directory
Purpose: This is where you should place your test files.
Details: Cypress automatically detects and runs tests from this folder. Test files typically have .spec.js or .test.js file extensions.
3. cypress/fixtures/ Directory (Optional)
Purpose: Store static data or fixture files that your tests might need.
Details: These can include JSON, CSV, or text files.
4. cypress/plugins/ Directory (Optional)
Purpose: Extend Cypress’s functionality.
Details: Write custom plugins or modify Cypress behavior through plugins.
5. cypress/support/ Directory (Optional)
Purpose: Store various support files, including custom commands and global variables.
Details:
commands.js (Optional): Define custom Cypress commands here to encapsulate frequently used sequences of actions, making your test code more concise and maintainable.
e2e.js (Optional): Include global setup and teardown code for your Cypress tests. This file runs before and after all test files, allowing you to perform tasks like setting up test data or cleaning up resources.
6. cypress.config.js File
Purpose: Customize settings for Cypress, such as the base URL, browser options, and other configurations.
Location: Usually found in the root directory of your Cypress project.
Details: You can create this file manually if it doesn’t exist or generate it using the Cypress Test Runner’s settings.
7. node_modules/ Directory
Purpose: Contains all the Node.js packages and dependencies used by Cypress and your project.
Details: Usually, you don’t need to change anything in this folder.
8. package.json File
Purpose: Defines your project’s metadata and dependencies.
Details: Used to manage Node.js packages and scripts for running Cypress tests.
9. package-lock.json File
Purpose: Ensures your project dependencies remain consistent across different environments.
Details: Automatically generated and used by Node.js’s package manager, npm.
10. README.md File (Optional)
Purpose: Include documentation, instructions, or information about your Cypress project.
11. Other Files and Folders (Project-Specific)
Purpose: Depending on your project’s needs, you may have additional files or folders for application code, test data, reports, or CI/CD configurations.
Folder Structure Overview
The folder structure is designed to keep your Cypress project organized and easy to maintain:
Main Directories:
cypress/e2e/: Where you write your tests.
cypress.config.js: Where you configure Cypress.
Optional Directories:
fixtures/: For test data.
plugins/: For extending Cypress functionality.
support/: For custom commands and utilities.
This structure helps you customize your testing environment and keep everything well-organized.
Now let’s start to install Cypress and Configure in our project.
Cypress Install and Configuration:
We’re now ready to dive into the Cypress installation and configuration process. With Node.js, VS Code, and a new project named “CypressJavaScriptFramework” set up, let’s walk through configuring Cypress step-by-step.
Open Your Project: Start by opening the “CypressJavaScriptFramework” project in VS Code.
Open a New Terminal: From the top-left corner of VS Code, open a new terminal.
Initialize Node.js Project: Verify your directory path and run the below command to initialize a new Node.js project and generate a package.json file.
npm init –y
Install Cypress: Install Cypress as a development dependency with the below command. Once installed, you’ll find Cypress listed in your package.json file. As of this writing, the latest version is 13.13.1.
npm install –save-dev cypress
Configure Cypress: To open the Cypress Test Runner, run the below command.
npx cypress open
Upon first launch, you’ll be greeted by Launchpad, which helps with initial setup and configuration.
Step 1: Choosing a Testing Type
The first decision we will make in the Launchpad is selecting the type of testing you want to perform:
E2E (End-to-End) Testing: This option runs your entire application and visits pages to test them comprehensively.
Component Testing: This option allows you to mount and test individual components of your app in isolation.
Here we must select E2E Testing.
What is E2E Testing?
End-to-End (E2E) testing is a method of testing that validates the functionality and performance of an application by simulating real user scenarios from start to end. This approach ensures that all components of the application, including the frontend and backend, work together seamlessly.
After selecting E2E Testing Configuration Screen where we just have to click on Continue button.
Step 2: Quick Configuration
Next, the Launchpad will automatically generate a set of configuration files tailored to your chosen testing type. You’ll see a list of these changes, which you can review before continuing. For detailed information about the generated configuration, you can check out the Cypress configuration reference page.
After clicking on Continue button we will notice some changes in the framework few Configuration files will be added in the Framework which are cypress.config.js cypress/ directory cypress directory Fixtures and Support directory
The description of these file s and folders we have seen in start of blog.
Step 3: Launching a Browser
Finally, the Launchpad will display a list of compatible browsers detected on your system. You can select any browser to start your testing. Don’t worry if you want to switch browsers later; Cypress allows you to change browsers at any point of time.
As in my system I have Chrome and Edge browser installed. Cypress also have the inbuild browser which is called as “Electron”
What is Electron Browser?
Electron is an open-source framework that allows developers to build cross-platform desktop applications using web technologies like HTML, CSS, and JavaScript. It combines the Chromium rendering engine and the Node.js runtime, enabling you to create desktop apps that function seamlessly across Windows, macOS, and Linux.
Key Points:
Cross-Platform Compatibility: Develop applications that work on Windows, macOS, and Linux.
Chromium-Based: Uses Chromium, the same rendering engine behind Google Chrome, for a consistent browsing experience.
Node.js Integration: Allows access to native OS functionalities via Node.js, blending web technologies with desktop capabilities.
Used by Popular Apps: Many well-known applications like Slack, Visual Studio Code, and GitHub Desktop are built using Electron.
Electron provides the flexibility to build powerful desktop applications with the familiarity and ease of web development.
Now, you’re ready to hit the start button and embark on your testing journey with Cypress!
In this article we will use chrome browser for that we have to select Chrome and click on “Start E2E Testing in Chrome”. Then we will land on Cypress runner screen here we have 2 options
Scaffold example specs: Automatically generate example test specifications to help you get started with Cypress.
Create new specs: Manually create new test specifications to tailor your testing needs and scenarios.
Here we will use Scaffold example specs.
Scaffolding Example Specs
Use: Scaffolding example specs in Cypress generates predefined test files that demonstrate how to write and structure tests.
Reason: Providing example specs helps new users quickly understand Cypress’s syntax and best practices, making it easier to start writing their own tests and ensuring they follow a proper testing framework.
Once we select Scaffold example specs option, we will notice in framework few files are added in cypress directory under e2e directory.
Finally, we have installed cypress, configured and now we can run Scaffolding Example Specs. Now we will add our own file and execute it with cypress runner and from Command Line. Before that we will go through the Cypress Testing components.
Cypress Testing Components
Let’s understand Cypress Testing Components used while automation.
describe() Block: Groups related tests and provides structure.
it() Blocks: Defines individual test cases, focusing on specific functionalities.
Hooks: Manage setup and teardown processes to maintain a consistent test environment.
Assertions: Verify that the application behaves as expected by comparing actual results to expected results.
describe() Block
The describe() block in Cypress is used to group related test cases together. It defines a test suite, making it easier to organize and manage your tests.
Purpose:
The describe() block provides a structure for your test cases, allowing you to group tests that are related to a particular feature or functionality. It helps in maintaining a clean and organized test suite, especially as your test cases grow in number.
Example:
describe('Login Functionality', () => {
  // Nested describe block for more granular organization
  describe('Valid Login', () => {
    it('should log in successfully with valid credentials', () => {
      // Valid Login Script
    });
  });

describe('Invalid Login', () => {
    it('should display an error message with invalid credentials', () => {
      // Invalid Login Script
    });
  });
});
it() Blocks
The it() block defines individual test cases within a describe() block. It contains the actual code for testing a specific aspect of the feature under test.
Purpose:
Each it() block should test a single functionality or scenario, making your test cases clear and focused. This helps in identifying issues quickly and understanding what each test is verifying.
Example:
describe('Form Submission', () => {
  it('should successfully submit the form and show a success message', () => {
    // Form Submission Script
  });
});
Hooks
Hooks are special functions in Cypress that run before or after tests. They are used to set up or clean up the state and perform common tasks needed for your tests.
Types of Hooks:
before(): Executes once before all tests in a describe() block.
beforeEach(): Runs before each it() block within a describe() block.
after(): Executes once after all tests in a describe() block.
afterEach(): Runs after each it() block within a describe() block.
Purpose:
Hooks are useful for setting up test environments, preparing data, and cleaning up after tests, ensuring a consistent and reliable test environment.
Example:
describe('User Registration', () => {
  before(() => {
    // Runs once before all tests
  });

  beforeEach(() => {
    // Runs before each test
  });

  afterEach(() => {
    // Runs after each test
  });

  after(() => {
    // Runs once after all tests
  });

  it('Valid Login', () => {
   // Valid Login Script
});
Assertions
Assertions are statements that check if a condition is true during the test execution. They verify that the application behaves as expected and helps identify issues when the actual results differ from the expected results.
Purpose:
Assertions validate the outcomes of your test cases by comparing actual results against expected results. They help ensure that your application functions correctly and meets the defined requirements.
Example:
describe('Homepage Content', () => {
  it('should display the correct page title', () => {
    cy.visit('/');
    cy.title().should('equal', 'Expected Page Title');
  });

  it('should have a visible welcome message', () => {
    cy.visit('/');
    cy.get('.welcome-message').should('be.visible');
    cy.get('.welcome-message').should('contain', 'Welcome to our website!');
  });
});
These components work together to create a comprehensive and organized test suite in Cypress, ensuring your application is thoroughly tested and reliable.
Create Test File
Before diving into test file creation, let’s define the functionalities. We will automate the Calculator.net web application and will focus on basic arithmetic operations: addition, subtraction, multiplication, and division.
Here’s a breakdown of the test scenarios:
1. Verify user able to do addition
Visit Calculator.net
Click on two numbers (e.g., 1 and 2)
Click the “+” operator
Click on another number (e.g., 1)
Click the “=” operator
Verify the result is equal to 3
Click the “reset” button
2. Verify user able to do Subtraction
Visit Calculator.net
Click on a number (e.g., 3)
Click the “-” operator
Click on another number (e.g., 1)
Click the “=” operator
Verify the result is equal to 2
Click the “reset” button
3. Verify user able to do Multiplication
Visit Calculator.net
Click on a number (e.g., 2)
Click the “*” operator
Click on another number (e.g., 5)
Click the “=” operator
Verify the result is equal to 10
Click the “reset” button
4. Verify user able to do Division
Visit Calculator.net
Click on a number (e.g., 8)
Click the “/” operator
Click on another number (e.g., 2)
Click the “=” operator
Verify the result is equal to 4
Click the “reset” button
Optimizing with Hooks:
As you noticed, visiting Calculator.net and resetting the calculator are common steps across all scenarios. To avoid code repetition, we’ll utilize Cypress hooks:
beforeEach: Execute this code before each test case. We’ll use it to visit Calculator.net.
afterEach: Execute this code after each test case. We’ll use it to reset the calculator.
Now, let’s create the test file and add the code below to Calculator.cy.js file.
/// <reference types="cypress" />
import selectors from '../fixtures/Selectors.json';
describe('Calculator Tests', () => {
    before(() => {
        cy.log('Tests are starting...');
    });
    beforeEach(() => {
        cy.visit('https://www.calculator.net');
    });
    afterEach(() => {
        cy.get(selectors.cancelButton).click();
    });
    after(() => {
        cy.log('All tests are finished.');
    });
    it('Verify user able to do addition', () => {
        cy.get(selectors.twoNumberButton).click();
        cy.get(selectors.plusOperatorButton).click();
        cy.get(selectors.oneNumberButton).click();
        cy.get(selectors.equalsOperatorButton).click();
        cy.get(selectors.result).should('contain.text', '3');
    });

    it('Verify user able to do Subtraction', () => {
        cy.get(selectors.threeNumberButton).click();
        cy.get(selectors.minusOperatorButton).click();
        cy.get(selectors.oneNumberButton).click();
        cy.get(selectors.equalsOperatorButton).click();
        cy.get(selectors.result).should('contain.text', '2');
    });

    it('Verify user able to do Multiplication', () => {
        cy.get(selectors.twoNumberButton).click();
        cy.get(selectors.multiplyOperatorButton).click();
        cy.get(selectors.fiveNumberButton).click();
        cy.get(selectors.equalsOperatorButton).click();
        cy.get(selectors.result).should('contain.text', '10');
    });
    it('Verify user able to do Division', () => {
        cy.get(selectors.eightNumberButton).click();
        cy.get(selectors.divideOperatorButton).click();
        cy.get(selectors.twoNumberButton).click();
        cy.get(selectors.equalsOperatorButton).click();
        cy.get(selectors.result).should('contain.text', '4');
    });
});
Let’s create a Selectors.json file to store all the selectors used in automation, assigning them meaningful names for better organization.
The Selector.json file is a crucial part of your test automation framework. It centralizes all the CSS selectors used in your tests, making the code more maintainable and readable. By keeping selectors in a dedicated file, you can easily update or change any element locator without modifying multiple test scripts.
Purpose:
Centralization: All element selectors are stored in one place.
Maintainability: Easy to update selectors if the application’s HTML changes.
Readability: Makes test scripts cleaner and easier to understand by abstracting the actual CSS selectors.
Add the following JSON content to your Selector.json file in the cypress/fixtures directory:
Number Buttons: Selectors for the number buttons (0-9) use the span[onclick=’r(number)’] pattern, identifying the buttons by their onclick attribute values specific to each number.
Operator Buttons: Selectors for the arithmetic operators (plus, minus, multiply, divide) use a similar pattern but include escaped quotes for the operator characters.
Equals Button: The selector for the equals button follows the same pattern, identifying it by its onclick attribute.
Result: The selector for the result display uses an ID (#sciOutPut), directly identifying the output element.
Cancel Button: The selector for the cancel button is included to reset the calculator between tests, ensuring a clean state for each test case.
By utilizing this Selector.json file, your test scripts can reference these selectors with meaningful names, thereby enhancing the clarity and maintainability of your test automation framework for UI.
Advanced Configuration In cypress.config.js:
While installing and Configration of cypress we have created cypress.config.js file. Now we will look at the Advanced configuration in cypress.config.js allows you to tailor Cypress’s behavior to fit the specific needs of your project, optimizing and enhancing the testing process.
Key Benefits:
Customization: You can set up custom configurations to suit your testing environment, such as base URL, default timeouts, viewport size, and more.
Environment Variables: Manage different environment settings, making it easy to switch between development, staging, and production environments.
Plugin Integration: Configure plugins for extended functionality, such as code coverage, visual testing, or integrating with other tools and services.
Reporter Configuration: Customize the output format of your test results, making it easier to integrate with CI/CD pipelines and other reporting tools.
Browser Configuration: Define which browsers to use for testing, including headless mode, to speed up the execution of tests.
Test Execution Control: Set up retries for flaky tests, control the order of test execution, and manage parallel test runs for better resource utilization.
Security: Configure authentication tokens, manage sensitive data securely, and control network requests and responses to mimic real-world scenarios.
This Cypress configuration file (cypress.config.js) sets various options to customize the behavior of Cypress tests. Here’s a breakdown of the configuration for modern UI Automation:
const { defineConfig } = require(“cypress”);: Import defineConfig function from Cypress, which is used to define configuration settings.
module.exports = defineConfig({ … });: Exports the configuration object, which Cypress uses to configure the test environment.
projectId: “CYFW01”: Specifies a unique project ID for identifying the test project. This is useful for organizing and managing tests in CI/CD pipeline.
downloadsFolder: “cypress/downloads”: Sets the folder where files downloaded during tests will be saved.
screenshotsFolder: “cypress/screenshots”: Defines the folder where screenshots taken during tests will be stored, particularly for failed tests.
video: true: Enables video recording of test runs, which can be useful for reviewing test execution and debugging.
screenshotOnRunFailure: true: Configures Cypress to take screenshots automatically when test fails.
chromeWebSecurity: false: Disables web security in Chrome, which can be useful for testing applications that involve cross-origin requests.
trashAssetsBeforeRuns: true: Ensures that previous test artifacts (like screenshots and videos) are deleted before running new tests, keeping the test environment clean.
viewportWidth: 1920 and viewportHeight: 1080: To simulate a screen resolution of 1920×1080 pixels, you can set the default viewport size for tests accordingly.
execTimeout: 10000: Configures the maximum time (in milliseconds) Cypress will wait for commands to execute before timing out.
pageLoadTimeout: 18000: Sets the maximum time (in milliseconds) Cypress will wait for a page to load before timing out.
defaultCommandTimeout: 10000: Defines the default time (in milliseconds) Cypress will wait for commands to complete before timing out.
retries:{ runMode: 1, openMode: 0 }:
runMode: 1: Specifies that Cypress should retry failed tests once when running in CI/CD mode (runMode).
openMode: 0: Indicates that Cypress should not retry failed tests when running interactively (openMode).
e2e: { setupNodeEvents(on, config) { … } }: Provide way to set-up Node.js event listeners for end-to-end tests. This is where you can implement custom logic or plugins to extend Cypress’s functionality.
Executing Test Cases Locally for Modern UI Automation
To run test cases for modern UI Automation, use Cypress commands in your terminal. Cypress supports both headed mode (with a visible browser window) and headless mode (where tests run in the background without displaying a browser window).
Running Test Cases in Headed Mode:
Open your terminal.
Navigate to the directory containing your Cypress tests.
Execute the tests in headed mode using the below command:
npx cypress open
This will open the Cypress Test Runner. Click on “E2E Testing,” select the browser, and run the test case from the list (e.g., calculator.cy.js). Once selected, the test case will execute, and you can see the results in real-time. Screenshots of the local test execution are provided below.
Running Test Cases in Headless Mode:
Headless mode in Cypress refers to running test cases without a visible user interface. This method allows tests to be executed entirely in the background. Here’s how you can set up and run Cypress in headless mode.
To run the test script directly from the command line, use the following command:
npx cypress run –spec “cypress\e2e\Calculator.cy.js” –browser edge
By default, Cypress executes tests in headless mode, but you can also specify it explicitly using the –headless flag:
npx cypress run — headless –spec “cypress\e2e\Calculator.cy.js” –browser edge
This enables efficient and automated test execution without launching the browser UI (UI Automation).
Conclusion
In this blog, we explored how the JavaScript and Cypress framework revolutionize modern UI automation. By leveraging Cypress’s powerful features, such as its intuitive API, robust configuration options, and seamless integration with JavaScript, we were able to effectively test complex web applications.
We delved into practical implementations of modern UI automation such as:
Creating and managing test cases with Cypress, including various operations like addition, subtraction, multiplication, and division using a calculator example.
Using advanced configuration in cypress.config.js to tailor the test environment to specific needs, from handling different environments and customizing timeouts to integrating plugins and managing network requests.
Implementing selectors through a Selector.json file to enhance test maintainability and clarity by using descriptive names for elements.
Executing tests locally in both headed and headless modes, providing insights into how to monitor test execution in real-time or run tests in the background.
By incorporating these strategies, we ensure that our web applications not only function correctly but also provide a seamless and reliable user experience. Cypress’s modern approach to UI testing simplifies the automation process, making it easier to handle the dynamic nature of contemporary web applications while maintaining high standards of quality and performance.
I am an SDET Engineer proficient in manual, automation, API, Performance, and Security Testing. My expertise extends to technologies such as Selenium, Cypress, Cucumber, JMeter, OWASP ZAP, Postman, Maven, SQL, GitHub, Java, JavaScript, HTML, and CSS. Additionally, I possess hands-on experience in CI/CD, utilizing GitHub for continuous integration and delivery. My passion for technology drives me to constantly explore and adapt to new advancements in the field.
For any web automation testing, the one and most important task is to identify and use robust locators to identify web elements so that your automated tests do not fail with “Unable to locate element”. In this article, we are providing you with the techniques that every tester should learn to create those robust locators. As we already know this can be done using different locator strategies. In this blog, we are going to learn about XPath. Before we dive into the topic of our discussion let’s just get more familiar with Xpaths. Let’s start with,
What is XPath?
XPath (XML Path Language) is an expression language that allows the processing of values conforming to the data model defined in the XQuery and XPath Data models. Basically, it is a query language that we use to locate or find an element present on the webpage. It is defined by the World Wide Consortium (W3C). Now, let’s discuss why Xpaths are necessary.
Why is XPaths necessary?
Xpaths are the most widely used locators in automation though there are other locators like id, name, class name, tag name, and so on. Also, it is used when there are no unique attributes available to locate the web element. It allows identification with the help of the visible test present on the screen with the help of Xpath function text().
Before explaining the importance of XPath let’s just go through the different types of locators available for automation testing.
In this blog, we will learn about the different types of Xpaths and how to implement them so that we can locate our web elements quickly using the selenium web driver. Basically, there are two types of Xpaths
1. Absolute XPath:
In this type, The XPath starts from the beginning or from the root node of the HTML DOM structure. It is a direct way to locate or find the web element but the disadvantage of absolute XPath is that as we are creating it from the start of the HTML DOM structure if there are any changes introduced in the created path of the web element then it gets failed. In this type of locator, we only use tags or nodes. The main advantage of this is that we can select a web element from the root node as it starts with the single forward slash “ / ”.
Example:
Here is an example of an absolute Xpath for an input field box.
The absolute XPath is: /html[1]/body[1]/div[1]/div[1]/div[1]/div[1]/div[1]/div[2]/div[2]/form[1]/div[1]/div[1]/div[2]/input[1]
2. Relative Xpath:
Compared to an absolute XPath the relative XPath does not start from the beginning of the HTML DOM structure. It starts from where the element is present e.g. from the middle of the HTML DOM structure if the element is located there. We don’t have to travel from the start of the HTML DOM structure. The relative Xpath starts with a double forward slash “ // “ and it can locate and search the web element anywhere on the webpage. Relative XPath directly jumps to elements on DOM. The other difference between absolute and relative XPath is that in absolute XPath we use tags or nodes but in relative XPath we use attributes.
Example:
We are writing the relative XPath for the same input field for which earlier we created an absolute XPath.
Relative XPath is:
//input[@name=’username’]
XPath Functions:
It is not always possible to locate a web element using relative XPath that is because at some times while locating a particular web element there is the possibility of elements that have similar properties, for example, the same id, name, or same class name. So, here the basic XPath won’t work efficiently for finding that web element. Xpath functions are used to write the efficient XPath by locating a web element with a unique value. Basically, there are three types of XPath functions as follows,
a. starts-with() Function:
starts-with() function is very useful in locating dynamic web elements. It is used to find the element in which the attribute value starts with some particular character or text.
While working on the dynamic web page the starts-with function plays an important role. We can use it to match the starting value of a web element that remains static.
It can also locate the web element whose attribute value is static.
Just like the start-with() function explained above, the contains() function is also used to create a unique expression to locate a web element.
It is used when if a part of the value of an attribute changes dynamically the function can navigate to the web element with the partial text present.
We can provide any partial attribute value to locate the web element.
It accepts two parameters the first one is the attribute of the tag must validate to locate the web element and the second one is the value of an attribute is a partial value that the attribute must contain.
Syntax:
Xpath = //tagname[contains(@attribute,’value’)]
Example:
//input[contains(@name,’username’)]
c. text() Function:
text() Function:
The text() function is used to locate web elements with exact text matches.
The function only works if the element contains the text.
This method returns the text of the web element when identified by the tag name and compared it with the value provided on the right side.
Syntax:
Xpath = //tagname[text()=’Actual text present’]
Example:
//button[text()=’ Login ‘]
How to use AND & OR in XPath:
AND & OR expressions can also be used in selenium Xpath expressions. Very useful if you want to use more than two attributes to find elements on a webpage.
The OR expression requires two conditions and it will check whether the first condition in the statement is true if so then it will locate that web element and if not then it will go for the second condition and if that is true then also it will locate that web element. So, here the point we should remember is that when we are using the OR expression at least either of two of the conditions should be true then, and then only it will find and locate that web element.
Syntax:
Xpath = //tagname[@attribute=’Value’ or @attribute=’Value’]
Example:
//input[@name=’username’ or @placeholder=’xyz’]
Here the first condition is true and the second one is false still the web element got located.
Just like the OR expression the AND expression also requires two conditions but the catch here is that both the provided condition must be true then and then only the web element will get located. If either of the conditions is false then it will not locate that web element.
Syntax:
Xpath = //tagname[@attribute=’Value’ and @attribute=’Value’]
Example:
//input[@name=’username’ and @placeholder=’Username’]
In this case, both the condition provided for an AND expression is true hence the web element got located.
XPath Axis:
It is a method to identify those dynamic elements that are impossible to find by normal XPath methods. All the elements are in a hierarchical structure and can be either located using absolute or relative Xpaths but it provides specific attributes called XPath axis to locate those elements with unique XPath expressions. The axes show a relationship to the current node and help locate the relative nodes concerning the tree’s current node. The dynamic elements are those elements on the webpage whose attributes dynamically change on refresh or any other operations. The HTML DOM structure contains one or more element nodes and they are known as trees of nodes. If an element contains the content, whether it is other elements or text, it must be declared with a start tag and an end tag. The text defined between the start tag and the end tag is the element content.
Types of XPath Axis:
1. Parent Axis XPath:
With the help of the parent axis XPath, we can select the parent of the current node. Here, the parent node can be either a root node or an element node. The point to consider here is that for all the other element nodes the maximum node the parent axis contains is one. Also, the root node of the HTML DOM structure has no parent hence the parent axis is empty when the current node is the root node.
As we have seen using the parent axis XPath actually we are creating an XPath by the following bottom-up approach but here in the child axis case, we are going to follow the top-down approach to create an XPath. The child axis selects all the child elements present under the current node. We can easily locate a web element as a child of the current node.
This type of XPath uses its own current node and selects the web element belonging to that current node. You will always observe only one node that represents the self-web element. The tag name we provide at the start and at the end of XPath are the same as they are on the self-axis of the current node. However, this provides the confirmation of the element present when there is more than one element present having the same value and attribute.
Using this axis we can select the current node and all its descendants i.e. child, grandchild, etc just like a descendant axis. The point to be noticed here is the tag name for descendants and self are the same.
As we understand how the descendant axis works now, the ancestor axis works exactly opposite to that of the descendant axis. It will select or locate all ancestors elements i.e. parent, grandparent, etc of the current node. This axis contains the root node too.
Using the following sibling axis method we can select all the nodes that have the same parent as that of the current node and that appear after the current node.
Using the following sibling axis method we can select all the nodes that have the same parent as that of the current node and that appear before the current node. It works opposite to that of the following sibling axis XPath.
You can try all of these examples mentioned above with the Orange HRM Demo website here.
Conclusion:
In conclusion, XPath is an essential tool for web automation testing when using Selenium, Playwright, and Cypress. It allows for more flexibility and specificity in locating elements on a web page. Understanding the different types of XPath expressions and how to use them can greatly improve the efficiency and effectiveness of the automation testing process. It can be particularly useful in situations where elements do not have unique CSS selectors, or when the structure of the HTML changes frequently. With the knowledge of XPath, you can write more robust and stable automation tests.