
Introduction:
Starting from September 30th, 2023, Selenium will no longer provide support for Java 8. Instead, the minimum supported version of Java will be Java 11. For the official announcement from Selenium, please refer to this link:
Selenium has supported Java for a long period. Java 8 reached the end of active support about a year ago as you can see below the details of version support.

The default of Selenium has not had a major release in several years and also a bug has been found that cannot be fixed. So the decision was made to move to the native Java HTTP client which requires using Java 11 or greater version. So instead of upgrading to the latest Java for now Java 11 will be a cautious step to move forward. In this blog, we will explore how to achieve that with minimal changes.
Download and Install Java 11:
First, you need to download the exe file for the JDK 11 version. For that, you can visit the link provided below:
https://www.oracle.com/in/java/technologies/javase/jdk11-archive-downloads.html
You can get it by signing in to the Oracle which is free. You will have various file types to download. For the exe file, you can refer below image.

After completing the download you proceed with the installation process.
For the installation, you can follow the below steps shown in screenshots. Then the installation process will be completed.


After completing the installation of Java 11.
You will find the file below in your system at the following path: C:\Program Files\Java.

So now you have successfully installed Java 11.
Setting Up Environment variable:
The next step is to set up the environment variable. To do that, simply navigate to the Environment Variable.
Settings > About > Advance System Settings > Environment Variables

As you can see in the image above, I have successfully updated the JAVA_HOME path with the latest JDK version. Additionally, don’t forget to update the path variable with the latest “bin” folder.

So now start your command prompt by executing the java -version command. You will get to see the latest updated version of Java.

We have now installed Java 11 and configured the Environment Variables.
Update Existing project on the latest installed Java version which is Java 11:
So for now we’ll see how we can update the existing Java 8 project to Java 11
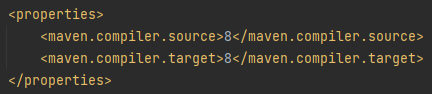
So you must have a pom.xml file present in your existing project framework.
Before:
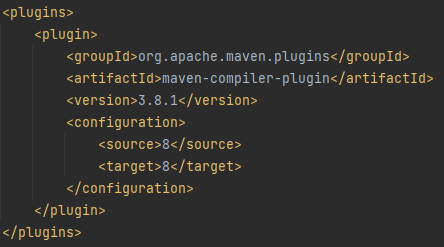
After:


As you can see the source and target in the above snapshots are version 8. Here you can update the version of the java with latest 11 as we have downloaded and installed Java 11. So after updating the 8 with 11, you have to rebuild the pom.xml project as well. After that, you will see the successfully updated Java version to 11. This is how you need to update your Java version to 11.
1Swapnil is an SDET with 1+ years of hands-on experience in Manual, Automation, and API testing. The technologies I have worked on include Selenium, Playwright, Cucumber, Appium, Postman, SQL, GitHub, Java, and Python. Also, I love Blog writing and learning new technologies.