UI Automation Tips for Software Testing: UI automation is a very essential part of delivering high-quality applications at speed. But if the approach is not right, automated tests can become unreliable and difficult to maintain. In this blog, we’ll explore the top five UI automation tips for software testing. Additionally, we’ll include practical examples and real-life scenarios to provide a better understanding and help you build a stable and scalable testing framework.
1. Keep Your Tests Independent
Interdependent tests are risky—they often lead to cascading failures that mask the true cause of issues. If one test fails, it shouldn’t bring down others. Independent tests provide clarity in results, ease of debugging, and improved parallel execution, which increases the speed and reliability of your CI/CD pipelines.
By making your tests independent, you can reduce the risk of false positives and flaky failures. Ensure that each test sets up its own data, and cleans up after execution when needed.
Example 1: When you’re testing a flight booking application. One test verifies user login, and another checks the flight search feature. If the login test fails, your search test fails too—not because the search is broken, but because the user will fail to log in.
Better Approach: Use a pre-authenticated session or API calls, which will help you log in directly on the flight search page. Additionally, this approach will ensure that one failure doesn’t impact others.
2. Use Reliable Locators
As we all know the locators are the backbone of any UI automation framework. If they’re unstable, your tests will be unstable too. Deep XPaths or class names that change frequently, can cause unnecessary failures whenever the UI changes—even if the application is working fine.
Instead, you should collaborate with developers and test-friendly attributes like data-testid or aria-labels should get implemented. These test-friendly attributes make your locators more robust, descriptive, and resilient, which leads to longer-lasting and more stable tests.
Example 1: Avoid XPath selectors like: //div[3]/span[1]
Better Approach: Use stable locators such as: id=’submitButton’ or data-test-id=’loginSubmit
Real-World Scenario: A banking app had dynamically generated class names, causing frequent locator failures. Switching to data-test-id attributes for element identification eliminated flakiness, even as the UI evolved.
3. Manage Test Data Strategically
Test data management is very important and often overlooked, but it directly impacts test reliability and maintenance efforts. Hardcoding test data, such as usernames or IDs, leads to data collisions, inconsistent results, and affect the data security.
A good strategy involves:
Using dummy data when testing specific scenarios
Keeping test data separate from test scripts (in JSON, YAML, CSV, or databases)
Using dynamic data generation when possible
Ensuring data clean up routines are in place to avoid leftover data that could impact other tests
Example 1: Instead of hardcoding data like: username = “JohnDoe”
Better Approach: Maintain test data in external files, such as JSON, YAML, or CSV: { “username”: “JohnDoe”, “password”: “SecurePass123” }
Pro Tip: Use dynamic test data generation or data factories when appropriate to create uniquedatasets on the fly. This prevents collisions and ensures tests are repeatable.
4. Focus on Test Stability
An unstable test suite could be a major productivity killer. Flaky tests result in false negatives, It causes teams to waste time investigating non-issues instead of focusing on real bugs.
proper synchronization is the key to stability. Tests should wait for specific events or conditions, not arbitrary timeouts. Selenium, Cypress, and Playwright are the modern tools provide explicit waits and smart retry mechanisms. Use them to wait for:
Background jobs or loaders to finish
Element visibility
API responses
Animations or transitions to complete
Example: In an inventory management system, tests failed intermittently due to a loading spinner. Instead of using: Thread.sleep(5000)‘
Better Approach: Implement explicit waits that wait until a specific condition is met: WebDriverWait wait = new WebDriverWait(driver, Duration.ofSeconds(10)); wait.until(ExpectedConditions.invisibilityOfElementLocated(By.id(“loadingSpinner”)));
Result: This ensures that your tests proceed only after the UI is ready, thereby improving reliability and performance.
5. Optimize and Maintain Test Suites
As your application evolves, so should your test suite. Without regular maintenance and optimization, your suite becomes slow, and hard to manage. Prioritizing test organization, test tagging, and test prioritization helps to keep the suite efficient and scalable.
Best practices for Maintenance include:
Monitoring test performance and analyzing the flaky test reports
Regularly reviewing and refactoring test cases
Deleting obsolete or redundant tests and test data
Categorizing tests by priority or test type like smoke, regression, and performance
Running critical tests on every pull request and full regression tests on scheduled intervals
Example: In a food delivery app, you should categorize tests by priority.
Critical: Order placement, payment processing
High: Cart updates, menu filtering
Low: Profile updates, UI cosmetic changes
Better Approach:
Run Critical tests in every build pipeline.
Execute High/Low priority tests during scheduled regression runs
Regularly review and refactor outdated tests to keep the suite lean.
Bonus Tip: Clean Up Test Data After Every Execution
If you are leaving test data behind after execution can lead to false positives or negatives, and unreliable results. It’s crucial to clean up the data created or modified during a test to ensure a consistent starting point for future runs.
Example: In an e-commerce app, a test case creates a new user and places an order. If the user and order aren’t deleted after the test, the next run might fail due to duplicate user or incorrect order counts.
Better Approach: You can add extra steps to clear the data or the best way use teardown methods (like @AfterMethod, @AfterTest) to delete or roll back any test data. You can also use.
Conclusion
By following these five UI automation best practices, you’ll build robust, stable, and maintainable test suites that provide real value. Whether you’re testing a banking platform, e-commerce site, or mobile app, these tips will help you navigate the complexities of UI automation and deliver flawless testing outcomes.
Priyanka is an experienced SDET with 4+ years in functional, regression, and mobile testing across IoT, Life Sciences, and HCM domains. She excels in building automation frameworks using Selenium, Playwright, Appium, and Cucumber, with strong skills in API testing (Postman, Rest Assured) and database validation (MySQL, PostgreSQL). ISTQB certified and proficient in agile environments, she ensures high-quality delivery through automation, cross-browser testing, and CI/CD integration.
Web tables, also known as HTML tables, are a widely used format for displaying data on web pages. They allow for a structured representation of information in rows and columns, making it easy to read and manipulate data. Selenium WebDriver, a powerful tool for web browser automation, provides the functionality to interact with these tables programmatically. This capability is beneficial for tasks like web scraping, automated testing, and data validation. In this blog, we will see how to extract data from Web tables in Java-Selenium.
Identify web table from your webpage:
To effectively identify and interact with web tables using Selenium, it’s crucial to understand the HTML structure of tables and the specific tags used. Here’s an overview of the key table-related HTML tags
A typical HTML table consists of several tags that define its structure:
<table>: The main container for the table.
<thead>: Defines the table header, which contains header rows (<tr>).
<tbody>: Contains the table body, which includes the data rows.
<tr>:Defines a table row.
<th>: Defines a header cell in a table row.
<td>: Defines a standard data cell in a table row.
As a demo website, here you will get a sample WebTable with fields like first name, last name, email, etc. Here we have applied a filter for email to minimize the size of the table.
We will be starting by launching the browser and navigating to the webpage. We have applied a filter for the email “PolGermain@whatever.com”, you can change it as per your requirement.
Once we get the filtered data from the table, now we need to locate the table and get the number of rows. The table will have multiple rows so, we need to use a list to store all the rows.
As we have stored all the rows in the list, now we need to iterate through each rows to fetch the columns and store the column data in another list.
Example :
Abc
1
Xyz
2
table has 2 rows and 2 columns
When we are iterating through the 1st row we will get data as Abc and 1 and store it in the list ’as rowdata[Abc, 1] similarly data from the 2nd row will be stored as rowdata[Xyz, 2].When we are iterating through the 2nd row the data from the 1st row will be overwritten. That’s why we will need one more list ‘webRows ’ to store all the rows. In the below code snippet, here we are iterating through all the columns from each row one by one and finally storing all the rows in the list WebRows.
We have successfully extracted the table data now you can use this data as per your requirement
To do this we need to iterate through the list ‘webRows’ where we have our table data stored. We will be accessing all the columns by their index. In this case, you should know the column index you want to access. The column index always starts from 0.
for (int s = 0; s < webRows.size(); s++) {
	List<String> row = webRows.get(s);
	System.out.println(row.get(1));
        System.out.println(row);
        }
Below is the complete code snippet for the above-mentioned steps. You need to update related Xpaths in case you are not able to access the rows and columns with the given Xpaths.
Instead of accessing data by the index, you can access it using the column index also, and to do that you need to use the HashMaps instead of lists. HashMap will help to store column headers as keys and column data as values
Example:
Name
Id
Abc
1
Xyz
2
Table has 3 rows and 2 columns
Here Name and ID will be your keys and Abc, 1 and Xyz, 2 will be the values.
How to store and access table data using HashMap?
The code snippet below shows how to use HashMap to store data in key-value format.
package Selenium;

import io.github.bonigarcia.wdm.WebDriverManager;
import org.openqa.selenium.*;
import org.openqa.selenium.chrome.ChromeDriver;

import java.util.ArrayList;
import java.util.List;

public class Webtable_Blog {
    public static void main(String[] args) throws InterruptedException {

        WebDriverManager.chromedriver().setup();
        WebDriver driver = new ChromeDriver();
        driver.get("https://www.globalsqa.com/angularJs-protractor/WebTable/");
        driver.manage().window().maximize();
        WebElement global_search = driver.findElement(By.xpath("//input[@type='search' and @placeholder='global search']"));
        global_search.sendKeys("PolGermain@whatever.com");
//        global_search.sendKeys("Pol");
        global_search.sendKeys(Keys.ENTER);
        Thread.sleep(5000);
        List<WebElement> rows = driver.findElements(By.xpath("//table[@class='table table-striped']/tbody/tr"));
        System.out.println("size-"+rows.size());
        List<Map<String, String>> webRows = new ArrayList<>();
        for (int i = 0; i < rows.size(); i++) {
            List<WebElement> keys = driver.findElements(By.xpath("//table[@class='table table-striped']/thead/tr[1]/th"));
            List<WebElement> values = driver.findElements(By.xpath("//table[@class='table table-striped']/tbody/tr["+(i+1)+"]/td"));
            Map<String, String> webColumn = new HashMap<>();
            try {
                for (int j = 0; i < keys.size(); j++) {
                    webColumn.put(keys.get(j).getText(), values.get(j).getText());
                }
            } catch (Exception e) {
            }
            webRows.add(webColumn);
        }

        for (int s = 0; s < webRows.size(); s++) {
            System.out.println(webRows.get(s).get("lastName"));
            System.out.println(webRows.get(s));
        }
}
}
In this blog, we’ve delved into the powerful capabilities of Selenium WebDriver for handling web tables in Java. WebTables are a crucial part of web applications, often used to display large amounts of data in an organized manner. In Java Selenium, handling these WebTables efficiently is a key skill for any test automation engineer. Throughout this blog, we’ve explored various techniques to interact with WebTables, including locating tables, accessing rows and cells, iterating through table data, and performing actions like sorting and filtering.
Click here for more blogs on software testing and test automation.
Priyanka is an experienced SDET with 4+ years in functional, regression, and mobile testing across IoT, Life Sciences, and HCM domains. She excels in building automation frameworks using Selenium, Playwright, Appium, and Cucumber, with strong skills in API testing (Postman, Rest Assured) and database validation (MySQL, PostgreSQL). ISTQB certified and proficient in agile environments, she ensures high-quality delivery through automation, cross-browser testing, and CI/CD integration.
At times, certain project specifications demand comprehensive testing of a web application across a diverse range of web browsers and their varying versions. Maintaining consistent functionality, visual appearance, and user engagement is essential.
To execute this type of cross-browser testing efficiently, there are two primary approaches:
One involves manual testing, where the website is examined across multiple browsers and devices.
The other approach entails leveraging specialized tools and services that replicate distinct browser environments.
Particularly, BrowserStack stands out as a tool that has garnered considerable attention in this field, thanks to its intuitive user interface.
Executing test cases on BrowserStack is crucial for QA teams to ensure the compatibility, functionality, and performance of websites and applications across a wide range of real browsers and devices.
It helps identify bugs, responsive design issues, and user experience problems, while also supporting automated testing and real environment testing.
BrowserStack eliminates the need for local testing infrastructure, reducing costs and enhancing overall testing efficiency.
So first let’s talk about the Basic Framework where we can automate test cases using the BDD approach to execute tests on a browser on the local machine.
So for this instead of explaining it from scratch here again, You can explore my blog where I have explained How to create a BDD automation framework using Cucumber in JavaScript and Playwright.
This blog gives you step-by-step guidance on how to Create Feature files, Steps files, Page Files, and various other utilities to make the framework more reusable and robust. So here is the link to this blog: https://shorturl.at/bjuvU
You must have a BrowserStack account to execute your tests, to create a new BrowserStack account you can visit the below link. https://www.browserstack.com/users/sign_up
To get started with BrowserStack implementation first store your BrowserStack username and access key in the .env file. To get the username and access key to navigate to your BrowserStack account. Click on Access key dropdown from dashboard and you will be able to see your username and access key.
Here you will be able to see your account details. Copy your Username and Access Key and store it in a .env file as shown below. To execute tests on BrowserStack set the Browserstack variable to ‘true’.
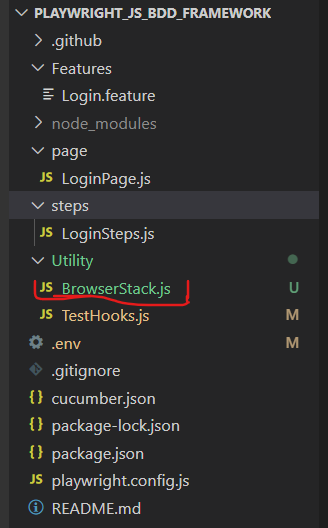
Now to set BrowserStack configurations Create a file as “Browserstack.js”, as you can see I have created a “Browserstack.js file” in the Utility folder.
Here are the essential BrowserStack configurations to integrate into this file.
The playwrightClientVersion variable is declared and assigned the output of the shell command executed using execSync from the child_process module.
.execSync('npx playwright --version’):
The command executed is npx playwright –version, which retrieves the version of the Playwright framework installed on the system. The output is converted to a string, trimmed to remove leading or trailing whitespace, and then split into an array based on spaces. The second element of the array (split(‘ ‘)[1]) represents the Playwright’s version.
caps():
This function is responsible for generating a configuration object used for browser testing with the BrowserStack platform and Playwright framework. It returns an object that contains configuration options for browser testing like browser, os, os_version, etc.
These are the variables from the .env file. If you are not using a .env file you can directly pass the BrowserStack username and access key.
As we have all the configurations ready, we will set up a test environment to execute tests on BrowserStack. Use the file where you have your Before and After methods. In the playwright-Js Framework we have these methods stored in the ‘TestHooks.js file’ so will update that file as below.
The above code Generates capabilities for BrowserStack using the caps() function from the ‘BrowserStack’ module. Construct the WebSocket endpoint URL for BrowserStack with the generated capabilities.
Now we have completed the BrowserStack implementation in our framework, now you can execute your tests on BrowserStack.
To execute tests on BrowserStack make sure you have “Browserstack = true” in the .env file.
Then you can execute your tests using the command ’npm run test’ on your terminal.
After running the test cases on BrowserStack, you’ll find the report below. Access comprehensive execution videos, and test logs for both successful and unsuccessful cases, along with execution duration.
Conclusion:
Integrating BrowserStack with Playwright JavaScript tests, gives access to a wide range of real browsers and devices, enabling comprehensive cross-browser and cross-platform testing. The scalability and cost-effectiveness of BrowserStack eliminate the need for maintaining an extensive device lab. Ultimately, this integration enhances test coverage, improves software quality, and ensures a seamless user experience across various browsers and platforms.
Priyanka is an experienced SDET with 4+ years in functional, regression, and mobile testing across IoT, Life Sciences, and HCM domains. She excels in building automation frameworks using Selenium, Playwright, Appium, and Cucumber, with strong skills in API testing (Postman, Rest Assured) and database validation (MySQL, PostgreSQL). ISTQB certified and proficient in agile environments, she ensures high-quality delivery through automation, cross-browser testing, and CI/CD integration.
In this Blog will learn How to create a BDD automation framework using Cucumber in JavaScript and Playwright. The playwright is an open-source automation tool. Playwright offers several features that make it stand out are Multi-browser support, Automatic waiting Headless and headful mode, etc. Cucumber is a popular open-source BDD(Behavior Driven Development) testing framework, Which helps build a framework that can be easily understood by both technical and non-technical stakeholders.
Prerequisite:
To get started with Cucumber BDD with playwright-js we need to have the following things installed.
2)Node.js: It is a cross-platform JavaScript runtime environment that allows developers to run JavaScript code outside of a web browser. To get Node.js you can visit: https://nodejs.org/en/download To check Node.js is installed on your system you can use the command ‘node –version’ on CMD or VS Code Terminal.
3)Cucumber (Gherkin) Full Support Extention: This extension provides support for the Cucumber (Gherkin) language to VS Code. To get the extension click on the extension icon on the left side panel of VS Code, search for the extension and install it.
Project setup:
Before starting with framework development we need to create a folder structure.
Create a folder structure with the following steps: 1) Create a folder as ‘Playwright-JS-Demo’, 2) In VS Code open the Playwright-JS-Demo folder 3) Install Playwright and Cucumber by executing the following commands in terminal a. npm init playwright@latest
b.npm i @cucumber/cucumber After execution of these commands, you can see package.json, node_modules, and playwright.config.js is created in the folder structure.
4) once you open the project, create a folder structure as below.
As our project structure is ready, we can start with the framework.
1. TestHooks.js:
Test Hooks mainly contain methods to execute Before and After every execution.
The Before hook gets executed before each Scenario in a cucumber test suite.
In this hook, a new Chrome browser instance is launched for every Test Case.
A new page is created in context with ‘await context.newPage()‘ and assigned to the global variable ‘page‘, which is accessible for any Test Case. This ensures that the browser page is available for each scenario in the test suite.
Once execution is done After the method gets executed It closes the current browser instance.
With Cucumber-BDD we can write scenarios in understandable language. Here I have created a Scenario for OrangeHRM Login.
We can create a separate scenario for each functionality.
Every step in a Feature File describes the action we are going to perform on UI.
In the feature file, we can add specific tags for scenarios or complete feature file ex. @login, @smoke.
If you add a tag for a specific scenario then it will only execute the particular scenario. But if you add tags for the Feature It will execute all the Scenarios from the Feature File.
It will make test execution easy if you want to execute test cases for specific functionality.
Feature: Login Feature
@login
Scenario: Login to OrangeHRM
 When I Visit the OrangeHRM login page
 And I enter username
 And I enter Password
 And I click on Login button
Then I verify dashboard URL
3. LoginSteps.js:
Essentially, the purpose of the step file is to attach steps from the feature file to the page file, where actual implementation is available.
We use the “Given-When-Then” (BDD) format to write step definitions. The required statement imports the necessary modules like:
Cucumber library that contains definitions for When Then etc.
A custom LoginPage module that likely contains functions for interaction with the login page.
The steps with ‘When’ are related to the user actions like navigation, clicking on the button, and filling in the information in input boxes, etc. The steps with ‘Then’ are related to the verifications or Assertions, just like in this case I have verified if the Login is successful.
The page file contains the actual implementation of the scenario, We also defined all the functions needed for test execution. Additionally, the LoginPage class contains functions that interact with the login page elements, like navigation to the Login page, entering the username and password, clicking the login button, and verifying the dashboard URL. Moreover, the playwright provides different functions to handle the UI elements and pages. For this test case I have used goto(), click(), fill() waitFor().
process.env.WEB_URL, process.env.WEB_USERNAME and process.env.WEB_PASSWORD are the variables we are accessing from the .env file. (The use of the .env file is explained below in point no 6).
To access the .env file I have imported const path = require(‘path’);
In this file, we specify the paths of all the required files. It helps to identify files in the framework. Whenever you create any new file in the framework, you have to add a path for that new file in this Cucumber.json file so that it can be accessible during the test case execution.
.env file is a Configuration file that contains environment variables. Using a .env file is a best practice for keeping sensitive information separate from the code. Moreover, for this framework, we have stored information like URL to navigate and username and password to Login into the OrangeHRM Web application.
We are executing the ‘npx’ command to run the cucumber-js package which is a test framework for BDD. 1) –require ./steps/*.js specifies The step files from the specified path that should be loaded. 2)–tags @login specifies scenarios with @login tags are going to be executed. You can add more than one tag if needed.
3)–publish flag specifies that test results should be published to the Cucumber Cloud which is a service for storing and analyzing test results.
To start execution you can execute the command ‘npm run test’ in the terminal. Once execution is completed you can see the link for cucumber reports is available in the terminal. By clicking on this link you can see the execution report.
This is how the report looks when you click on the above URL
In conclusion, the BDD automation framework using Cucumber in JavaScript and Playwright helps improve the quality and efficiency of their testing process. This framework will help you to write test cases for any web application very efficiently, It also provides a great reusability of code.
Priyanka is an experienced SDET with 4+ years in functional, regression, and mobile testing across IoT, Life Sciences, and HCM domains. She excels in building automation frameworks using Selenium, Playwright, Appium, and Cucumber, with strong skills in API testing (Postman, Rest Assured) and database validation (MySQL, PostgreSQL). ISTQB certified and proficient in agile environments, she ensures high-quality delivery through automation, cross-browser testing, and CI/CD integration.
Most of us are familiar with API testing tools like Postman, SoapUI, etc, and API automation libraries like RestAssured and Karate to automate API test cases. A recent entrant in this category is Playwright. The playwright is an Automation Tool provided by Microsoft. It provides cross-browser testing using which we can perform testing on multiple browsers like Chromium, Webkit, Firefox, etc. playwright supports cross-language testing (Java, Node.js, Python, .NET, etc.). However, very few of us know that it can actually do an API Test automation of methods GET, PUT, POST, and DELETE. Let’s see how it can be done.
Can we perform API testing using Playwright?
The playwright provides inbuilt support for API testing that’s why we don’t need any external libraries to handle API. The playwright doesn’t use any browser to call API. It sends requests using Node.js which provides faster execution.
In this tutorial, we will explore basic API methods with the help of Playwright- java. Below are the Four methods.
GET
POST
PUT
DELETE
Pre-requisite:
To get started with API automation with playwright-java first we need playwright to be installed in your system, to do this we can simply add the following dependency in the pom.xml file.
Along with the playwright, we have to add Testing and JSON dependencies.
Now let’s see how we can start API automation testing with Playwright-java.
1. GET:
By providing an API endpoint we can read data using a GET request. We must pass a few parameters to get the required data from the API.
We can verify the request by asserting the Response Code. The response code for a successful GET Request is 200. You can also assert a text inside the JSON body response.
For Example, I am using postman here to send a GET request to ” ‘/api/users/4’ endpoint of a sample API URL ‘https://reqres.in’
The below code shows the implementation of the GET method through Playwright.
To verify the response data we are parsing the response to JSON Object so that we can verify specific key-value pairs.
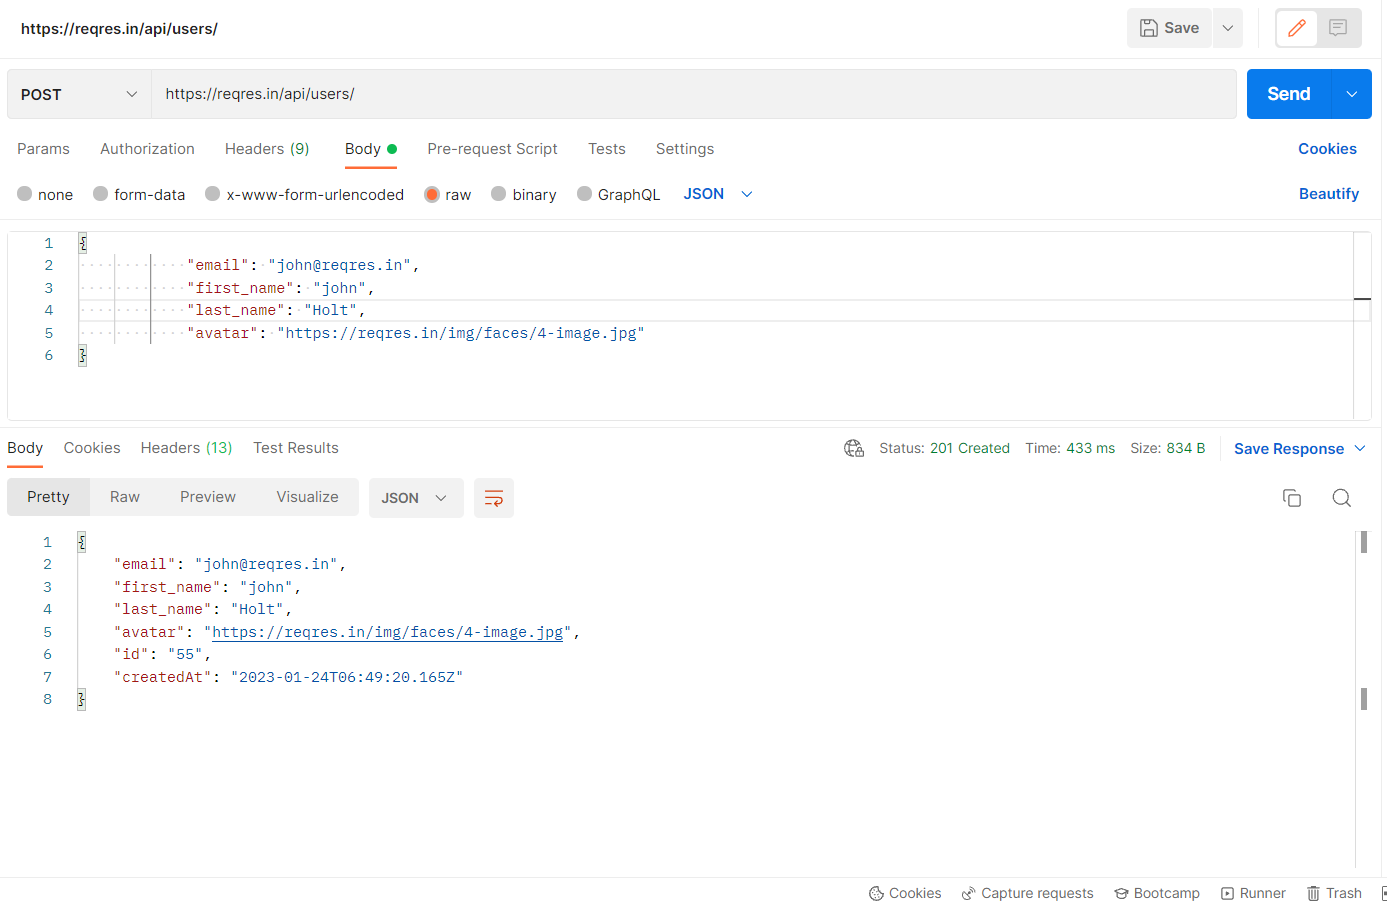
2. POST:
POST method is used to add a new record via API where we have to pass data as payload ex. first name, last name, etc. The response code for a successful POST Request is 201.
For example, I am sending a POST request to ‘/api/users/’ endpoint with base URL ‘https://reqres.in‘ and the body as given below in the screenshot:
To pass the data payloads to the POST/PUT method, first, we have to create a POJO class which will help to create methods to get and set payloads. below we have created a POJO class employee which will help to get and set data to both POST and PUT calls.
public class Employee {
// private variables or data members of pojo class
private String email;
private String first_name;
private String last_name;
private String avatar;

public String getEmail() {
   return email;
}
public void setEmail(String email) {
   this.email = email;
}
public String getFirstName() {
   return first_name;
}
public void setFirstName(String firstName) {
   this.first_name = firstName;
}
public String getLastName() {
   return last_name;
}
public void setLastName(String lastName) {
   this.last_name = lastName;
}
public String getAvatar() {
   return avatar;
}
public void setAvatar(String avatar) {
   this.avatar = avatar;
}
}
The below code will help you with the POST method through Playwright.
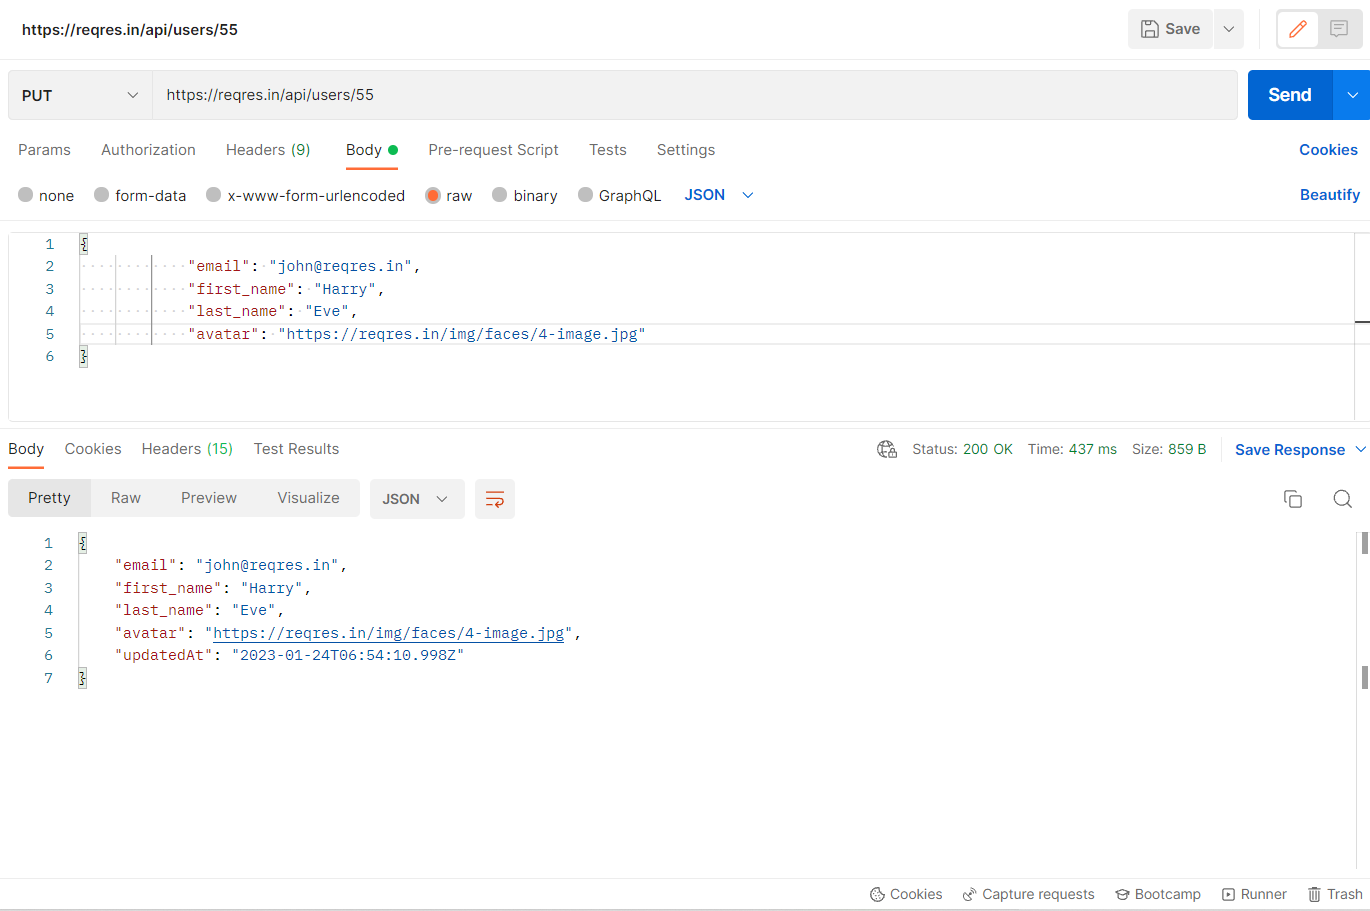
PUT Request is used to update the existing records via the API. we have to pass the data we want to update as a payload ex. first name, last name, etc. The response code for a successful PUT Request is 200.
For example, I am sending a POST request to ‘/api/users/55’ endpoint with the base URL ‘https://reqres.in’ and the body as given below in the screenshot:
The below example shows the implementation of the PUT method. We need to use the above POJO class to pass the data as a payload to the PUT call.
We can delete existing records using the API by using DELETE Request. Ideally, you must have added a record before you delete it. Hence you would need to append an ID to the DELETE URL. To delete the record using API first we need to pass the record URI (Universal Resource Identifier). The response code for a successful DELETE Request is 200.
For example, I am sending a POST request to ‘https://retoolapi.dev’ endpoint with base URL ‘/3njSPM/calc/43’ and the body as given below in the screenshot:
Following is the code for the DELETE method in Playwright
After performing a DELETE call we can perform a GET call on the same endpoint to verify data is actually deleted. For this GET call, we will get response code 204 as the content is not found.
GET, PUT, POST, and DELETE are the basic CRUD API methods used in any Web application. With the help of the inbuilt functionalities of Playwright, API Automation Testing became much easier and faster.
Priyanka is an experienced SDET with 4+ years in functional, regression, and mobile testing across IoT, Life Sciences, and HCM domains. She excels in building automation frameworks using Selenium, Playwright, Appium, and Cucumber, with strong skills in API testing (Postman, Rest Assured) and database validation (MySQL, PostgreSQL). ISTQB certified and proficient in agile environments, she ensures high-quality delivery through automation, cross-browser testing, and CI/CD integration.