For any web automation testing, the one and most important task is to identify and use robust locators to identify web elements so that your automated tests do not fail with “Unable to locate element”. In this article, we are providing you with the techniques that every tester should learn to create those robust locators. As we already know this can be done using different locator strategies. In this blog, we are going to learn about XPath. Before we dive into the topic of our discussion let’s just get more familiar with Xpaths. Let’s start with,
What is XPath?
XPath (XML Path Language) is an expression language that allows the processing of values conforming to the data model defined in the XQuery and XPath Data models. Basically, it is a query language that we use to locate or find an element present on the webpage. It is defined by the World Wide Consortium (W3C). Now, let’s discuss why Xpaths are necessary.
Why is XPaths necessary?
Xpaths are the most widely used locators in automation though there are other locators like id, name, class name, tag name, and so on. Also, it is used when there are no unique attributes available to locate the web element. It allows identification with the help of the visible test present on the screen with the help of Xpath function text().
Before explaining the importance of XPath let’s just go through the different types of locators available for automation testing.
In this blog, we will learn about the different types of Xpaths and how to implement them so that we can locate our web elements quickly using the selenium web driver. Basically, there are two types of Xpaths
1. Absolute XPath:
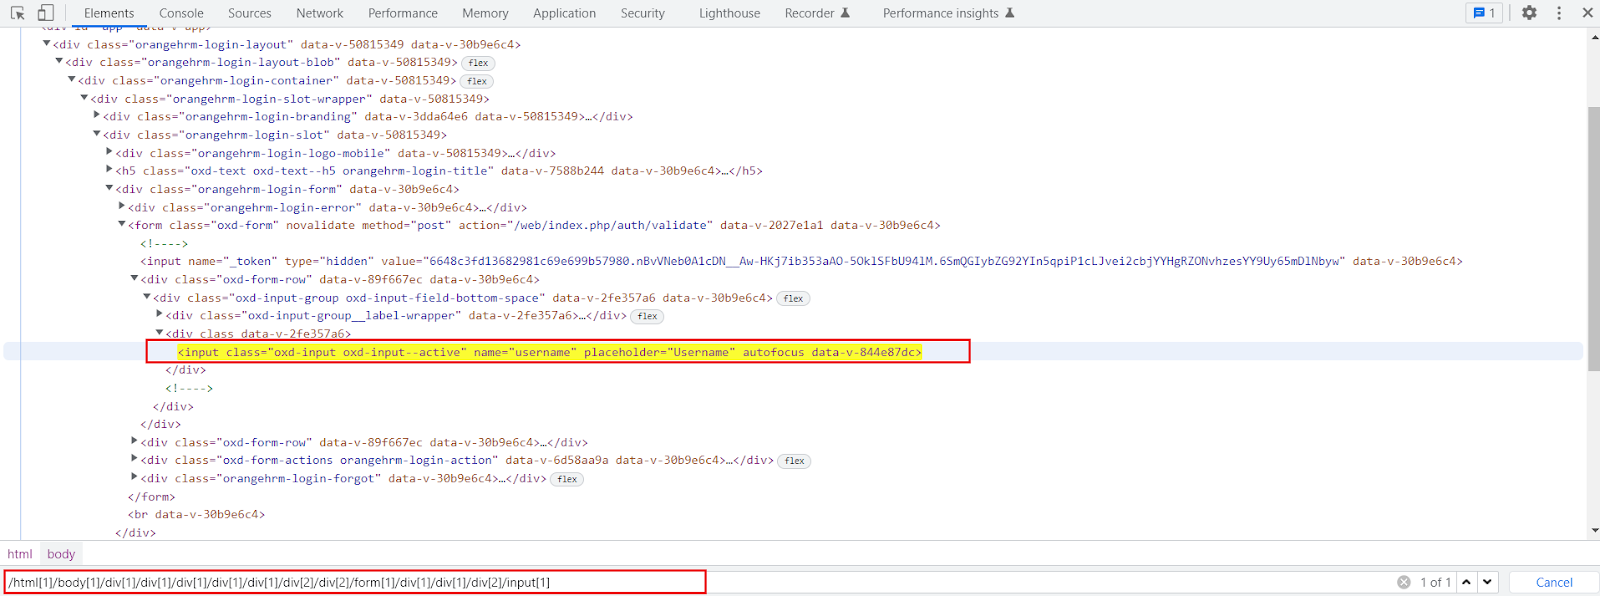
In this type, The XPath starts from the beginning or from the root node of the HTML DOM structure. It is a direct way to locate or find the web element but the disadvantage of absolute XPath is that as we are creating it from the start of the HTML DOM structure if there are any changes introduced in the created path of the web element then it gets failed. In this type of locator, we only use tags or nodes. The main advantage of this is that we can select a web element from the root node as it starts with the single forward slash “ / ”.
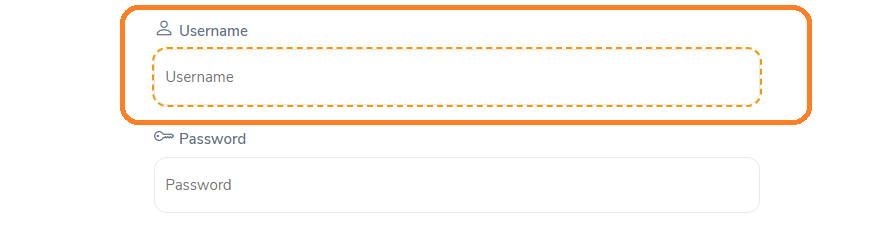
Example:
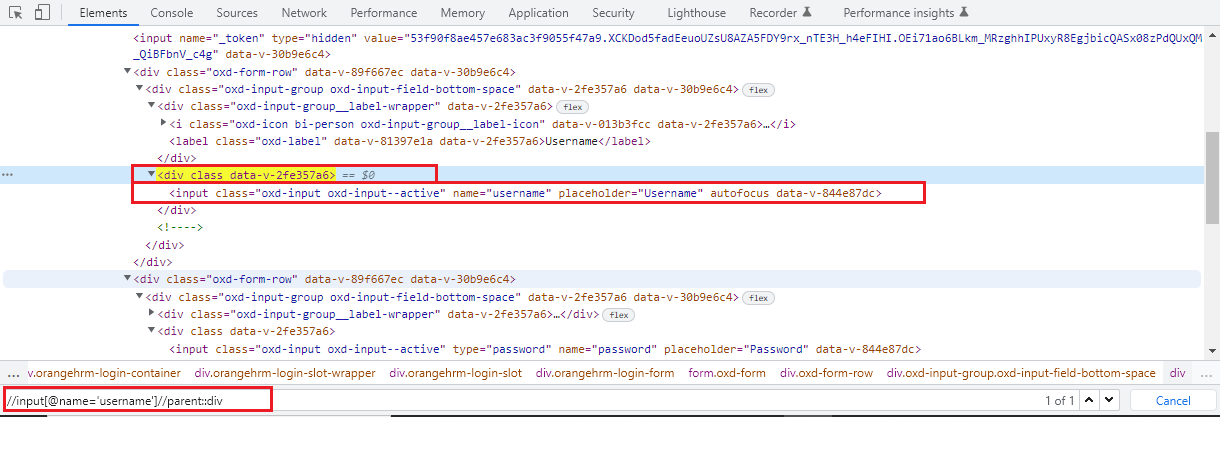
Here is an example of an absolute Xpath for an input field box.
The absolute XPath is: /html[1]/body[1]/div[1]/div[1]/div[1]/div[1]/div[1]/div[2]/div[2]/form[1]/div[1]/div[1]/div[2]/input[1]
2. Relative Xpath:
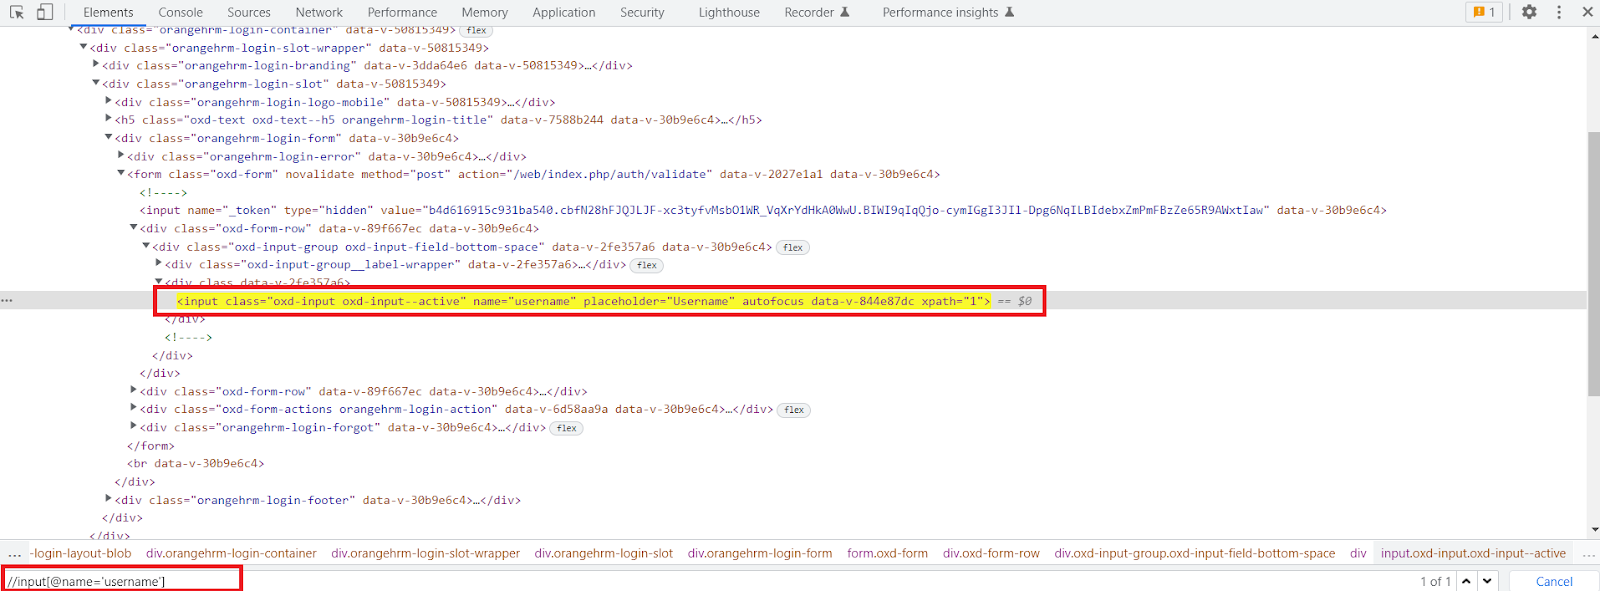
Compared to an absolute XPath the relative XPath does not start from the beginning of the HTML DOM structure. It starts from where the element is present e.g. from the middle of the HTML DOM structure if the element is located there. We don’t have to travel from the start of the HTML DOM structure. The relative Xpath starts with a double forward slash “ // “ and it can locate and search the web element anywhere on the webpage. Relative XPath directly jumps to elements on DOM. The other difference between absolute and relative XPath is that in absolute XPath we use tags or nodes but in relative XPath we use attributes.
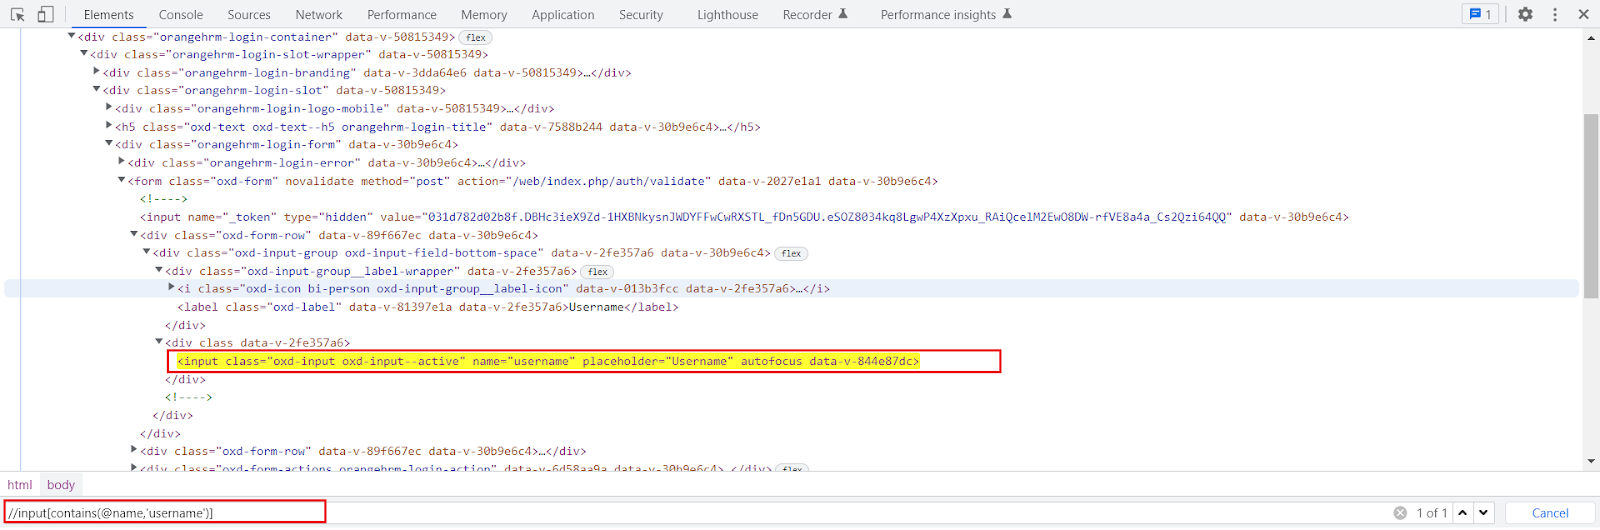
Example:
We are writing the relative XPath for the same input field for which earlier we created an absolute XPath.
Relative XPath is:
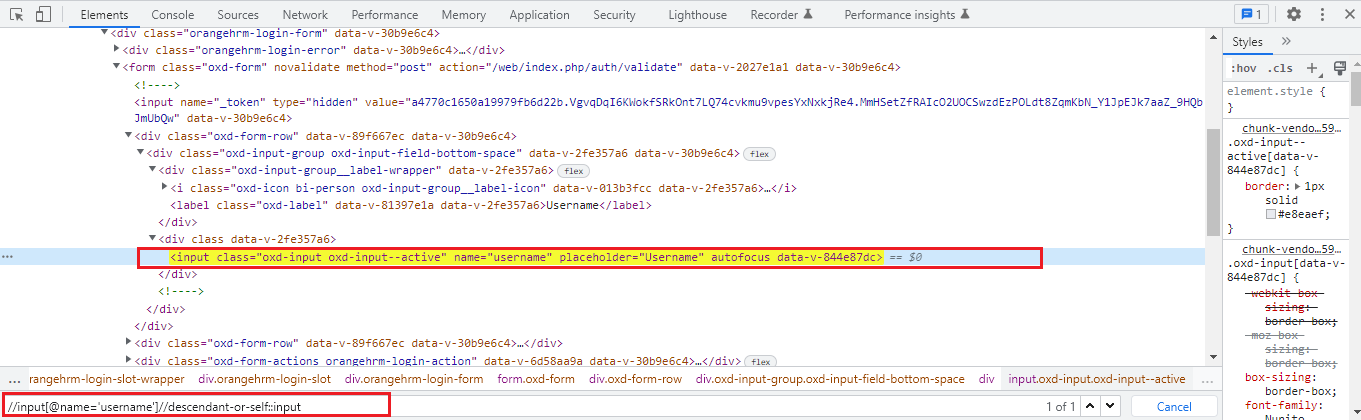
//input[@name=’username’]
XPath Functions:
It is not always possible to locate a web element using relative XPath that is because at some times while locating a particular web element there is the possibility of elements that have similar properties, for example, the same id, name, or same class name. So, here the basic XPath won’t work efficiently for finding that web element. Xpath functions are used to write the efficient XPath by locating a web element with a unique value. Basically, there are three types of XPath functions as follows,
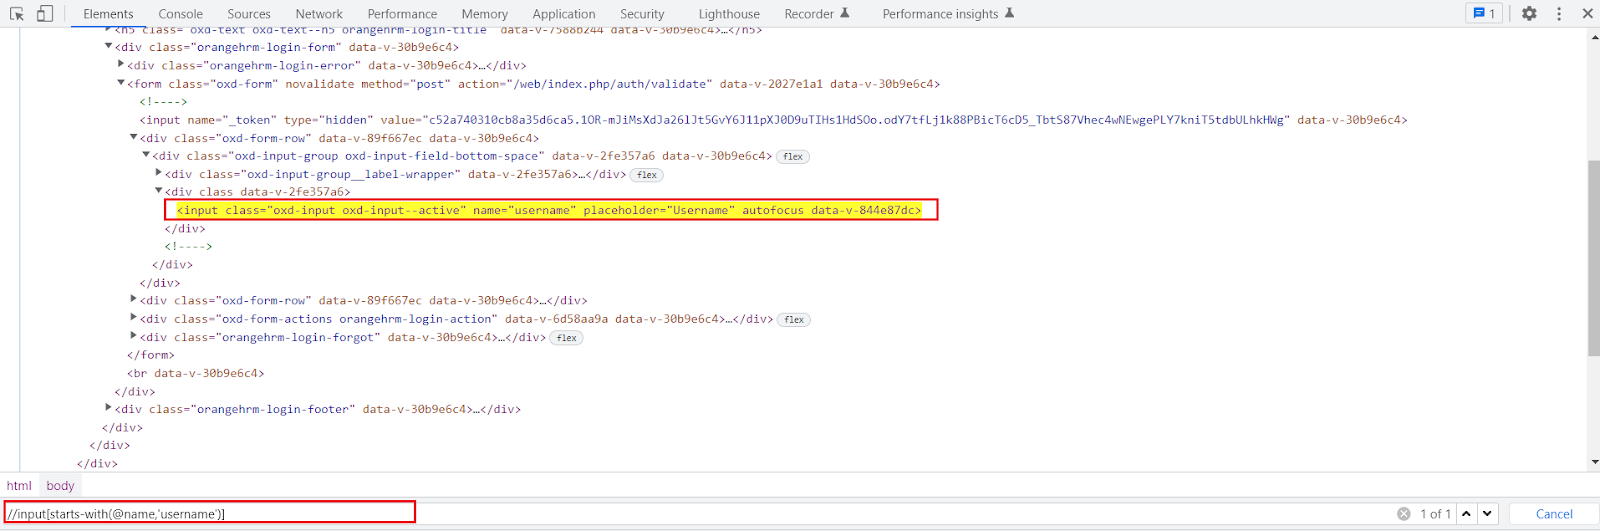
a. starts-with() Function:
starts-with() function is very useful in locating dynamic web elements. It is used to find the element in which the attribute value starts with some particular character or text.
While working on the dynamic web page the starts-with function plays an important role. We can use it to match the starting value of a web element that remains static.
It can also locate the web element whose attribute value is static.
Just like the start-with() function explained above, the contains() function is also used to create a unique expression to locate a web element.
It is used when if a part of the value of an attribute changes dynamically the function can navigate to the web element with the partial text present.
We can provide any partial attribute value to locate the web element.
It accepts two parameters the first one is the attribute of the tag must validate to locate the web element and the second one is the value of an attribute is a partial value that the attribute must contain.
Syntax:
Xpath = //tagname[contains(@attribute,’value’)]
Example:
//input[contains(@name,’username’)]
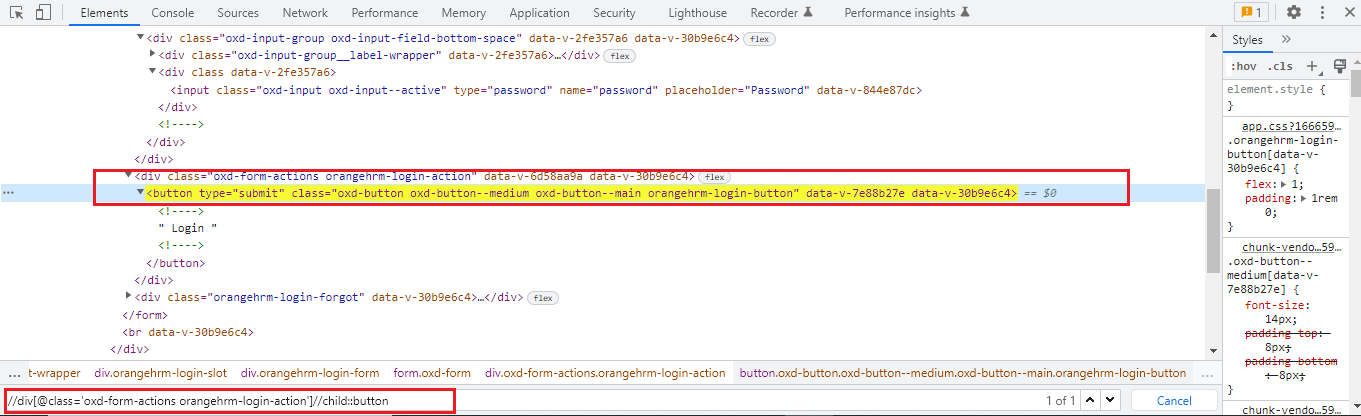
c. text() Function:
text() Function:
The text() function is used to locate web elements with exact text matches.
The function only works if the element contains the text.
This method returns the text of the web element when identified by the tag name and compared it with the value provided on the right side.
Syntax:
Xpath = //tagname[text()=’Actual text present’]
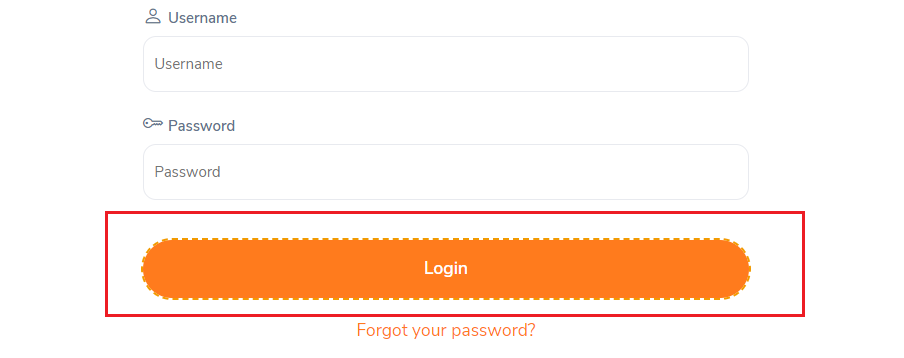
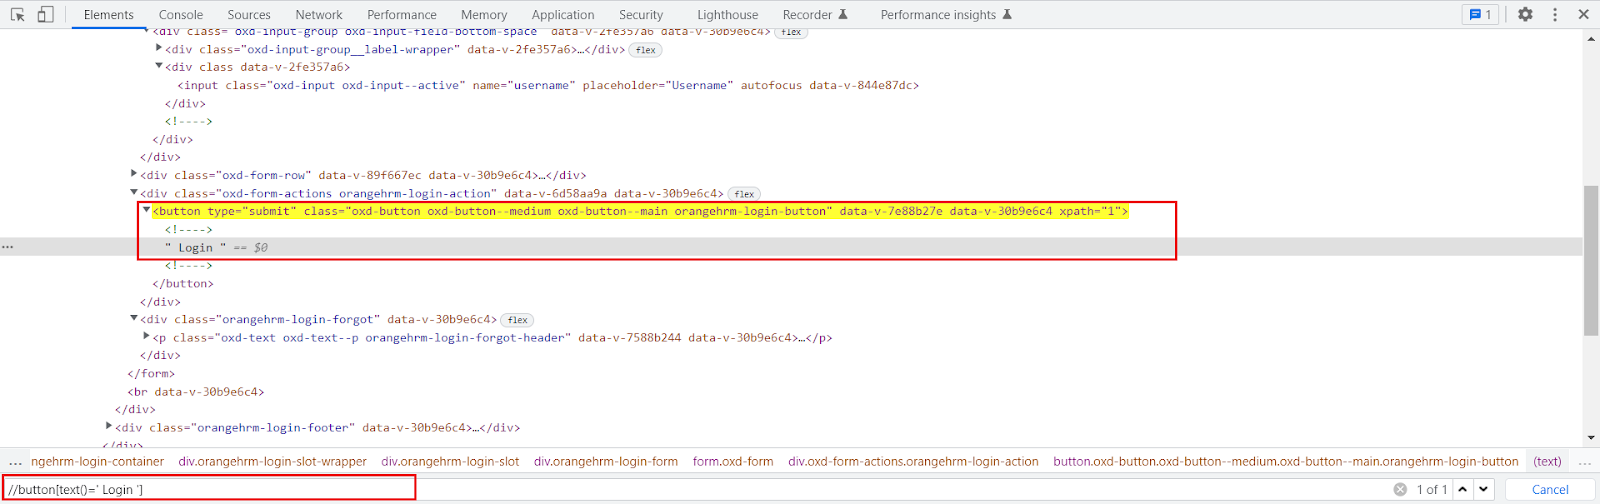
Example:
//button[text()=’ Login ‘]
How to use AND & OR in XPath:
AND & OR expressions can also be used in selenium Xpath expressions. Very useful if you want to use more than two attributes to find elements on a webpage.
The OR expression requires two conditions and it will check whether the first condition in the statement is true if so then it will locate that web element and if not then it will go for the second condition and if that is true then also it will locate that web element. So, here the point we should remember is that when we are using the OR expression at least either of two of the conditions should be true then, and then only it will find and locate that web element.
Syntax:
Xpath = //tagname[@attribute=’Value’ or @attribute=’Value’]
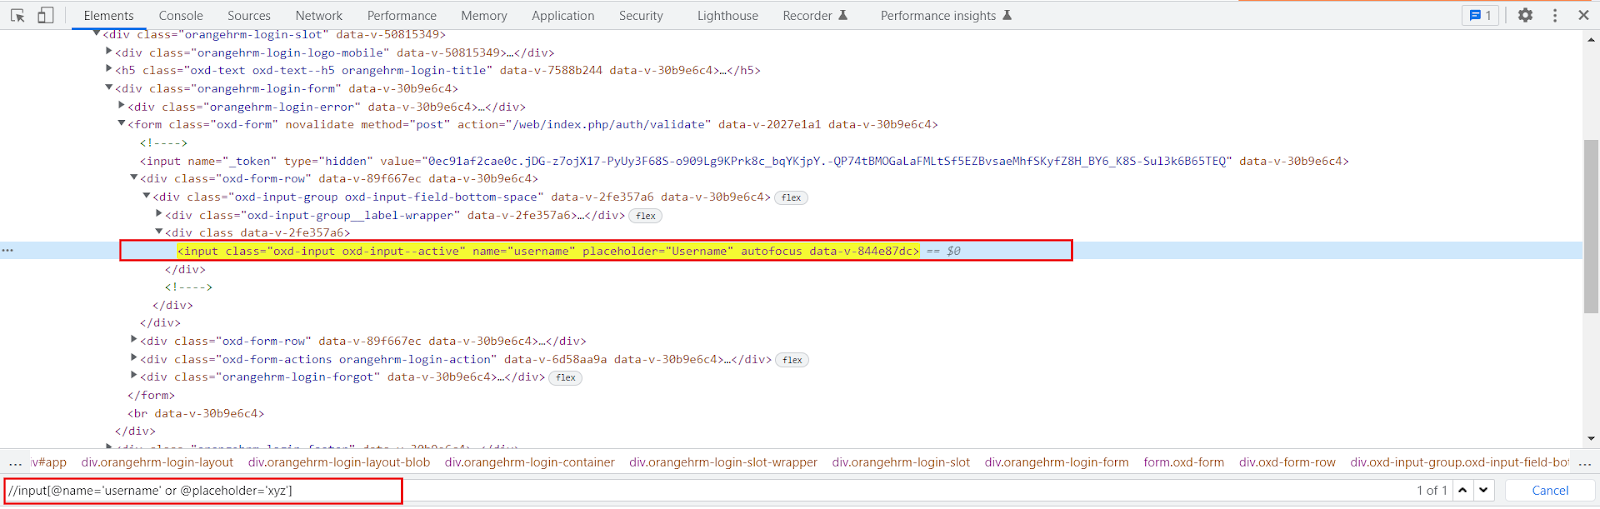
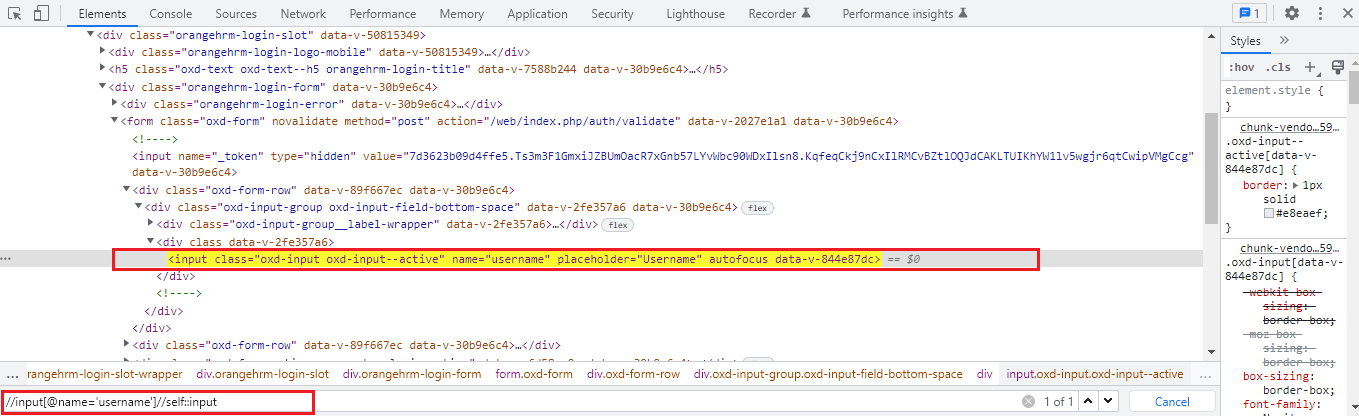
Example:
//input[@name=’username’ or @placeholder=’xyz’]
Here the first condition is true and the second one is false still the web element got located.
Just like the OR expression the AND expression also requires two conditions but the catch here is that both the provided condition must be true then and then only the web element will get located. If either of the conditions is false then it will not locate that web element.
Syntax:
Xpath = //tagname[@attribute=’Value’ and @attribute=’Value’]
Example:
//input[@name=’username’ and @placeholder=’Username’]
In this case, both the condition provided for an AND expression is true hence the web element got located.
XPath Axis:
It is a method to identify those dynamic elements that are impossible to find by normal XPath methods. All the elements are in a hierarchical structure and can be either located using absolute or relative Xpaths but it provides specific attributes called XPath axis to locate those elements with unique XPath expressions. The axes show a relationship to the current node and help locate the relative nodes concerning the tree’s current node. The dynamic elements are those elements on the webpage whose attributes dynamically change on refresh or any other operations. The HTML DOM structure contains one or more element nodes and they are known as trees of nodes. If an element contains the content, whether it is other elements or text, it must be declared with a start tag and an end tag. The text defined between the start tag and the end tag is the element content.
Types of XPath Axis:
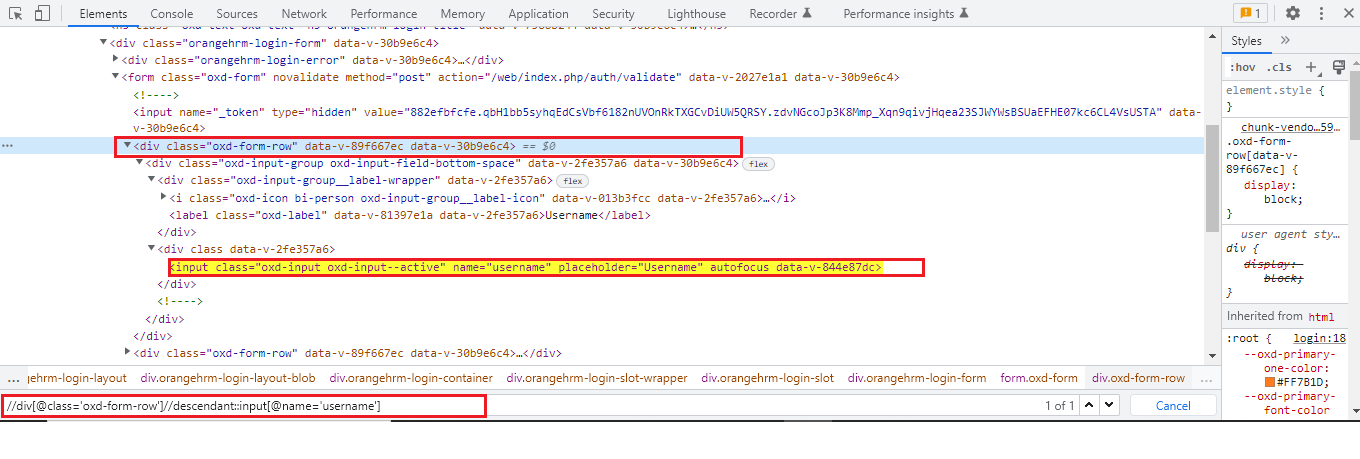
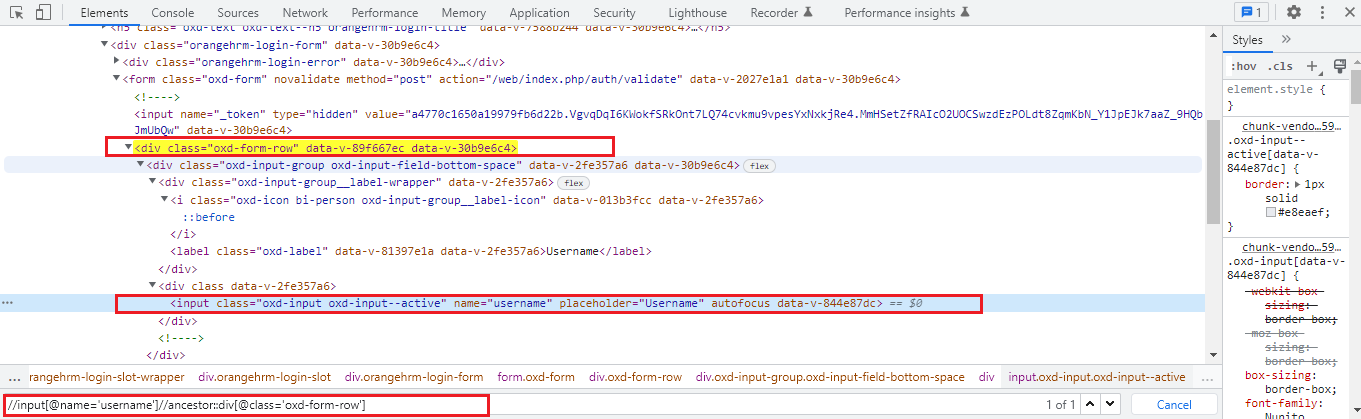
1. Parent Axis XPath:
With the help of the parent axis XPath, we can select the parent of the current node. Here, the parent node can be either a root node or an element node. The point to consider here is that for all the other element nodes the maximum node the parent axis contains is one. Also, the root node of the HTML DOM structure has no parent hence the parent axis is empty when the current node is the root node.
As we have seen using the parent axis XPath actually we are creating an XPath by the following bottom-up approach but here in the child axis case, we are going to follow the top-down approach to create an XPath. The child axis selects all the child elements present under the current node. We can easily locate a web element as a child of the current node.
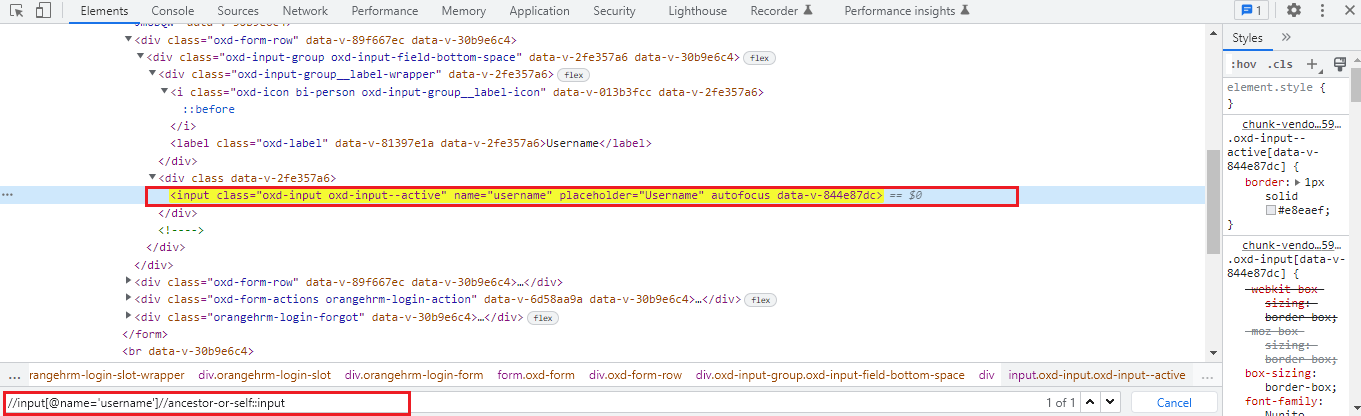
This type of XPath uses its own current node and selects the web element belonging to that current node. You will always observe only one node that represents the self-web element. The tag name we provide at the start and at the end of XPath are the same as they are on the self-axis of the current node. However, this provides the confirmation of the element present when there is more than one element present having the same value and attribute.
Using this axis we can select the current node and all its descendants i.e. child, grandchild, etc just like a descendant axis. The point to be noticed here is the tag name for descendants and self are the same.
As we understand how the descendant axis works now, the ancestor axis works exactly opposite to that of the descendant axis. It will select or locate all ancestors elements i.e. parent, grandparent, etc of the current node. This axis contains the root node too.
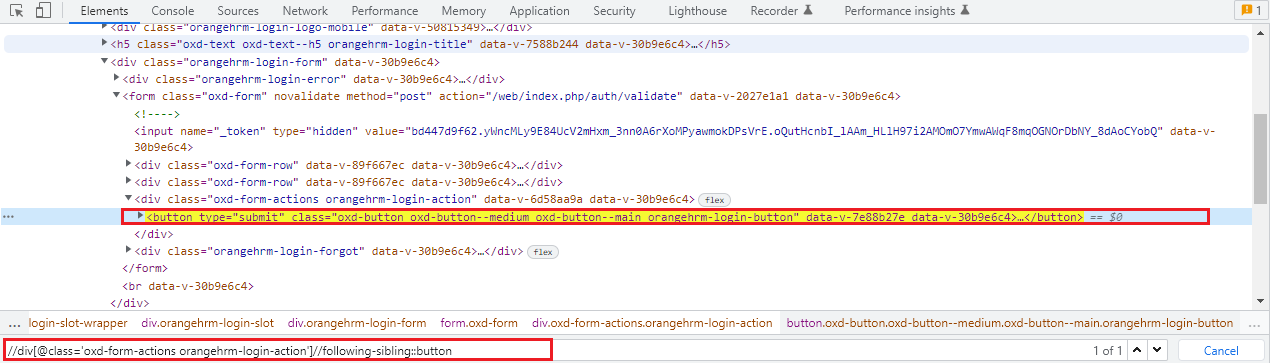
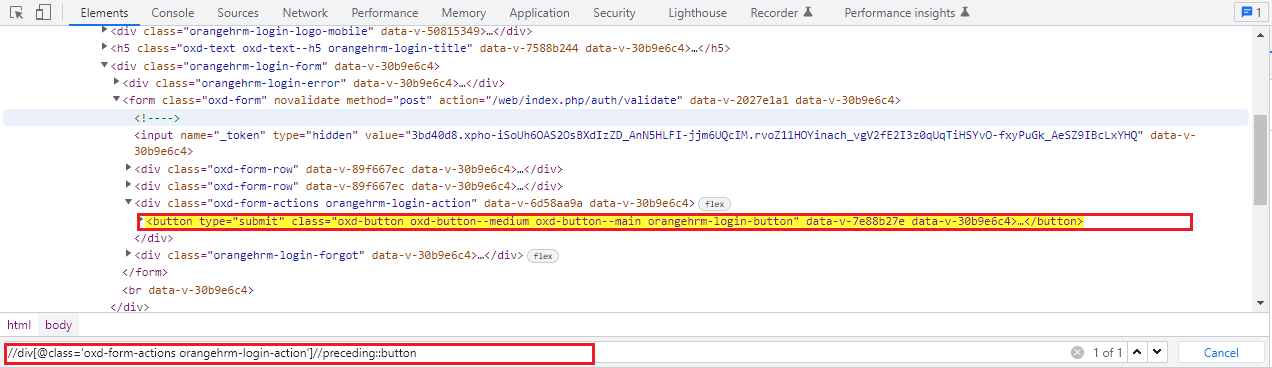
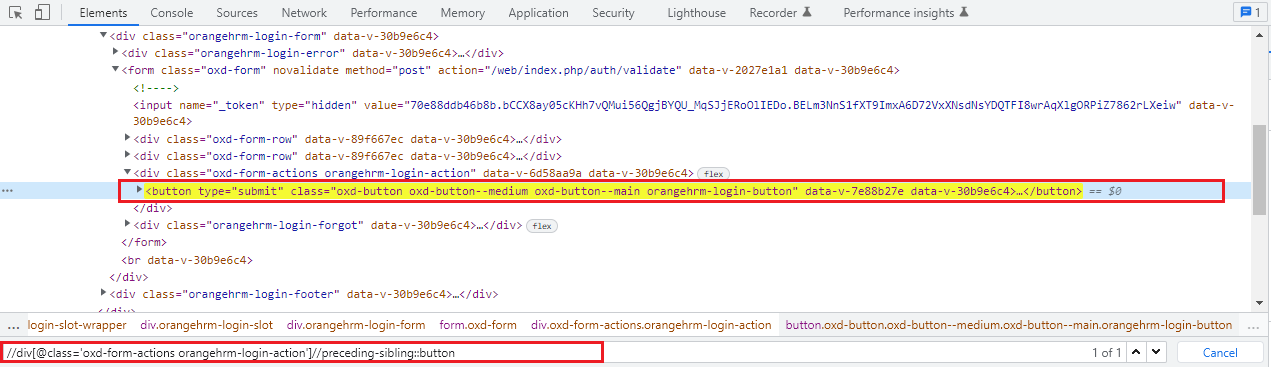
Using the following sibling axis method we can select all the nodes that have the same parent as that of the current node and that appear after the current node.
Using the following sibling axis method we can select all the nodes that have the same parent as that of the current node and that appear before the current node. It works opposite to that of the following sibling axis XPath.
You can try all of these examples mentioned above with the Orange HRM Demo website here.
Conclusion:
In conclusion, XPath is an essential tool for web automation testing when using Selenium, Playwright, and Cypress. It allows for more flexibility and specificity in locating elements on a web page. Understanding the different types of XPath expressions and how to use them can greatly improve the efficiency and effectiveness of the automation testing process. It can be particularly useful in situations where elements do not have unique CSS selectors, or when the structure of the HTML changes frequently. With the knowledge of XPath, you can write more robust and stable automation tests.
An SDET Engineer with hands-on experience in manual, automation, API, Performance, and Security Testing. The technologies I have worked on include Selenium, Playwright, Cypress, SpecFlow, Cucumber, JMeter, K6, OWASP ZAP, Appium, Postman, Maven, Behave, Pytest, BrowserStack, SQL, GitHub, Java, JavaScript, Python, C#, HTML, CSS. Also, I have hands-on experience in CI/CD the technologies I have used for CI/CD include Azure DevOps, AWS, and Github. Apart from this, I like to write blogs and explore new technologies.
Most of us are familiar with API testing tools like Postman, SoapUI, etc, and API automation libraries like RestAssured and Karate to automate API test cases. A recent entrant in this category is Playwright. The playwright is an Automation Tool provided by Microsoft. It provides cross-browser testing using which we can perform testing on multiple browsers like Chromium, Webkit, Firefox, etc. playwright supports cross-language testing (Java, Node.js, Python, .NET, etc.). However, very few of us know that it can actually do an API Test automation of methods GET, PUT, POST, and DELETE. Let’s see how it can be done.
Can we perform API testing using Playwright?
The playwright provides inbuilt support for API testing that’s why we don’t need any external libraries to handle API. The playwright doesn’t use any browser to call API. It sends requests using Node.js which provides faster execution.
In this tutorial, we will explore basic API methods with the help of Playwright- java. Below are the Four methods.
GET
POST
PUT
DELETE
Pre-requisite:
To get started with API automation with playwright-java first we need playwright to be installed in your system, to do this we can simply add the following dependency in the pom.xml file.
Along with the playwright, we have to add Testing and JSON dependencies.
Now let’s see how we can start API automation testing with Playwright-java.
1. GET:
By providing an API endpoint we can read data using a GET request. We must pass a few parameters to get the required data from the API.
We can verify the request by asserting the Response Code. The response code for a successful GET Request is 200. You can also assert a text inside the JSON body response.
For Example, I am using postman here to send a GET request to ” ‘/api/users/4’ endpoint of a sample API URL ‘https://reqres.in’
The below code shows the implementation of the GET method through Playwright.
To verify the response data we are parsing the response to JSON Object so that we can verify specific key-value pairs.
2. POST:
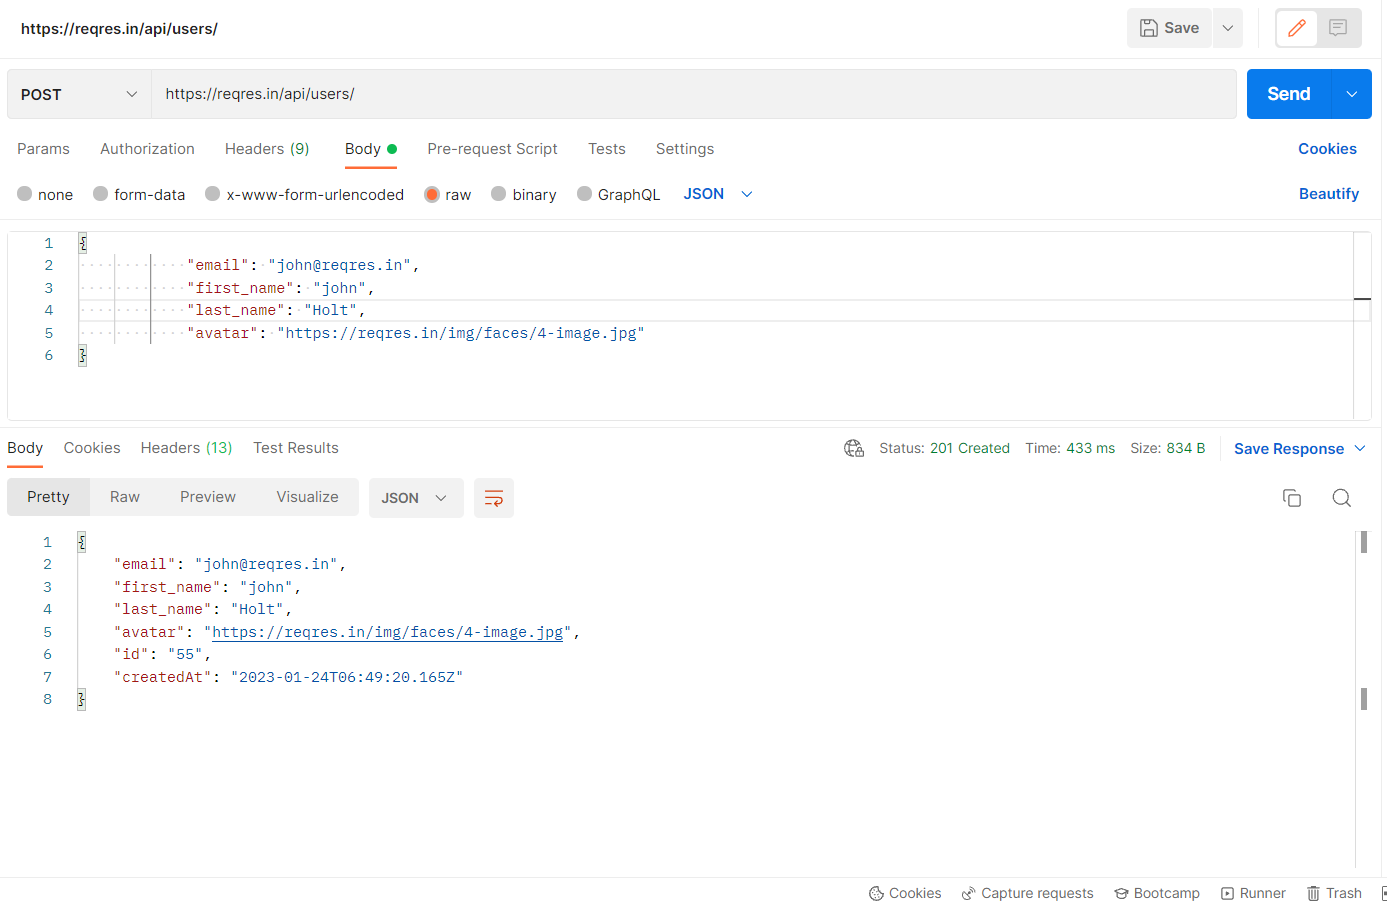
POST method is used to add a new record via API where we have to pass data as payload ex. first name, last name, etc. The response code for a successful POST Request is 201.
For example, I am sending a POST request to ‘/api/users/’ endpoint with base URL ‘https://reqres.in‘ and the body as given below in the screenshot:
To pass the data payloads to the POST/PUT method, first, we have to create a POJO class which will help to create methods to get and set payloads. below we have created a POJO class employee which will help to get and set data to both POST and PUT calls.
public class Employee {
// private variables or data members of pojo class
private String email;
private String first_name;
private String last_name;
private String avatar;

public String getEmail() {
   return email;
}
public void setEmail(String email) {
   this.email = email;
}
public String getFirstName() {
   return first_name;
}
public void setFirstName(String firstName) {
   this.first_name = firstName;
}
public String getLastName() {
   return last_name;
}
public void setLastName(String lastName) {
   this.last_name = lastName;
}
public String getAvatar() {
   return avatar;
}
public void setAvatar(String avatar) {
   this.avatar = avatar;
}
}
The below code will help you with the POST method through Playwright.
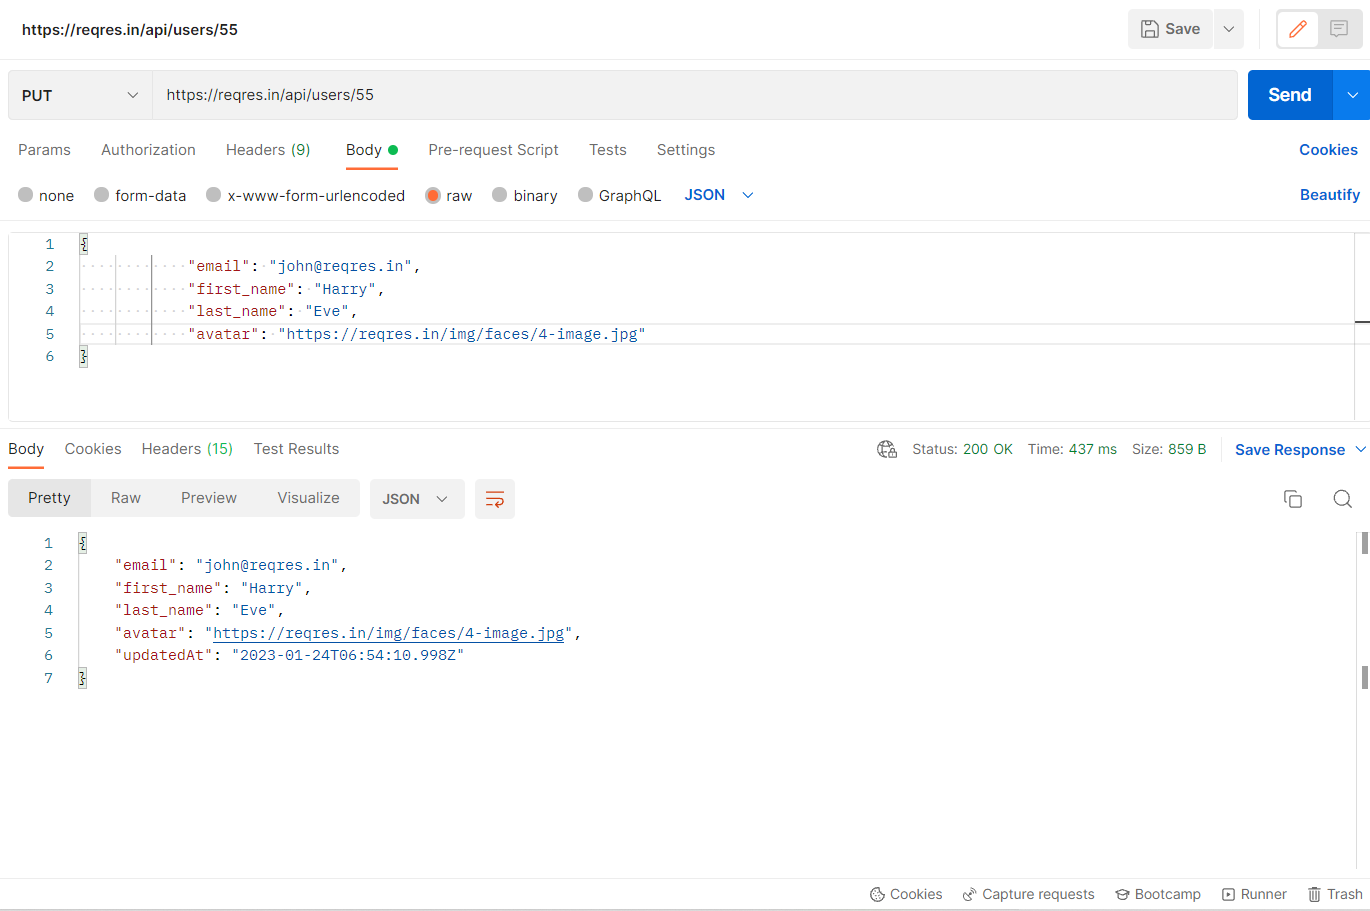
PUT Request is used to update the existing records via the API. we have to pass the data we want to update as a payload ex. first name, last name, etc. The response code for a successful PUT Request is 200.
For example, I am sending a POST request to ‘/api/users/55’ endpoint with the base URL ‘https://reqres.in’ and the body as given below in the screenshot:
The below example shows the implementation of the PUT method. We need to use the above POJO class to pass the data as a payload to the PUT call.
We can delete existing records using the API by using DELETE Request. Ideally, you must have added a record before you delete it. Hence you would need to append an ID to the DELETE URL. To delete the record using API first we need to pass the record URI (Universal Resource Identifier). The response code for a successful DELETE Request is 200.
For example, I am sending a POST request to ‘https://retoolapi.dev’ endpoint with base URL ‘/3njSPM/calc/43’ and the body as given below in the screenshot:
Following is the code for the DELETE method in Playwright
After performing a DELETE call we can perform a GET call on the same endpoint to verify data is actually deleted. For this GET call, we will get response code 204 as the content is not found.
GET, PUT, POST, and DELETE are the basic CRUD API methods used in any Web application. With the help of the inbuilt functionalities of Playwright, API Automation Testing became much easier and faster.
Priyanka is an SDET with 1+ years of hands-on experience in Manual, Automation, and API testing. The technologies she has worked on include Selenium, Playwright, Cucumber, Appium, Postman, SQL, GitHub, and Java. Also, she is interested in Blog writing and learning new technologies.
Hello! In this blog, I will be exploring how to automate tests using Taiko with Cucumber in JavaScript. The Taiko tool is easy to automate and is very reliable, and it works faster to execute and run test cases. It is a user-friendly tool as well.
What is Takio?
A Taiko is an automation tool that is available for free and it is an open-source browser automation tool. It is built by the ThoughtWorks team. It uses the Node.js library to automate the chrome browser. Taiko is very useful to create maintainable and highly readable JavaScript tests.
Taiko Features:
The Taiko was explicitly built to test modern web applications.
The features of Taiko that set it apart from other browser automation solutions are listed below.
Easy Installation
Interactive Recorder
Smart Selectors
Handle XHR and dynamic content
Request/Response stubbing and mocking
We can use Taiko on three platforms:
Windows
macOS
Linux
How to install Taiko?
A Taiko is available on npm: You can use the following NPM command to install the taiko on your system.
npm install -g taiko
What is cucumber?
A Cucumber is a testing tool that allows BDD. It offers a way to write tests that everyone, regardless of technical ability, can follow. Before developers build their code in BDD, users (business analysts, product owners) first write scenarios or acceptance tests that describe the system behavior from the perspective of the customer. Such scenarios and acceptance tests then are reviewed and approved by the product owners.
How to install Cucumber?
Basically, cucumber is available on npm: You can use the following NPM command to install the cucumber on your system.
npm install --save-dev @cucumber/cucumber
Getting Started
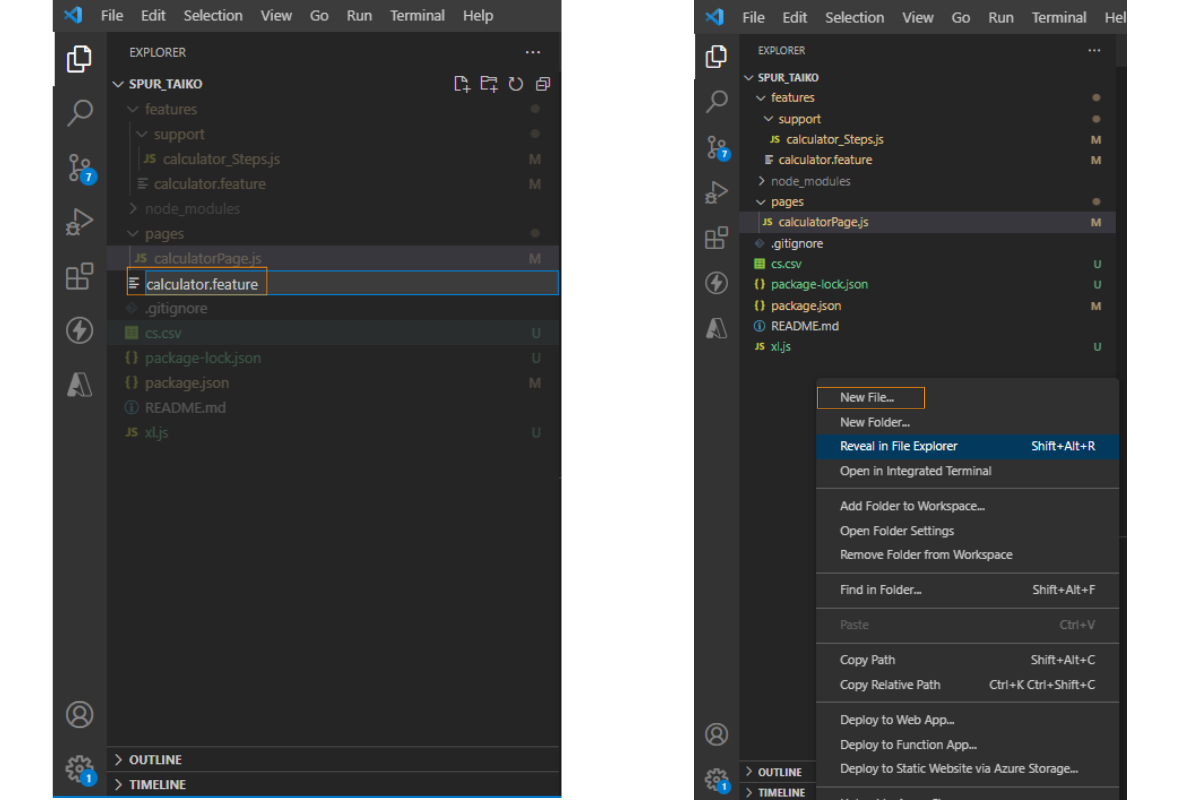
We will be using Visual Studio code to write our test automation code in JavaScript. We will create a feature file first, then click on the left side of the panel and choose “new file” from the menu that appears. Give a file name after that, such as the Calculator. feature
I’ll start out by introducing the Taiko framework, which integrates BDD and Cucumber. You will be guided through the code in the next step.
Feature: Calculator operations
  @smoke
  Scenario: Addition of 2 numbers
    Given I launch calculator application
    When I click on number 2
    And I click on operator +
    And I click on number 2
    Then I verify the result is 4
I’ll describe how to automate the calculator page in this place. The code shown below builds calculator steps where we must import statements provided by cucumber before navigating to the support folder.
After that, we can import the cucumber and assertion statements and that will build a page where all the steps are generally placed.
Basically, this is the step definition file where we need to map the feature file steps and call methods declared in the page file.
After that, we have to import the page file in the step definition file. And we need to call the methods declared in the page file.
Following is the code snippet for the step definition file.
const { Given, When, Then } = require('@cucumber/cucumber')
const calculate = require('../../pages/calculatorPage')
Given('I launch calculator application', async function () {
  await new calculate().launch()
})
When('I click on number {string}', async function (num) {
  await new calculate().click_number(num)
})
When('I click on operator {string}', async function (num) {
  await new calculate().click_operator(num)
})
Then('I verify the result is {string}', async function (num) {
  await new calculate().verify_result(num)
})
Now let’s create a page(We are using Page Object Model (POM) structure here) file where we have to declare the class and all the methods cleaning in step definitions.
And, In the above code snippet, methods contain actions like opening the browser, visiting a website, CSS selectors and actions to be performed on it (click), and Assertions. You may notice that we are doing open browser and close browser actions into this page file itself which is not the best practice. You can move it to Before/After hooks and create a nice framework. However, that is for a later blog 🙂
So, to execute the test case, you can run the following command from the terminal.
npx cucumber-js --publish
Happy testing !!!
Conclusion:
We can automate tests using taiko with Cucumber with JavaScript very easily. Taiko is a very powerful tool and easy to implement. It will definitely compete with Selenium and Playwright in the coming years.
By profession an Automation Test Engineer, Having 3+year experience in Manual and automation testing. Having hands-on experience in Cypress with JavaScript, NodeJS. Designed automation web framework in Cypress, Webdriver.io, Selenium with jest in JavaScript. He loves to explore and learn new tools and technologies.