Starting from September 30th, 2023, Selenium will no longer provide support for Java 8. Instead, the minimum supported version of Java will be Java 11. For the official announcement from Selenium, please refer to this link:
Selenium has supported Java for a long period. Java 8 reached the end of active support about a year ago as you can see below the details of version support.
The default of Selenium has not had a major release in several years and also a bug has been found that cannot be fixed. So the decision was made to move to the native Java HTTP client which requires using Java 11 or greater version. So instead of upgrading to the latest Java for now Java 11 will be a cautious step to move forward. In this blog, we will explore how to achieve that with minimal changes.
Download and Install Java 11:
First, you need to download the exe file for the JDK 11 version. For that, you can visit the link provided below: https://www.oracle.com/in/java/technologies/javase/jdk11-archive-downloads.html You can get it by signing in to the Oracle which is free. You will have various file types to download. For the exe file, you can refer below image.
After completing the download you proceed with the installation process.
For the installation, you can follow the below steps shown in screenshots. Then the installation process will be completed.
After completing the installation of Java 11.
You will find the file below in your system at the following path: C:\Program Files\Java.
So now you have successfully installed Java 11.
Setting Up Environment variable:
The next step is to set up the environment variable. To do that, simply navigate to the Environment Variable.
Settings > About > Advance System Settings > Environment Variables
As you can see in the image above, I have successfully updated the JAVA_HOME path with the latest JDK version. Additionally, don’t forget to update the path variable with the latest “bin” folder.
So now start your command prompt by executing the java -version command. You will get to see the latest updated version of Java.
We have now installed Java 11 and configured the Environment Variables.
Update Existing project on the latest installed Java version which is Java 11:
So for now we’ll see how we can update the existing Java 8 project to Java 11
So you must have a pom.xml file present in your existing project framework.
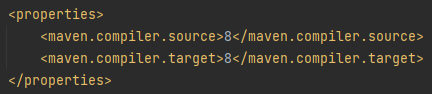
Before:
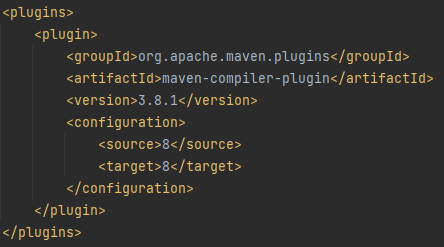
After:
As you can see the source and target in the above snapshots are version 8. Here you can update the version of the java with latest 11 as we have downloaded and installed Java 11. So after updating the 8 with 11, you have to rebuild the pom.xml project as well. After that, you will see the successfully updated Java version to 11. This is how you need to update your Java version to 11.
Swapnil is an SDET with 1+ years of hands-on experience in Manual, Automation, and API testing. The technologies I have worked on include Selenium, Playwright, Cucumber, Appium, Postman, SQL, GitHub, Java, and Python. Also, I love Blog writing and learning new technologies.
Faster App Deployment: Manual testing can be time-consuming and resource-intensive when it comes to identifying bugs in code. Mobile automation testing reduces the time and effort required by using automation tools. These tools enable quick checks to ensure the code performs as desired, leading to a faster feedback loop and accelerated app deployment.
Improved Efficiency: With automated testing, there is no need for human intervention. Tests can be scheduled to run overnight, and results can be collected the next morning. By automating the testing process, app developers and QA teams can spend less time on testing and focus more on other critical tasks. This boosts overall productivity and efficiency.
Precision in Testing: Mobile automation testing is more reliable than manual testing, which is prone to human errors. Automated tests produce precise and consistent results, reducing the likelihood of bugs. Test cases generated by automated systems enhance reliability and minimize the probability of errors when launching the app.
Real-time Feedback: Automated testing provides instant feedback. Tests run quickly, and test reports are generated immediately. This enables developers to promptly address any malfunctions or issues detected during the testing process. Real-time feedback helps in identifying and resolving problems swiftly, ensuring app quality.
Cost Savings: Contrary to common misconception, automated testing is more cost-effective than manual testing. Manual testing can be repetitive and monotonous, leading to increased chances of human error. Automation increases testing speed and accuracy, reducing the need for extensive manual intervention. Once the automated testing scripts are developed, they can be reused 24/7 without incurring additional costs.
What is WebDriver.io?
WebdriverIO is an open-source testing automation framework written in JavaScript and running on NodeJS. Next-gen browser and mobile automation test framework for Node.js
Why Webdriver.IO?
WebdriverIO is a progressive automation framework built to automate modern web and mobile applications. It simplifies the interaction with your app and provides a set of plugins that help you create a scalable, robust, and stable test suite.
Features of WebDriver.io:
Easy to Set up: WebdriverIO follows a simple setup process. Just install node packages using npm and start testing
Customization: WebdriverIO is highly extendable so users can customize the framework as they need
Cross-Browser Testing: WebdriverIO supports multiple browsers such as Chrome, Edge, Firefox, Internet Explorer, and Safari.
Native Mobile Application Testing: WebdriverIO framework can be extended to test native mobile applications.
Multiple Tab/Window Support: WebdriverIO Supports switching to and from various windows and tabs.
iFrame Support: WebdriverIO doesn’t restrict in terms of iFrame. Testers can automate iframe-based scenarios using simple web driver commands.
Reporters: WebdriverIO supports more than dozens of reporters.
Testing Framework/Assertions: WebdriverIO supports Mocha, Jasmine, and Cucumber test frameworks.
Parallel Testing: Testers can configure WebdriverIO to launch multiple instances and execute tests parallelly.
Screenshots: WebdriverIO can be configured to take screenshots for tests.
Video: Though WebdriverIO doesn’t support video recording out of the box it can be configured to do so.
Pipeline Integration: WebdriverIO tests can be integrated into CI Systems like Jenkins, Azure, etc.
Selectors: It supports various types of selectors including CSS and Xpath.
Page Object Pattern: WebdriverIO Framework can be easily configured to Page Object Model.
File Upload and Download: WebdriverIO supports File Upload and Download features.
Mobile Automation with WebDriver.io: This enables code usage between iOS, Android, and Windows test suites. It runs on iOS and Android applications using the WebDriver protocol.
Requirement For Mobile Automation using webdriver.io:
Pre-Setup
Installation & Configuration
Install the latest stable version of Android Studio from https://developer.android.com/studio
Then Install android-platform-tools from CLI
Install JDK’s latest stable version from here https://www.oracle.com/java/technologies/javase-jdk16-downloads.html
Download the latest stable version of VS Code from https://code.visualstudio.com/download
Install the latest version of Allure for Report Generation from https://docs.qameta.io/allure/
Download and install the latest LTS Node.js – https://nodejs.org/en/download
Install Following Dependencies
Commands to install the dependencies
npm i @wdio/allure-reporter
npm i @wdio/appium-service
npm i @wdio/browserstack-service
npm i @wdio/cli
npm i @wdio/cucumber-framework
npm i @wdio/local-runner
npm i @wdio/mocha-framework
npm i chromedriver
npm i wdio-chromedriver-service
npm i ts-node
npm i webdriverio
npm i allure-commandline
npm i appium
In WebDriver.io, the config file (wdio.conf.js) is a crucial component used for configuring and customizing the test execution environment. It allows you to define various settings, options, and capabilities for your WebDriver.io tests. The config file acts as a central configuration hub for your test suites and provides flexibility in managing different test environments and setups.
Here are some common uses of the config file in WebDriver.io:
Specifying Test Framework and Reporter:
You can define the test framework (e.g., Mocha, Jasmine) and the reporter (e.g., Spec, Dot, Allure) for your test runs. This ensures that the tests are executed using the desired framework and provides appropriate reporting formats.
Defining Test Files and Suites:
You can specify the test files or directories containing the test files to be executed during a test run. Additionally, you can define test suites, which allow you to group related tests together for organized execution.
Configuring Test Environments:
The config file allows you to configure different test environments (e.g., local, remote, cloud-based) and set the desired capabilities for each environment. This includes specifying the browser or device to be used, browser version, operating system, and other relevant configurations.
Managing Selenium Grid and WebDriver Services:
If you’re using a Selenium Grid or WebDriver service, the config file lets you configure the connection details and capabilities for these services. You can specify the host, port, and other relevant configurations for connecting to the grid or service.
Defining Hooks and Lifecycle Events:
WebDriver.io provides hooks and lifecycle events that allow you to execute code at specific points during the test execution cycle. The config file lets you define these hooks, such as before and after hooks, to perform setup and teardown actions or customize test behavior.
Setting Timeout and Retry Options:
You can configure timeout values for various actions, such as test execution, page loading, and element interactions. Additionally, you can define retry options, which specify the number of times a test should be retried in case of failures.
Integrating with Test Services and Frameworks:
WebDriver.io supports integration with various test services and frameworks, such as Appium, Sauce Labs, and Cucumber. The config file allows you to set up and configure these integrations, enabling seamless usage and interaction with these services.
By utilizing the config file effectively, you can streamline and tailor your WebDriver.io test runs according to your specific requirements. It provides a flexible and centralized approach to managing test configurations, environments, and other essential aspects of your test automation setup.
Prerequisites for the Android Studio:
To use Android Studio, you will need to ensure that your system meets the following prerequisites:
Operating System:
Android Studio is compatible with Windows, macOS, and Linux operating systems. Make sure you have a supported version of the operating system installed on your computer.
Java Development Kit (JDK):
Android Studio requires a compatible version of the JDK to be installed. It is recommended to use the latest stable version of JDK. Currently, Android Studio supports JDK 8 or higher. You can download the JDK from the Oracle website or use OpenJDK.
System Requirements:
Android Studio has certain hardware requirements to function optimally. The exact specifications may vary depending on the version and updates of Android Studio, but generally, you should have:
Android SDK:
Android Studio requires the Android SDK (Software Development Kit) to develop and test Android applications. The SDK provides libraries, APIs, and tools necessary for app development. Android Studio includes a bundled version of the Android SDK, which you can install during the Android Studio installation process. Alternatively, you can download the SDK separately and configure Android Studio to use it.
Emulator Requirements:
If you plan to test your apps on emulated devices, your system should meet the requirements for running the Android Emulator. This includes having an Intel or AMD processor with virtualization extensions enabled in the BIOS settings.
Internet Connection:
An internet connection is required during the installation and setup process of Android Studio. It is necessary to download additional components, SDK packages, and updates. It’s important to note that the specific requirements and recommendations may change with different versions of Android Studio. It’s always a good practice to refer to the official documentation and system requirements provided by Google for the most up-to-date information before installing Android Studio.
What is use tsconfig.json:
The tsconfig.json file is used in TypeScript projects to configure the TypeScript compiler (tsc) and specify the compilation settings for your TypeScript code. It provides a way to customize the behavior of the TypeScript compiler and control how your TypeScript files are transpiled into JavaScript.
key uses and features of the tsconfig.json file:
Compiler Options:
The tsconfig.json file allows you to define various compiler options to specify how the TypeScript compiler should handle your code. These options include target ECMAScript version, module system (e.g., CommonJS, ES modules), output directory, source map generation, strictness level, and more. You can tailor these options to match the requirements of your project and the desired JavaScript output.
File Inclusion and Exclusion:
Using the include and exclude properties in tsconfig.json, you can specify the files or directories to include or exclude from the TypeScript compilation process. This helps you define the scope of compilation and avoid unnecessary collection of files that are not part of your project.
Module Resolution:
TypeScript supports different module resolution strategies (e.g., Node.js, Classic) for resolving module imports in your code. The tsconfig.json file allows you to specify the desired module resolution strategy using the module resolution compiler option.
Type Checking and Error Reporting:
TypeScript provides powerful type-checking capabilities. The tsconfig.json file enables you to configure the level of type-checking strictness using options like strict, noImplicitAny, strictNullChecks, and more. By adjusting these options, you can control the rigor of type checking and the level of error reporting during compilation.
Project References:
With the tsconfig.json file, you can set up project references, which enables you to organize your TypeScript code into multiple smaller projects and manage their dependencies. Project references allow you to compile and reference TypeScript code across projects and enforce dependencies between them.
Extended Configuration Inheritance:
The tsconfig.json file supports extending and inheriting configurations from base configuration files using the extends property. This allows you to define a common set of compiler options in a base configuration file and override or extend them in specific project configurations.
IDE and Tooling Integration:
IDEs and development tools, such as Visual Studio Code and other TypeScript-aware editors, use the tsconfig.json file to provide features like IntelliSense, code navigation, error highlighting, and build integration. The configuration file helps tools understand the project structure, dependencies, and compilation settings, enhancing the development experience.
The tsconfig.json file serves as a central configuration file for TypeScript projects, enabling you to customize and fine-tune the TypeScript compilation process according to the needs of your project. It helps maintain consistency, improves code quality, and ensures smooth integration with development tools and workflows.
In Behavior-Driven Development (BDD), feature files, step files, and page files are essential components used to describe and implement the behavior of a software system. BDD focuses on collaboration and communication between developers, testers, and stakeholders by using a common language that is easily understandable by all parties involved.
Feature file Step Definition and Page object file:
Feature Files:
A feature file is a textual representation of a software feature or functionality. It typically describes the behavior of a specific feature from a user’s perspective. Feature files are written using a plain-text format, often in the Gherkin syntax. They are used to capture high-level scenarios, user stories, and acceptance criteria in a structured manner. Feature files serve as a communication tool between stakeholders, developers, and testers to ensure a shared understanding of the system’s behavior.
Step Files:
Step files, also known as step definitions or step implementations, are code files that provide the actual implementation of the steps described in the feature files. Each step in a feature file is associated with a corresponding step definition in the step files. Step files are written in a programming language (such as JavaScript, Java, Ruby, etc.) and contain the logic and actions to be performed for each step. They connect the feature files with the underlying codebase and define the behavior of the system in response to the steps described in the feature files.
Page Files:
In the context of BDD test automation, page files represent the Page Object Model (POM) or similar abstraction that represents the user interface (UI) elements and actions of a web application. Page files provide a structured way to define and manage the UI elements, such as buttons, forms, input fields, etc., along with associated methods for interacting with those elements. They encapsulate the UI interactions and provide reusable methods to perform actions on the web application’s pages. Page files enhance the maintainability and reusability of the test automation code.
In summary, feature files describe the behavior of a software feature in a structured, human-readable format. Step files provide the implementation of the steps described in the feature files, connecting them to the underlying codebase. Page files, specific to BDD test automation, represent a web application’s UI elements and actions, encapsulating the UI interactions and providing reusable methods. These files collectively enable collaboration, communication, and automated testing in a BDD approach.
Let’s See about Appium
Appium is an open-source tool for traditional automation, web, and hybrid apps on iOS, Android, and Windows desktop mobile platforms. Indigenous apps are those written using iOS and Android. Mobile web applications are accessed using a mobile browser (Appium supports Safari for iOS apps and Chrome or the built-in ‘Browser’ for Android apps). Hybrid apps have a wrapper around “web view”—a traditional controller that allows you to interact with web content. Projects like Apache Cordova make it easy to build applications using web technology and integrate them into a traditional wrapper, creating a hybrid application.
Importantly, Appium is “cross-platform”, allowing you to write tests against multiple platforms (iOS, Android), using the same API. This enables code usage between iOS, Android, and Windows test suites. It runs on iOS and Android applications using the WebDriver protocol.
Cucumber:
Cucumber is a tool for running automated tests written in plain language. Because they’re written in plain language, they can be read by anyone on your team. Because they can be read by anyone, you can use them to help improve communication, collaboration and trust in your team.
Android Emulator:
The Android Emulator simulates Android devices on your computer so that you can test your application on a variety of devices and Android API levels without needing to have each physical device. The emulator offers these advantages:
Flexibility: In addition to being able to simulate a variety of devices and Android API levels, the emulator comes with predefined configurations for various Android phones, tablets, Wear OS, and Android TV devices.
High fidelity: The emulator provides almost all the capabilities of a real Android device. You can simulate incoming phone calls and text messages, specify the location of the device, simulate different network speeds, simulate rotation and other hardware sensors, access the Google Play Store, and much more.
Speed: Testing your app on the emulator is in some ways faster and easier than doing so on a physical device. For example, you can transfer data faster to the emulator than to a device connected over USB.
In most cases, the emulator is the best option for your testing needs. This page covers the core emulator functionalities and how to get started with it.
Browser Stack:
BrowserStack is a cross-platform web browser testing tool that allows users to test their websites and mobile applications on different browsers and operating systems. It is available as a cloud-based service or as an on-premise solution. BrowserStack provides a range of features, including live testing, automated screenshots, and performance analysis. It is also compatible with a number of popular testing frameworks, such as Selenium, WebDriver, and Protractor. BrowserStack is a paid service, but it offers a free trial for new users.
Create a sample Appium Project:
initialize a project and create the package. json file
npm init -y
Install Dependencies
npm install
Install Webdriver.io
npm install -g webdriverio or npm install --save-dev webdriverio @wdio/cli
services: [
    [
      'appium',
      {
        // This will use the globally installed version of Appium
        command: 'appium',
        args: {
          // This is needed to tell Appium that we can execute local ADB commands
          // and to automatically download the latest version of ChromeDrive
          relaxedSecurity: true,
          address: '127.0.0.1/wd/hub',
          // Write the Appium logs to a file in the root of the directory
          log: './appium.log',
        },
      },
    ],
  ],
Install cucumber
$ npm install @cucumber/cucumber
Write your Feature File then, write your feature in features/calculator.feature
Feature: Mobile App Feature
Scenario: Verify user can perform addition operation on calculator
When User taps on fou
And User taps on +
And User taps on four
And User taps on equals
Then User Verify total is 8
Create a Step definition features/support/calc.ts
const { When, Then } = require('@cucumber/cucumber')
import { DemoPage } from '../page/DemoPage'
let Demo = new DemoPage()
When('User taps on four', async () => {
  await Demo.firstNumber()
})
When('User taps on +', async () => {
  await Demo.Add()
})
When('User taps on equals', async () => {
  await Demo.Equals()
})
Then('User Verify total is 8', async () => {
  await Demo.Verify()
})
Webdriver.io has great support for Mobile automation and using Webriver.io users can Quickly set up the Mobile automation framework.BDD helps Teams across Organizations to work collaboratively and helps non-tech teams to understand the flow of applications. Tools like Appium make mobile automation easy. combination of Webdriver.io cucumber appium and BrowserStack makes things more. Reliable and useful in modern Mobile automation testing.
By profession an Automation Test Engineer, Having 3+year experience in Manual and automation testing. Having hands-on experience in Cypress with JavaScript, NodeJS. Designed automation web framework in Cypress, Webdriver.io, Selenium with jest in JavaScript. He loves to explore and learn new tools and technologies.
The purpose of this blog is to provide a step-by-step guide on how to use Visual Studio Code for Java Selenium Automation as the Integrated Development Environment (IDE) for designing and running Selenium tests with Java. Visual Studio Code is a defacto IDE for JavaScript, however, it is rarely used for Java and Selenium automation as traditionally test automation engineers use either Eclipse or IntelliJ IDEA. Being one of the most widely used IDEs, software professionals prefer Visual Sstudio Code for its functionality.
Cross-platform support: Visual Studio Code can run on Windows, macOS, and Linux
IntelliSense: Visual Studio Code provides intelligent code completion and error detection, making it easier to write and debug code
Built-in Git integration: Visual Studio Code provides built-in support for Git, allowing you to easily version control your projects
Extensible with plugins: Visual Studio Code has a large community of developers who have created a variety of plugins to enhance the functionality of the IDE.
Fast and lightweight: The design of Visual Studio Code focuses on being fast and lightweight, making it easy to use on lower-end hardware.
Free and open-source: Visual Studio Code is free and open-source, making it accessible to everyone.
Debugging and testing: Visual Studio Code has built-in support for debugging and testing, making it easier to identify and fix bugs in your code.
Customization: You can customize Visual Studio Code with themes, keybindings, and settings, allowing you to tailor the IDE to your needs.
Here’s what you’ll need to get started with using Visual Studio Code for Java Selenium Automation:
Once you’ve installed these components, you can create a new Java project in Visual Studio Code and add the Maven libraries to it.
Following the installation of these parts, you can use Visual Studio Code to build a new Java project and add the Maven libraries to your project.
Steps to setup in Visual Studio Code for Java Selenium Automation:
Assuming Visual Studio Code is installed, let’s start the recipe step by step to create a flow for execution.
Step 1:
You need to open Visual Studio Code and locate the Marketplace.
Step 2:
Go to the search bar search for Java then Install the Extension pack for Java from the Marketplace.
Step 3:
Now, Navigate to the settings option in the lower left corner.
Step 4:
Select the command palette and look for the command create Java project.
Step 5:
Probably, here we start how to add a maven repository into the project to run the Java-Selenium test using Visual Studio Code. After selecting Create Java Project, select the “Maven” option to help you create the project.
Step 6:
After that, it will navigate to the browse folder and choose a specific folder to create your Java project. Please select a folder and open it in Visual Studio Code.
Step 7:
The screen below will appear; enter your project name and press “Enter” to open that project in Visual Sstudio Code.
Step 8:
Once you open the project, you will see the default folder structure displayed. To ensure code reusability, we create the following framework in Visual Studio Code.
Default Structure
Hybrid Framework folder structure
Hybrid Driven Framework is a combination of both the Data-Driven and Keyword-Driven frameworks. Here, we externalize the keywords, as well as the test data. Furthermore, Keywords are maintained in a separate Java class file and test data can be maintained either in a properties file/excel file/can use the data provider of a TestNG framework.
Step 9:
So, for adding Maven dependencies and how to download them
Maven is a tool for managing or building projects. When various test engineers incorporate their files into the same framework, they use it to check for compilation problems amongst framework components. Consequently, every time we make a change to the framework, we update the build status and continuously maintain the monitor, framework components, or build. As a result, there are no compilation errors in the framework, it will output a “build success” message; otherwise, it will output a “build failure” message.
Once you select Maven Project, it will create a Maven project with a pom.xml file. In the pom.xml file, you need to add the selenium dependency from the website https://mvnrepository.com/ and add it into dependency.
This dependency has been added to provide the libraries required to run the Selenium project. In a normal Selenium project, we need to download standalone libraries and then add them to external libraries, whereas here, once you add this Maven dependency, it will automatically download all libraries required for the Selenium project.
In a Maven project, you can use the Apache POI library by adding its dependency to your project’s pom.xml file. This will automatically download and include the library in your project’s classpath. Once you have added the dependency, you can start using the Apache POI APIs in your Java code to read, write, and manipulate Microsoft Office documents.
In a Maven project, you can add the Extent Reports dependency to your project’s pom.xml file to use its reporting functionality. Once you have added the dependency, you can start using the Extent Reports APIs in your Java code to create and generate detailed reports for your automation test results.
In a Maven project, you can add the TestNG dependency to your project’s pom.xml file to use its testing functionality. Once you have added the dependency, you can start using the TestNG annotations in your Java code to define your tests, test suites, and test configurations.
In a Maven project, you can add the Log4j dependency to your project’s pom.xml file to use its logging functionality. Once you have added the dependency, you can start using the Log4j APIs in your Java code to log messages to various output targets. You can configure Log4j using a configuration file such as log4j2.xml or log4j2.properties, which specifies the logging level, output target, and other logging settings.
Here, you need to run Java-selenium tests by using the pom.xml file, according to your demand and test requirements, Therefore, you can add more maven repositories.
1. Test/Java/example:
This folder contains the test source code packages and classes. Here, this contains all the data related to test cases, including page objects, base classes, and the test case class, which helps run the whole TestNG framework. However, this contains all the data related to test cases, including page objects, base classes, and the test cases class, which help run the whole TestNG framework.
Code Explanation in Demo example:
Login Page:
The base class in the main class will take care of browser setup, loading configuration files, and other reusable methods like screenshots, handling sync issues, and many more.
Using Base, we can avoid code duplication.
Reuse code as much as we can.
package com.example.Pages;
import org.openqa.selenium.WebDriver;
import org.openqa.selenium.WebElement;
import org.openqa.selenium.support.FindBy;
import org.openqa.selenium.support.PageFactory;

public class LoginPage {
    WebDriver driver;
    public LoginPage(WebDriver driver){
        this.driver = driver;
        PageFactory.initElements(driver, this);
    }

    @FindBy(id="email")
    WebElement usernameBox;

    @FindBy(id="passwd")
    WebElement passwordBox;

    @FindBy(name="SubmitLogin")
    WebElement SignInBtn;

    public void enterUsername(String uname){
        usernameBox.sendKeys(uname);
    }

    public void enterPassword(String upwd){
        passwordBox.sendKeys(upwd);
    }

    public void submitButton(){
        SignInBtn.click();
    }
}
Base Class:
@BeforeClass: The annotated method will be run before the first test method in the current class is invoked.
@AfterClass: The annotated method will be run after all the test methods in the current class have been run.
package com.example.TestCases;
import org.apache.log4j.Logger;
import org.apache.log4j.PropertyConfigurator;
import org.openqa.selenium.WebDriver;
import org.openqa.selenium.chrome.ChromeDriver;
import org.testng.annotations.AfterClass;
import org.testng.annotations.BeforeClass;
import com.example.Utilities.ReadConfig;
public class BaseClass {
    ReadConfig read = new ReadConfig();
    public String googlebaseurl = read.getGoogleBaseURL();
    public String loginbaseurl = read.getLoginBaseURL();
    public String uname = read.getUsername();
    public String upwd = read.getPassword();
    public String SuccessURL = read.getSuccessURL();
    public WebDriver driver;
    public Logger logger;
    @BeforeClass
    public void SetUp(){
        System.setProperty("webdriver.chrome.driver", "Drivers/chromedriver.exe");
        // WebDriverManager.chromedriver().setup();
        driver = new ChromeDriver();
        driver.manage().window().maximize();

        logger = Logger.getLogger("googledemo");
        PropertyConfigurator.configure("log4j.properties");
    }

    @AfterClass
    public void tearDown(){
        driver.quit();
    }
}
Test Class:
According to the below code, This class will help to run TestNG test cases and will give results. You can add third-party tools for generating reports as well such as extent reports, and Allure reports.
Basically, this folder is used to store browsers that will be required to run test cases on that specific browser. Whether it is Chrome, Edge, or Opera. Further includes driver information, where the Chrome Driver, Firefox, or Edge—whichever you’re comfortable with. Even you can use maven dependency for instantiating Webdriver. The WebDriverManager is a library that allows you to automate the management of WebDriver binaries. There are such as Chrome driver, gecko driver, etc. in your Java project.
3. Configuration:
The Above image implies that properties are used to externalize configurable data. Because if you put that data in your code (test script), you would need to build the code each time you wanted to modify the property’s value. As a result, the fundamental advantage of properties is that they may be modified at any time. And exist independently of your source code. Thus, a pair of strings is used to store each parameter, with one string serving as the key and the other as the value.
You can see the folder structure, where the configuration folder contains a config file that includes all the common information required to run a test.
4. Utilities:
Once we have the config file loaded, we need to read the properties of the config file. The Properties object gives us the .getPropertymethod that takes the key of the property as a parameter and returns it. Basically, the value of the matched key from the .properties file. Therefore, this includes a class that assists in reading all of the data from the config.properties file.
5. Screenshots:
A screenshot in Selenium WebDriver is there we can use for bug analysis. Selenium WebDriver can automatically take screenshots during the execution. But if users need to capture a screenshot on their own, they need to use the Take Screenshot method. So, which notifies the WebDriver to take the screenshot and store it in Selenium. As a result, it includes screenshots that we took at the time of running the test.
6. log4j.properties:
The above image log4j.properties is a configuration file that we can use with the Apache Log4j logging framework. As a result, which is a popular logging library for Java applications. Users utilize this file to configure the logging behavior of the application, including specifying the output destination for log messages. The format of log messages, and the logging levels for different categories of log messages. The log4j.properties file contains key-value pairs that define the various logging settings for the application.
Step 10:
Basically, here is how we organize the hybrid framework. We need to add a few folders to make it easier for testers to run code without encountering them.
Initially, you will not find any errors until you save your code in Visual Studio Code through ctrl+s. You can hover over that error and you will find a solution for that. If you need to install any package, Thus it will also be visible to you.
Run Test:
Navigate to the Project Directory:- Open a command prompt or terminal window. And navigate to the directory where your Maven project is located. This should be the directory that contains the “pom.xml” file, which is the Maven project configuration file.
Run Maven Test Command:- Once you are in the project directory, you can run the following command to execute the Maven tests: “mvn test”
This command will instruct Maven to run the tests defined in your Maven project. Maven will automatically compile the necessary source code and download dependencies. And execute the tests using a testing framework such as JUnit, TestNG, or any other testing framework that you have configured in your project’s dependencies.
View Test Results:- After the tests have been executed. The Maven will display the test results in the command prompt or terminal window. You can view the test results to see which tests have passed, failed, or skipped.
Video:
Accordingly, the below tutorial will guide you
Conclusion:
Since Visual Studio Code for Java Selenium m Automation is a well-known IDE among software professionals. Here, I can think of no better method to run Java-Selenium automation through VSCode.
However, It offers the best Java extension for using Visual Studio Code for Java Selenium Automation. Basically, we make run test cases more appropriate and adaptable.
Harish is an SDET with expertise in API, web, and mobile testing. He has worked on multiple Web and mobile automation tools including Cypress with JavaScript, Appium, and Selenium with Python and Java. He is very keen to learn new Technologies and Tools for test automation. His latest stint was in TestProject.io. He loves to read books when he has spare time.
In the realm of automation testing, the conventional practice of identifying locators such as XPath, CSS, and ID is widely employed. However, there are scenarios where substantial time is expended in locating elements within diverse components, such as popup windows and Microsoft Foundation Class (MFC) windows. Additionally, there are cases where element location proves to be impossible. These challenges often impede progress and create bottlenecks. Hence, here in this blog, my aim is to propose a solution for addressing these issues and optimizing time allocation.
What if there was a way to bypass the traditional locator-finding technique and still identify and interact with elements?
Well, it is indeed possible using Sikuli. Sikuli offers an alternative approach to automation by leveraging visual patterns, allowing users to interact with elements on the screen without relying on traditional locator-based techniques.
Let’s understand What is Sikuli:
Sikuli is an open-source and powerful test automation tool that excels when there is limited access to a GUI’s internal or source code. Instead of relying on XPath, CSS, or ID, Sikuli employs image recognition and GUI component control to identify objects displayed on the screen. It is operate as a separate tool to employees’ image recognition mechanism with some action perform on the element.
Sikuli is a versatile tool that integrates seamlessly with popular programming languages like Python and Java. It is compatible with various operating systems, including Windows, Mac, and Linux as well as integrating with Selenium and Pycharm. By adopting this approach, we significantly reduce the time required for element location, simplifying the automation process.
Pre-requisite For Sikuli:
To get started using Sikuli, we need to install the following things.
Download and Installed any IDE as per your preference. Here we are using Intellij Idea
Install Other required dependencies like selenium, web driver, etc
Create a folder to store screenshots in a project.
To take a screenshot, you can use a built-in snippet tool available on your system. Alternatively, you can install tools like Inspector, PowerShell, or AutoIT, which provide x and y coordinates. For more information on these tools, you can refer to this blog: https://spurqlabs.com/different-tools-to-inspect-desktop-app-elements/
Using x and y coordinates, we take a screenshot during execution and store it in a specific path. We have written the code below:
Create one Java class.
Build your project.
Architecture of Sikuli:
Sikuli is a framework that assists in automating various elements on web pages.
The framework utilizes an image recognition mechanism to identify elements on a webpage.
Image recognition is achieved by comparing the elements on the webpage with provided images.
If a provided image is not found on the webpage, Sikuli raises an exception.
In specific scenarios, it is advisable to select an appropriate image that precisely highlights a single element on the webpage.
Selecting a precise image helps to ensure greater accuracy in element identification.
The Sikuli framework offers different methods to execute actions on web pages.
These methods provide versatility and flexibility in achieving automation objectives.
Screen Class:
The Sikuli framework has an inbuilt Screen class, a predefined method for performing actions on web elements using images. To access methods of the Screen class, we need to declare a reference to this class and initialize it.
Screen screen = new Screen();
In the above code, the variable “screen” is declared as an instance of the Screen class, and the new keyword is used to create a new object of the Screen class.
Here are some of the methods available in the Screen class that can be used efficiently:
Click on Element- Image:
To perform a left click on an element, provide an image to locate/identify the element to be clicked.
Ex: screen.click(“image path”);
Right-click on the element:
This method is used to perform a right-click on an element by providing an image to locate/identify the element to be clicked.
Ex: s.rightClick(“Image Path”);
Double-click on the element:
We use this method to perform a double-click action on an element. It first locates the element on the screen and then performs a double left click on the element.
Ex. s.doubbleClick(“Image Path”);
Type on Element :
In the Sikuli framework, you use the Type method to send Keys by providing an image path and sending text as a method argument.
Ex: screen.type(“Image path”, ”Send Key”);
Find() :
We can use this method to check the element’s visibility on a webpage.
EX. screen.find(“Image Path”);
DragDrop :
Users use this method to perform the action as drag and drop. We provide a source image and target image to the drag-drop method argument.
In the world of automation testing, we use an Integrated Development Environment (IDE) to write code. Nowadays, it has become common to create Maven projects to facilitate collaboration with various add-ons. As a widely used automation tool, Selenium supports integration with many add-ons. To integrate Sikuli into the Selenium framework, we need to add the required dependencies in the pom.xml file of our project.
To find the Sikuli dependencies, we can search the Maven repository at https://mvnrepository.com/artifact/org.sikuli. From this repository, we can copy the necessary dependencies and paste them into the pom.xml file of our project.
By adding the Sikuli dependencies to the pom.xml file, we ensure that the required libraries and resources are properly imported and utilized within our Selenium-Sikuli integration. This allows us to leverage the capabilities of Sikuli for image recognition and interaction within our Selenium automation framework.
We are creating sikuli funcion
1. Create a maven project, create a class with the main method where a set a browser and launch a browser:
public static void main (String [] argos){
WebDriverManager.chromedriver().setup();
ChromeDriver driver = new ChromeDriver();
driver.get(“https://demoqa.com/”);
driver.manage().window().maximize();}
2. Take a screenshot and store it in a specific location:
We are well aware that the Snipping Tool is a reliable tool for capturing screenshots. By utilizing this tool, we can capture customized screenshots and save them within the project. folder.
From the above image, we are cropping a single element image and saving it in the project screenshot folder.
How to take screenshots by using x,y coordinates:
There is an alternative method to capture screenshots without relying on external tools.
We can utilize the Robot class and its methods to capture screenshots based on x and y coordinates.
To capture a rectangular screenshot, we need two sets of x and y coordinates.
The first set represents the top-left corner of the rectangle, and the second set represents the bottom-right corner.
By specifying these coordinates, we can define the area of the screen to capture.
An example code snippet captures a screenshot based on the specified coordinates.
Our framework saves the captured screenshot to a specific location.
String fileName1 = "";
        try {
            Robot robot = new Robot();
            String imgeFormat = ".png";
            StringBuilder str = new StringBuilder("imageFolderPath" +
System.currentTimeMillis() + image format);
fileName1 = str.toString();
            Rectangle captureRect = new Rectangle(xStart, yStart, xEnd - xStart, yEnd - yStart);
            BufferedImage screenFullImage = robot.createScreenCapture(captureRect);
            format = "png";
            System.out.println(" Path is " + fileName1);
            ImageIO.write(screenFullImage, format, new File(fileName1));
            System.out.println("A partial screenshot saved!");
  } catch (AWTException | IOException ex) {
            System.err.println(ex);
        }
Explanation of the above code:
Declares a variable fileName1 of type String and initializes it as an empty string.
The try-catch block handles potential exceptions that may occur during execution.
Creates a new instance of the Robot class, which allows for programmatic control of the mouse and keyboard
Declare an image format variable that assigns value as ‘.png’
Constructs a StringBuilder object to create the file path for the screenshot. It concatenates the image folder path, the current system time in milliseconds, and the image format.
Converts the StringBuilder object to a String and assigns it to the ‘fileName1’ variable.
Defines a Rectangle object that represents the area of the screen to be captured. It takes the starting coordinates (xStart, yStart) and the width and height calculated from (xEnd – xStart) and ( yEnd – yStart)
Uses the ‘createScreenCapture(captureRect)’ method of the Robot class to capture the screen within the specified Rectangle area. It returns a BufferedImage object representing the captured image.
Writes the captured image to the file specified by fileName1 using the write() method from the ImageIO class.
3. Click on Element by using the previous taking screenshot:
As we mentioned above sikuli methods, by using this method we will do multiple actions performed on elements.
Screen s = new Screen();
s.find(fileName1);
s.click(fileName1);
Limitations:
Manage a number of screenshots:
Managing a large number of screenshots can be a complex and time-consuming process. Locating a specific screenshot among many can become challenging. To simplify this process, a recommended solution is to establish a specific naming convention for the screenshots.
Two similar images are available on the webpage:
If there is more than one image available on the webpage, Sikuli cannot accurately categorize and distinguish a specific image. If it’s not a recognized image then it throws an exception.
Conclusion:
To overcome the challenges of locating elements in automation testing, especially within popup windows and MFC windows, we have successfully implemented Sikuli as a solution. So by adopting Sikuli, we can eliminate the need for traditional locators, leading to enhanced execution time and improved efficiency in our automation efforts. Sikuli’s visual recognition capabilities can help users swiftly identify and interact with GUI elements, enabling faster automation execution. Overall, Sikuli proves to be a valuable alternative in scenarios where traditional locators are insufficient or inaccessible.
An SDET with hands-on experience in the life science domain, including manual testing, functional testing, Jira, defect reporting, web application, and desktop
application testing. I also have extensive experience in web and desktop automation using Selenium, WebDriver, WinAppDriver, Playwright, Cypress, Java, JavaScript, Cucumber, maven, POM, Xray, and building frameworks.