

API BDD Test automation framework using Behave and Python
API’s the term we heard a lot and wanted to know more about it. The questions that come to our mind are what is it? Why is it so important? How to test it? So, let’s just explore these questions one by one. API testing is accessible only if you know what to test and how to test. Again, a proper framework will help you to achieve your goals and deliver a good quality of work. The importance of automation framework and the factors we should consider for choosing the proper framework are described in our previous blog. Please go through the blog here, then you can start reading this blog because you will have a good understanding of automation testing frameworks.
To build the API testing framework we will be using the BDD approach. Again, why I have chosen a BDD framework for API testing the reason is very simple the BDD approach provides you with an easy understanding of the framework, you can easily maintain the framework and they have feature files that are very easy to understand for a non-technical person.
What is API?
API (Application Programming Interface) is like a mechanism that works between the two software components and helps them to communicate with each other. The communication happened using sets of definitions and set protocols. In simple language, API works as an intermediate between two systems and helps them exchange data and communicate. The working mechanism of Rest API is straightforward they work by sending requests and receiving a response in a standardized format. Usually, the standardized format used for Rest API is JSON i.e. (JavaScript Object Notation)
Let’s understand it better with an example. Consider you are using a ticket booking app to book a flight ticket. As the app is connected to the internet so it will set data to the server. When the server receives the data it interprets it and performs the required actions and sends it back to your device. Then the application translates that data and display the information in a readable way. So this is how API works. I hope you have understood the working mechanism of API’s now let’s discuss the next topic i.e.
What is API Testing?
As we have understood what is an API and how they work so let’s see why their testing is important. Basically, API testing is a part of software testing that includes the testing of the functionality, reliability, security, and performance of API. API is used for data transfer and to establish communication between the two systems so testing APIs includes verifying that the APIs are meeting its requirement, performing as per the expectations, and can handle a variety of inputs. This testing provides you the information that the API’s functionality is correct and efficient and the data they return is accurate and consistent.
Why is API Testing Important?
API testing is an important part of a Software testing process as it helps you to understand the functionality of the working APIs and validate any defect present before the application is released to the end users. The other key reasons why API testing is important to include:
- Ensuring Functionality
- Validating data integrity
- Enhancing the Security
- Improving the Performance
- Detecting Bugs and Issues
- Improving readability and stability
- Facilitating integration and collaboration
All the above-mentioned points get checked and validate in API testing. Till now we have discussed what is api, what is api testing, and why it is important. Let’s see what different tools are available to conduct the manual as well as automation testing of API.
Tools for Manual API Testing:
- Postman
- SoapUI
- Insomnia
- Paw
- Advanced REST Client (ARC)
- Fiddler
- cURL
Tools for API Automation Testing:
- Postman
- SoapUI
- RestAssured
- RestSharp
- Apache HTTP client
- JMeter
- Karate
- Newman
- Pact.js
- Cypress.js
These are just a few examples of the tools available for both manuals as well as automation testing of API. Each mentioned tool has its own strength and weakness and the choice of the right tool for your API testing depends upon the requirement and the specific needs of the project. These tools will help us to ensure that the APIs meet the desired functionality and performance requirements.
Now we are more familiar with APIs so let’s start the main topic of our discussion and i.e. Python Behave API Testing BDD Framework.
Framework Overview:

To validate all the above-mentioned points creating a robust API testing framework is very essential. With the help of the below-mentioned steps, you will come to know how to create your own API testing framework. Here, we are going to create a BDD framework. Please go through this blog before starting to read this blog as the previous blog will help you to understand the advantages of BDD and this blog is linked to the previous blog topics. You can read the previous blog here.
This framework structure contains a feature file, a step file, and a utility file. We will be discussing all these terms shortly. To create such a framework you need to follow certain steps to make your work tedious-free and easy.
Step1: Prerequisites
- Python: https://www.python.org/downloads/ visit the site to download and install python in your system if it is not there.
- Pycharm IDE (Professional or Community): https://www.jetbrains.com/pycharm/download/
- Install all the required packages using the below command as long as you have all the packages mentioned in rquirement.txt with the right version number
pip install -r requirement.txt
- To know more about behave, allure report please visit https://pypi.org/project/behave/ & https://pypi.org/project/allure-behave/
- We can also install the mentioned packages from the settings of Pycharm IDE
Step2: Creating Project
After understanding the prerequisites the next step is to create a project in our IDE. Here I am using a Pycharm Professional IDE. As mentioned in the above step, we will install the packages mentioned in the requirement.txt file. Please note it is not compulsory to use Pycharm Professional IDE to create this framework you can use the community version too.
Step3: Creating a Feature File
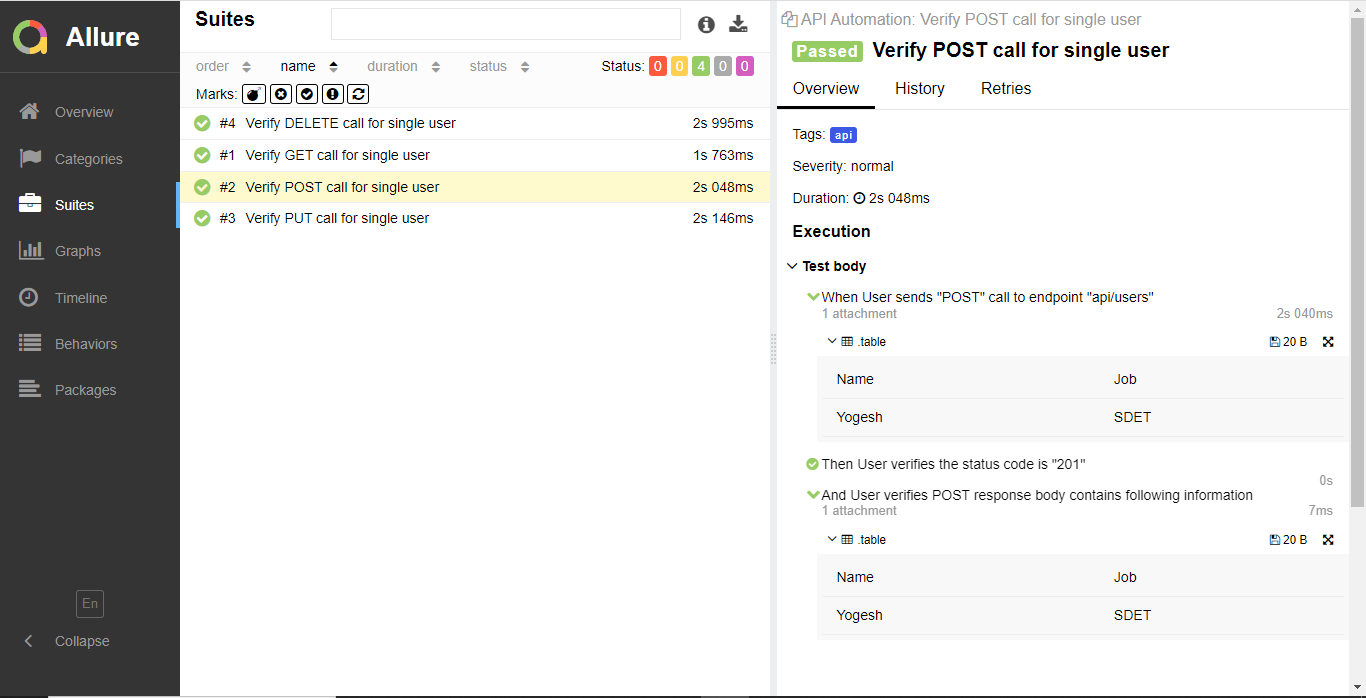
In this, we will be creating a feature file. A feature file consists of steps. These steps are mentioned in the gherkin language. The feature is easy to understand and can be written in the English language so that a non-technical person can understand the flow of the test scenario. In this framework we will be automating the four basic API request methods i.e. POST, PUT, GET and DELETE. We are taking https://reqres.in/
We can assign tags to our scenarios mentioned in the feature file to run particular test scenarios based on the requirement. The key point you must notice here is the feature file should end with .feature extension. We will be creating four different scenarios for the four different API methods.
Feature: User API
Verify the GET PUT POST DELETE methods of User API
  @api
  Scenario: Verify GET call for single user
    When User sends "GET" call to endpoint "api/users/2"
    Then User verifies the status code is "200"
    And User verifies GET response contains following information
      | First_name | Last_name | Mail-id                |
      | Janet      | Weaver    | janet.weaver@reqres.in |

  @api
  Scenario: Verify POST call for single user
    When User sends "POST" call to endpoint "api/users"
      | Name   | Job  |
      | Yogesh | SDET |
    Then User verifies the status code is "201"
    And User verifies POST response body contains following information
      | Name   | Job  |
      | Yogesh | SDET |

  @api
  Scenario: Verify PUT call for single user
    When User sends "PUT" call to endpoint "api/users/2"
      | Name   | Job  |
      | Yogesh | SDET |
    Then User verifies the status code is "200"
    And User verifies PUT response body contains following information
      | Name   | Job  |
      | Yogesh | SDET |

  @api
  Scenario: Verify DELETE call for single user
    When User sends DELETE call to the endpoint "api/users/2"
    Then User verifies the status code is "200"
Step4: Creating a Step File
Unlike the automation framework which we have built in the previous blog, we will be creating a single-step file for all the feature files. In the BDD framework, the step files are used to map and implement the steps described in the feature file. Python’s behave library is very accurate to map the steps with the steps described in the feature file. We will be describing the same steps in the step file as they have described in the feature file so that behave will come to know the step implementation for the particular steps present in the feature file.
from behave import *
from Utility.API_Utility import API_Utility
api_util = API_Utility()

@when('User sends "{method}" call to endpoint "{endpoint}"')
def step_impl(context, method, endpoint):
    global response
    response = api_util.Method_Call(context.table, method, endpoint)
@then('User verifies the status code is "{status_code}"')
def step_impl(context, status_code):
    actual_status_code = response.status_code
    assert actual_status_code == int(status_code)

@step("User verifies GET response contains following information")
def step_impl(context):
    api_util.Verify_GET(context.table)
    response_body = response.json()
    assert response_body['data']['first_name'] == context.table[0][0]
    assert response_body['data']['last_name'] == context.table[0][1]
    assert response_body['data']['email'] == context.table[0][2]

@step("User verifies POST response body contains following information")
def step_impl(context):
    api_util.Verify_POST(context.table)
    response_body = response.json()
    assert response_body['name'] == context.table[0][0]
    assert response_body['job'] == context.table[0][1]

@step("User verifies PUT response body contains following information")
def step_impl(context):
    api_util.Verify_PUT(context.table)
    response_body = response.json()
    assert response_body['Name'] == context.table[0][0]
    assert response_body['Job'] == context.table[0][1]

@when('User sends DELETE call to the endpoint "{endpoint}"')
def step_impl(context, endpoint):
    api_util.Delete_Call(endpoint)
Step5: Creating Utility File
Till now we have successfully created a feature file and a step file now in this step we will be creating a utility file. Generally, in Web automation, we have page files that contain the locators and the actions to perform on the web elements but in this framework, we will be creating a single utility file just like the step file. The utility file contains the API methods and the endpoints to perform the specific action like, POST, PUT, GET, or DELETE. The request body i.e. payload and the response body will be captured using the methods present in the utility file. So the reason these methods are created in the utility file is that we can use them multiple times and don’t have to create the same method over and over again.
import json
import requests
class API_Utility:
    data = json.load(open("Resources/config.json"))
    api_url = data["APIURL"]
    global response

    def Method_Call(self, table, method, endpoint):
        if method == 'GET':
            uri = self.api_url + endpoint
            response = requests.request("GET", uri)
            return response

        if method == 'POST':
            uri = self.api_url + endpoint
            payload = {
                "name": table[0][0],
                "job": table[0][1]
            }
            response = requests.request("POST", uri, data=payload)
            return response

        if method == 'PUT':
            uri = self.api_url + endpoint
            reqbody = {
                "Name": table[0][0],
                "Job": table[0][1]
            }
            response = requests.request("PUT", uri, data=reqbody)
            return response

    def Get_Status_Code(self):
        status_code = response.status_code
        return status_code

    def Verify_GET(self, table):
        for row in table:
            first_name = row['First_name']
            last_name = row['Last_name']
            email = row['Mail-id']
            return first_name, last_name, email

    def Verify_POST(self, table):
        for row in table:
            name = row['Name']
            job = row['Job']
            return name, job

#Following method can be merged with POST, however for simplicity I kept it
    def Verify_PUT(self, table):
        for row in table:
            name = row['Name']
            job = row['Job']
            return name, job

    def Delete_Call(self, endpoint):
        uri = self.api_url + endpoint
        response = requests.request("DELETE", uri)
        return response
Step6: Create a Config file
A good tester is one who knows the use and importance of config files. In this framework, we are also going to use the config file. Here, we are just going to put the base URL in this config file and will be using the same in the utility file over and over again. The config file contains more data than just of base URL when you start exploring the framework and start automating the new endpoints then at some point, you will realize that some data can be added to the config file.
Additionally, the purpose of the config files is to make tests more maintainable and reusable. Another benefit of a config file is that it makes the code more modular and easier to understand as all the configuration settings are stored in a separate file and it makes it easier to update the configuration settings for all the tests at once.
"APIURL": "https://reqres.in/"
Step7: Execute and Generate Allure Report
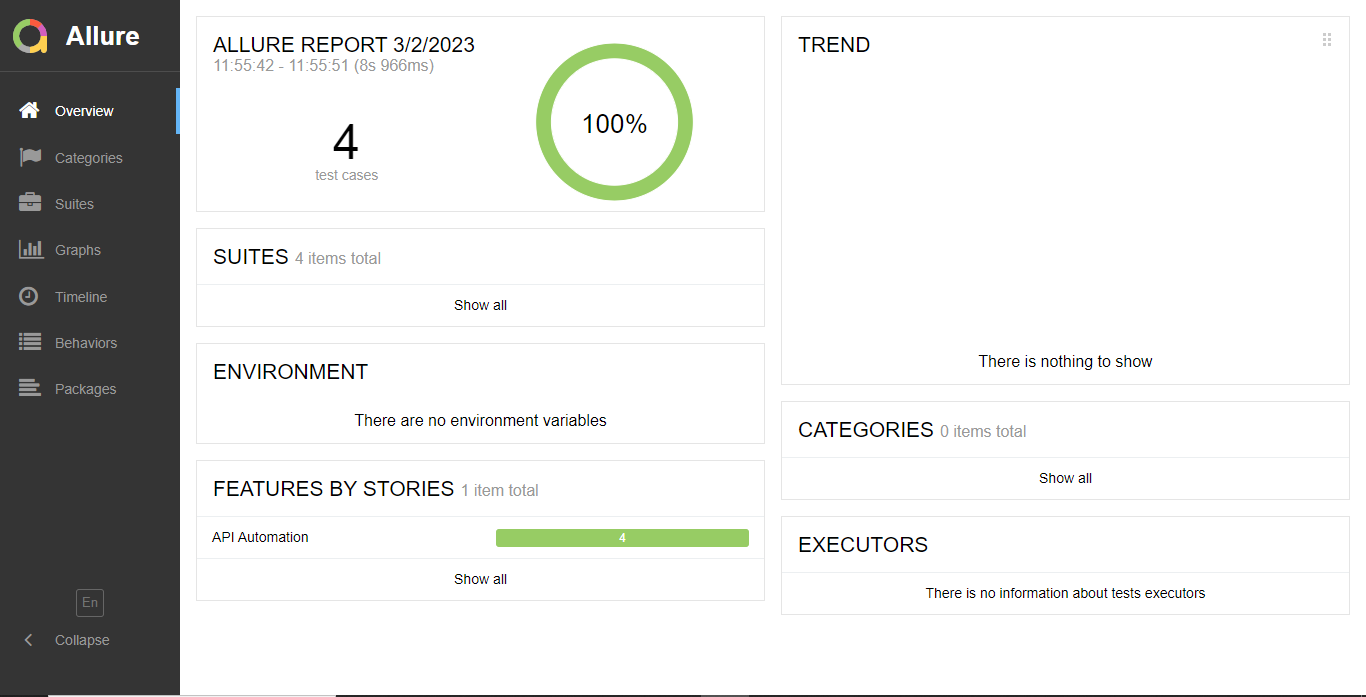
The reason behind using allure reports as a reporting medium is because the allure report provides detailed information about the test execution process and results which includes the test status, test steps, duration, and screenshots of the test run. The report is generated in HTML i.e. web format making it easy to share with team members and with clients and easy to understand. It provides a dashboard that is user-friendly having interactive charts and graphs that provide a detailed analysis of the test results.
Let’s understand how to execute API tests and generate an allure report for automated API calls. To generate the report we will have to execute the test using the terminal or command line. There are two steps to follow sequentially they are as follows:
- behave Features/Api.feature -f allure_behave.formatter:AllureFormatter -o Report_Json
The purpose of the above command is to execute the test present in the mentioned feature file and generate a JSON report folder.
- allure generate Report_Json -o Report_Html –clean
This command is used to generate an HTML report from the JSON report. So, that it is easy to understand and can be shared with team members or clients.
Please find the attached GitHub repository link. I have uploaded the same project to this repository and also attached a Readme.md file which explains the framework and the different commands we have used so far in this project.
Conclusion:
Before creating a framework it is very important to understand the concept and I hope I have provided enough information for the different queries on APIs. In conclusion, creating a BDD API testing framework using Python and Behave is easy to process if you know how to proceed further. By following the steps outlined in this blog I am sure you can create a powerful and flexible framework that will help you to define and execute the test cases, generate a detailed report with allure and also iterate with other testing tools and systems. Again I am suggesting you check out the previous blog here because that will clear most of your doubts on automation testing frameworks and will help you to create your own automation testing framework.
An SDET Engineer with hands-on experience in manual, automation, API, Performance, and Security Testing. The technologies I have worked on include Selenium, Playwright, Cypress, SpecFlow, Cucumber, JMeter, K6, OWASP ZAP, Appium, Postman, Maven, Behave, Pytest, BrowserStack, SQL, GitHub, Java, JavaScript, Python, C#, HTML, CSS. Also, I have hands-on experience in CI/CD the technologies I have used for CI/CD include Azure DevOps, AWS, and Github. Apart from this, I like to write blogs and explore new technologies.