Building a Complete API Automation Testing Framework with Java, Rest Assured, Cucumber, and Playwright
API Automation Testing Framework – In Today’s fast-paced digital ecosystem, almost every modern application relies on APIs (Application Programming Interfaces) to function seamlessly. Whether it’s a social media integration pulling live updates, a payment gateway processing transaction, or a data service exchanging real-time information, APIs act as the invisible backbone that connects various systems together.
Because APIs serve as the foundation of all interconnected software, ensuring that they are reliable, secure, and high performing is absolutely critical. Even a minor API failure can impact multiple dependent systems; consequently, it may cause application downtime, data mismatches, or even financial loss.
That’s where API automation testing framework comes in. Unlike traditional UI testing, API testing validates the core business logic directly at the backend layer, which makes it faster, more stable, and capable of detecting issues early in the development cycle — even before the frontend is ready.
In this blog, we’ll walk through the process of building a complete API Automation Testing Framework using a combination of:
- Java – as the main programming language
- Maven – for project and dependency management
- Cucumber – to implement Behavior Driven Development (BDD)
- RestAssured – for simplifying RESTful API automation
- Playwright – to handle browser-based token generation
The framework you’ll learn to build will follow a BDD (Behavior-Driven Development) approach, enabling test scenarios to be written in simple, human-readable language. This not only improves collaboration between developers, testers, and business analysts but also makes test cases easier to understand, maintain, and extend.
Additionally, the API automation testing framework will be CI/CD-friendly, meaning it can be seamlessly integrated into automated build pipelines for continuous testing and faster feedback.
By the end of this guide, you’ll have a scalable, reusable, and maintainable API testing framework that brings together the best of automation, reporting, and real-time token management — a complete solution for modern QA teams.
What is API?
An API (Application Programming Interface) acts as a communication bridge between two software systems, allowing them to exchange information in a standardized way. In simpler terms, it defines how different software components should interact — through a set of rules, protocols, and endpoints.
Think of an API as a messenger that takes a request from one system, delivers it to another system, and then brings back the response. This interaction, therefore, allows applications to share data and functionality without exposing their internal logic or database structure.
Let’s take a simple example:
When you open a weather application on your phone, it doesn’t store weather data itself. Instead, it sends a request to a weather server API, which processes the request and sends back a response — such as the current temperature, humidity, or forecast.
This request-response cycle is what makes APIs so powerful and integral to almost every digital experience we use today.
Most modern APIs follow the REST (Representational State Transfer) architectural style. REST APIs use the HTTP protocol and are designed around a set of standardized operations, including:
| HTTP Method | Description | Example Use |
| GET | Retrieve data from the server | Fetch a list of users |
| POST | Create new data on the server | Add a new product |
| PUT | Update existing data | edit user details |
| DELETE | Remove data | Delete a record |
The responses returned by API’s are typically in JSON (JavaScript Object Notation) format – a lightweight, human-readable, and machine-friendly data format that’s easy to parse and validate.
In essence, API’s are the digital glue that holds modern applications together — enabling smooth communication, faster integrations, and a consistent flow of information across systems.
What is API Testing?
API Testing is the process of verifying that an API functions correctly and performs as expected — ensuring that all its endpoints, parameters, and data exchanges behave according to defined business rules.
In simple terms, it’s about checking whether the backend logic of an application works properly — without needing a graphical user interface (UI). Since APIs act as the communication layer between different software components, testing them helps ensure that the entire system remains reliable, secure, and efficient.
API testing typically focuses on four main aspects:
- Functionality – Does the API perform the intended operation and return the correct response for valid requests?
- Reliability – Does it deliver consistent results every time, even under different inputs and conditions?
- Security – Is the API protected from unauthorized access, data leaks, or token misuse?
- Performance – Does it respond quickly and remain stable under heavy load or high traffic?
Unlike traditional UI testing, which validates the visual and interactive parts of an application, API testing operates directly at the business logic layer. This makes it:
- Faster – Since it bypasses the UI, execution times are much shorter.
- More Stable – UI changes (like a button name or layout) don’t affect API tests.
- Proactive – Tests can be created and run even before the front-end is developed.
In essence, API testing ensures the heart of your application is healthy. By validating responses, performance, and security at the API level, teams can detect defects early, reduce costs, and deliver more reliable software to users.
Why is API Testing Important?
API Testing plays a vital role in modern software development because APIs form the backbone of most applications. A failure in an API can affect multiple systems and impact overall functionality.
Here’s why API testing is important:
- Ensures Functionality: Verifies that endpoints return correct responses and handle errors properly.
- Enhances Security: Detects vulnerabilities like unauthorized access or token misuse.
- Validates Data Integrity: Confirms that data remains consistent across APIs and databases.
- Improves Performance: Checks response time, stability, and behavior under load.
- Detects Defects Early: Allows early testing right after backend development, saving time and cost
- Supports Continuous Integration: Easily integrates with CI/CD pipelines for automated validation.
In short, API testing ensures your system’s core logic is reliable, secure, and ready for real-world use.
Tools for Manual API Testing
Before jumping into automation, it’s essential to explore and understand APIs manually. Manual testing helps you validate endpoints, check responses, and get familiar with request structures.
Here are some popular tools used for manual API testing:
- Postman: The most widely used tool for sending API requests, validating responses, and organizing test collections [refer link – https://www.postman.com/.
- SoapUI: Best suited for testing both SOAP and REST APIs with advanced features like assertions and mock services.
- Insomnia: A lightweight and user-friendly alternative to Postman, ideal for quick API exploration.
- cURL: A command-line tool perfect for making fast API calls or testing from scripts.
- Fiddler: Excellent for capturing and debugging HTTP/HTTPS traffic between client and server.
Using these tools helps testers understand API behavior, request/response formats, and possible edge cases — forming a strong foundation before moving to API automation.
Tools for API Automation Testing
After verifying APIs manually, the next step is to automate them using reliable tools and libraries. Automation helps improve test coverage, consistency, and execution speed.
Here are some popular tools used for API automation testing:
- RestAssured: A powerful Java library designed specifically for testing and validating RESTful APIs.
- Cucumber: Enables writing test cases in Gherkin syntax (plain English), making them easy to read and maintain.
- Playwright: Automates browser interactions; in our framework, it will be used for token generation or authentication flows.
- Postman + Newman: Allows you to run Postman collections directly from the command line — ideal for CI/CD integration.
- JMeter: A robust tool for performance and load testing of APIs under different conditions.
In this blog, our focus will be on building a framework using RestAssured, Cucumber, and Playwright — combining functional, BDD, and authentication automation into one cohesive setup.
Framework Overview
We’ll build a Behavior-Driven API Automation Testing Framework that combines multiple tools for a complete testing solution. Here’s how each component fits in:
- Cucumber – Manages the BDD layer, allowing test scenarios to be written in simple, readable feature files.
- RestAssured – Handles HTTP requests and responses for validating RESTful APIs.
- Playwright – Automates browser-based actions like token generation or authentication.
- Maven – Manages project dependencies, builds, and plugins efficiently.
- Cucumber HTML Reports – Automatically generates detailed execution reports after each run.
The framework follows a modular structure, with separate packages for step definitions, utilities, configurations, and feature files — ensuring clean organization, easy maintenance, and scalability.
Step 1: Prerequisites
Before starting, ensure you have:
- Java JDK (version 11 or above)
- IDE such as IntelliJ IDEA or Eclipse
Add the required dependencies to your pom.xml file:
<?xml version="1.0" encoding="UTF-8"?>
<project xmlns="http://maven.apache.org/POM/4.0.0"
         xmlns:xsi="http://www.w3.org/2001/XMLSchema-instance"
         xsi:schemaLocation="http://maven.apache.org/POM/4.0.0 http://maven.apache.org/xsd/maven-4.0.0.xsd">
    <modelVersion>4.0.0</modelVersion>

    <groupId>org.Spurqlabs</groupId>
    <artifactId>SpurQLabs-Test-Automation</artifactId>
    <version>1.0-SNAPSHOT</version>
    <properties>
        <maven.compiler.source>11</maven.compiler.source>
        <maven.compiler.target>11</maven.compiler.target>
        <project.build.sourceEncoding>UTF-8</project.build.sourceEncoding>
    </properties>
    <dependencies>
        <!-- Playwright for UI automation -->
        <dependency>
            <groupId>com.microsoft.playwright</groupId>
            <artifactId>playwright</artifactId>
            <version>1.50.0</version>
        </dependency>
        <!-- Cucumber for BDD -->
        <dependency>
            <groupId>io.cucumber</groupId>
            <artifactId>cucumber-java</artifactId>
            <version>7.23.0</version>
        </dependency>
        <dependency>
            <groupId>io.cucumber</groupId>
            <artifactId>cucumber-testng</artifactId>
            <version>7.23.0</version>
        </dependency>
        <!-- TestNG for test execution -->
        <dependency>
            <groupId>org.testng</groupId>
            <artifactId>testng</artifactId>
            <version>7.11.0</version>
            <scope>test</scope>
        </dependency>
        <!-- Rest-Assured for API testing -->
        <dependency>
            <groupId>io.rest-assured</groupId>
            <artifactId>rest-assured</artifactId>
            <version>5.5.5</version>
        </dependency>
        <!-- Apache POI for Excel support -->
        <dependency>
            <groupId>org.apache.poi</groupId>
            <artifactId>poi-ooxml</artifactId>
            <version>5.4.1</version>
        </dependency>
        <!-- org.json for JSON parsing -->
        <dependency>
            <groupId>org.json</groupId>
            <artifactId>json</artifactId>
            <version>20250517</version>
        </dependency>
        <dependency>
            <groupId>org.seleniumhq.selenium</groupId>
            <artifactId>selenium-devtools-v130</artifactId>
            <version>4.26.0</version>
            <scope>test</scope>
        </dependency>
        <dependency>
            <groupId>com.sun.mail</groupId>
            <artifactId>jakarta.mail</artifactId>
            <version>2.0.1</version>
        </dependency>
        <dependency>
            <groupId>com.sun.activation</groupId>
            <artifactId>jakarta.activation</artifactId>
            <version>2.0.1</version>
        </dependency>
    </dependencies>
    <build>
        <plugins>
            <plugin>
                <groupId>org.apache.maven.plugins</groupId>
                <artifactId>maven-compiler-plugin</artifactId>
                <version>3.14.0</version>
                <configuration>
                    <source>11</source>
                    <target>11</target>
                </configuration>
            </plugin>
        </plugins>
    </build>
</project>
Step 2: Creating Project
Create a Maven project with the following folder structure:
loanbook-api-automation

│
├── .idea
│
├── src
│   └── test
│       └── java
│           └── org
│               └── Spurlabs
│                   ├── Core
│                   │   ├── Hooks.java
│                   │   ├── Main.java
│                   │   ├── TestContext.java
│                   │   └── TestRunner.java
│                   │
│                   ├── Steps
│                   │   └── CommonSteps.java
│                   │
│                   └── Utils
│                       ├── APIUtility.java
│                       ├── FrameworkConfigReader.java
│                       └── TokenManager.java
│
├── resources
│   ├── Features
│   ├── headers
│   ├── Query_Parameters
│   ├── Request_Bodies
│   ├── Schema
│   └── cucumber.properties
│
├── target
│
├── test-output
│
├── .gitignore
├── bitbucket-pipelines.yml
├── DealDetails.json
├── FrameworkConfig.json
├── pom.xml
├── README.md
└── token.json
Step 3: Creating a Feature File
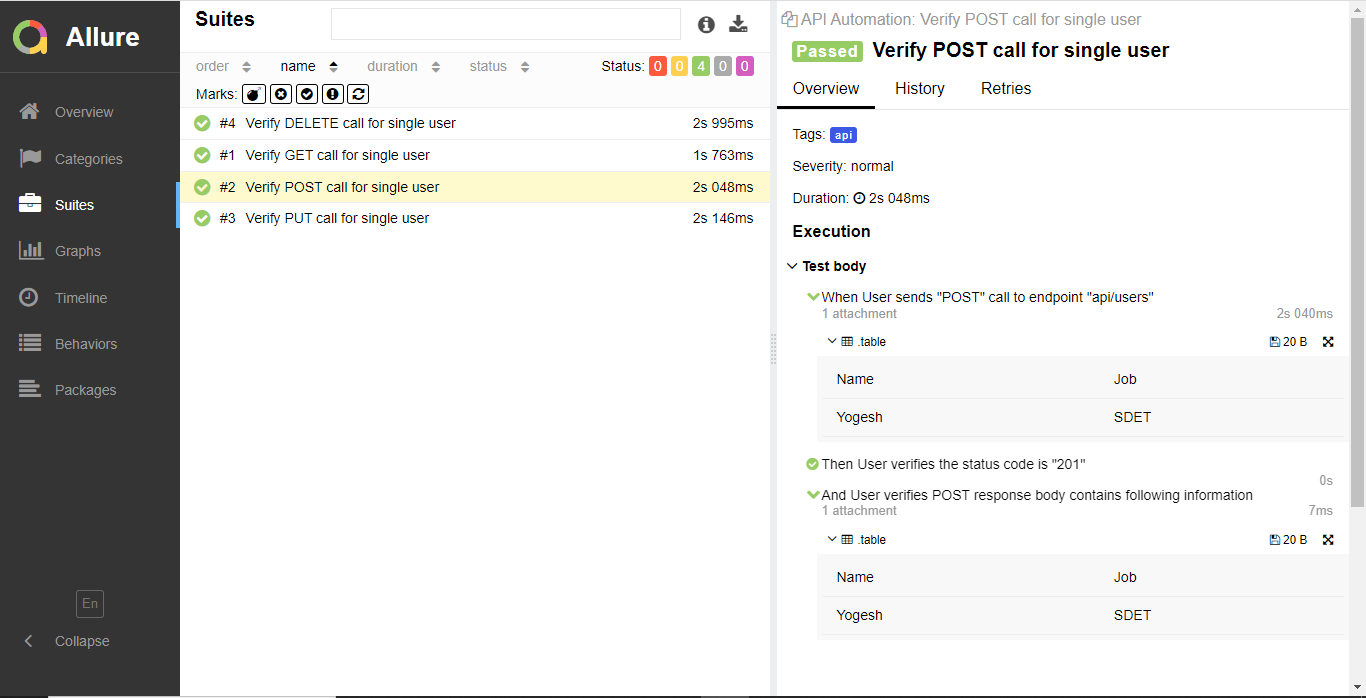
In this, we will be creating a feature file for API Automation Testing Framework. A feature file consists of steps. These steps are mentioned in the gherkin language. The feature is easy to understand and can be written in the English language so that a non-technical person can understand the flow of the test scenario. In this framework we will be automating the four basic API request methods i.e. POST, PUT, GET and DELETE.
We can assign tags to our scenarios mentioned in the feature file to run particular test scenarios based on the requirement. The key point you must notice here is the feature file should end with .feature extension. We will be creating four different scenarios for the four different API methods.
Feature: All Notes API Validation
@api
Scenario Outline: Validate POST Create Notes API Response for "<scenarioName>" Scenario
When User sends "<method>" request to "<url>" with headers "<headers>" and query file "<queryFile>" and requestDataFile "<bodyFile>"
Then User verifies the response status code is <statusCode>
And User verifies the response body matches JSON schema "<schemaFile>"
Then User verifies fields in response: "<contentType>" with content type "<fields>"
Examples:
| scenarioName | method | url | headers | queryFile | bodyFile | statusCode | schemaFile | contentType | fields |
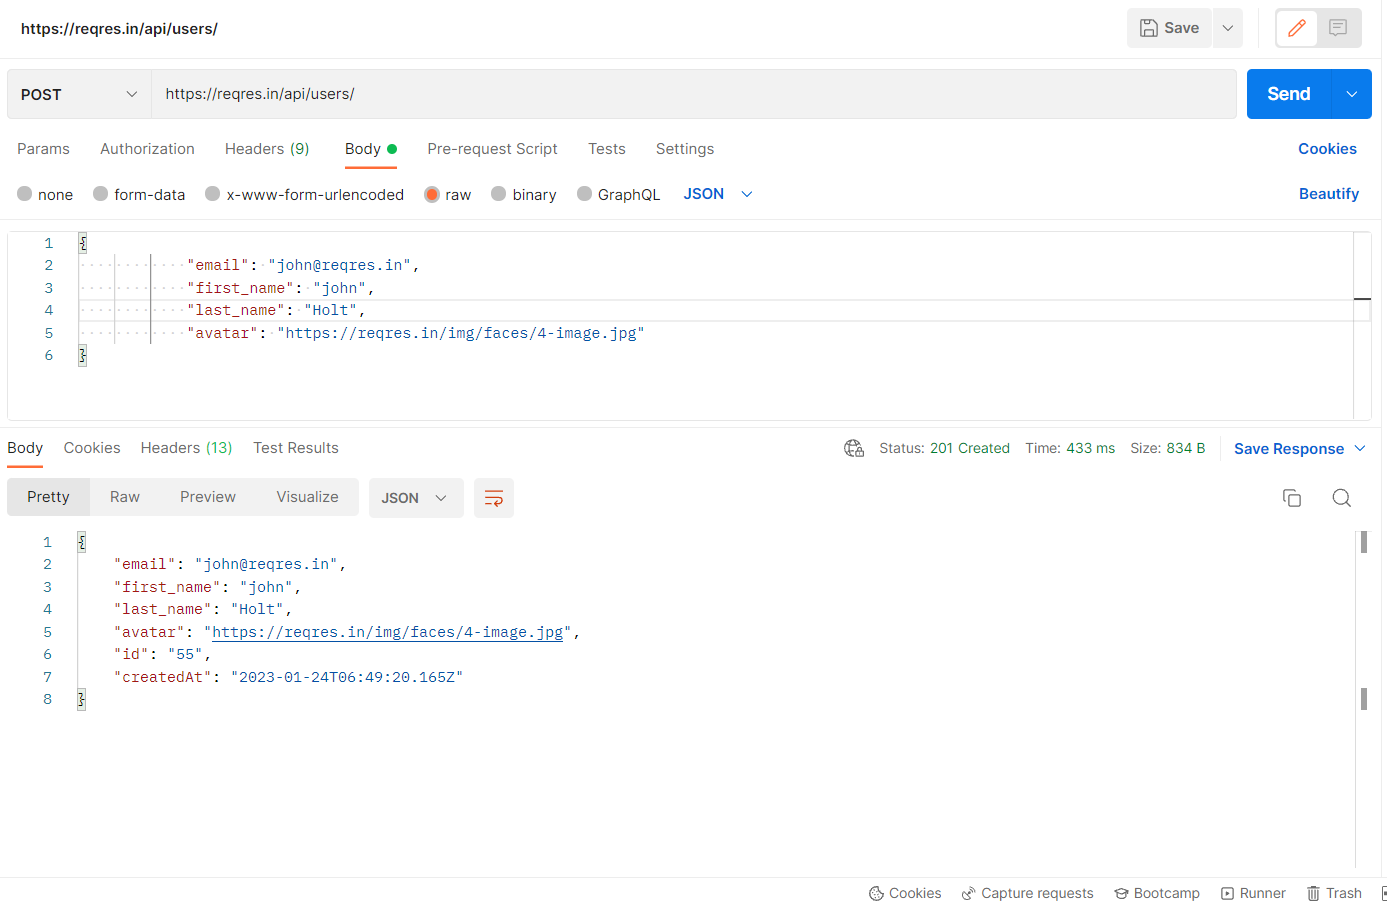
| Valid create Notes | POST | /api/v1/loan-syndications/{dealId}/investors/{investorId}/notes | NA | NA | Create_Notes_Request | 200 | NA | NA | NA |
Scenario Outline: Validate GET Notes API Response for "<scenarioName>" Scenario
When User sends "<method>" request to "<url>" with headers "<headers>" and query file "<queryFile>" and requestDataFile "<bodyFile>"
Then User verifies the response status code is <statusCode>
And User verifies the response body matches JSON schema "<schemaFile>"
Then User verifies fields in response: "<contentType>" with content type "<fields>"
Examples:
| scenarioName | method | url | headers | queryFile | bodyFile | statusCode | schemaFile | contentType | fields |
| Valid Get Notes | GET | /api/v1/loan-syndications/{dealId}/investors/{investorId}/notes | NA | NA | NA | 200 | Notes_Schema_200 | json | note=This is Note 1 |
Scenario Outline: Validate Update Notes API Response for "<scenarioName>" Scenario
When User sends "<method>" request to "<url>" with headers "<headers>" and query file "<queryFile>" and requestDataFile "<bodyFile>"
Then User verifies the response status code is <statusCode>
And User verifies the response body matches JSON schema "<schemaFile>"
Then User verifies fields in response: "<contentType>" with content type "<fields>"
Examples:
| scenarioName | method | url | headers | queryFile | bodyFile | statusCode | schemaFile | contentType | fields |
| Valid update Notes | PUT | /api/v1/loan-syndications/{dealId}/investors/{investorId}/notes/{noteId}/update-notes | NA | NA | Update_Notes_Request | 200 | NA | NA | NA |
Scenario Outline: Validate DELETE Create Notes API Response for "<scenarioName>" Scenario
When User sends "<method>" request to "<url>" with headers "<headers>" and query file "<queryFile>" and requestDataFile "<bodyFile>"
Then User verifies the response status code is <statusCode>
And User verifies the response body matches JSON schema "<schemaFile>"
Then User verifies fields in response: "<contentType>" with content type "<fields>"
Examples:
| scenarioName | method | url | headers | queryFile | bodyFile | statusCode | schemaFile | contentType | fields |
| Valid delete | DELETE | /api/v1/loan-syndications/{dealId}/investors/{investorId}/notes/{noteId} | NA | NA | NA | 200 | NA | NA | NA | Step 4: Creating a Step Definition File
Unlike the automation framework which we have built in the previous blog, we will be creating a single-step file for all the feature files. In the BDD framework, the step files are used to map and implement the steps described in the feature file. Rest Assured library is very accurate to map the steps with the steps described in the feature file. We will be describing the same steps in the step file as they have described in the feature file so that behave will come to know the step implementation for the particular steps present in the feature file.
package org.Spurqlabs.Steps;

import io.cucumber.java.en.Then;
import io.cucumber.java.en.When;
import io.restassured.response.Response;
import org.Spurqlabs.Core.TestContext;
import org.Spurqlabs.Utils.*;
import org.json.JSONArray;
import org.json.JSONObject;

import java.io.File;
import java.io.IOException;
import java.nio.charset.StandardCharsets;
import java.nio.file.Files;
import java.nio.file.Paths;
import java.util.HashMap;
import java.util.Map;

import static io.restassured.module.jsv.JsonSchemaValidator.matchesJsonSchemaInClasspath;
import static org.Spurqlabs.Utils.DealDetailsManager.replacePlaceholders;
import static org.hamcrest.Matchers.equalTo;
public class CommonSteps extends TestContext {
    private Response response;

    @When("User sends {string} request to {string} with headers {string} and query file {string} and requestDataFile {string}")
    public void user_sends_request_to_with_query_file_and_requestDataFile (String method, String url, String headers, String queryFile, String bodyFile) throws IOException {
        String jsonString = Files.readString(Paths.get(FrameworkConfigReader.getFrameworkConfig("DealDetails")), StandardCharsets.UTF_8);
        JSONObject storedValues = new JSONObject(jsonString);

        String fullUrl = FrameworkConfigReader.getFrameworkConfig("BaseUrl") + replacePlaceholders(url);

        Map<String, String> header = new HashMap<>();
        if (!"NA".equalsIgnoreCase(headers)) {
            header = JsonFileReader.getHeadersFromJson(FrameworkConfigReader.getFrameworkConfig("headers") + headers + ".json");
        } else {
            header.put("cookie", TokenManager.getToken());
        }
        Map<String, String> queryParams = new HashMap<>();
        if (!"NA".equalsIgnoreCase(queryFile)) {
            queryParams = JsonFileReader.getQueryParamsFromJson(FrameworkConfigReader.getFrameworkConfig("Query_Parameters") + queryFile + ".json");
            for (String key : queryParams.keySet()) {
                String value = queryParams.get(key);
                for (String storedKey : storedValues.keySet()) {
                    value = value.replace("{" + storedKey + "}", storedValues.getString(storedKey));
                }
                queryParams.put(key, value);
            }
        }

        Object requestBody = null;
        if (!"NA".equalsIgnoreCase(bodyFile)) {
            String bodyTemplate = JsonFileReader.getJsonAsString(
                    FrameworkConfigReader.getFrameworkConfig("Request_Bodies") + bodyFile + ".json");

            for (String key : storedValues.keySet()) {
                String placeholder = "{" + key + "}";
                if (bodyTemplate.contains(placeholder)) {
                    bodyTemplate = bodyTemplate.replace(placeholder, storedValues.getString(key));
                }
            }

            requestBody = bodyTemplate;
        }

        response = APIUtility.sendRequest(method, fullUrl, header, queryParams, requestBody);
        response.prettyPrint();
        TestContextLogger.scenarioLog("API", "Request sent: " + method + " " + fullUrl);

        if (scenarioName.contains("GET Notes") && response.getStatusCode() == 200) {
            DealDetailsManager.put("noteId", response.path("[0].id"));
        }

    }

    @Then("User verifies the response status code is {int}")
    public void userVerifiesTheResponseStatusCodeIsStatusCode(int statusCode) {
        response.then().statusCode(statusCode);
        TestContextLogger.scenarioLog("API", "Response status code: " + statusCode);
    }

    @Then("User verifies the response body matches JSON schema {string}")
    public void userVerifiesTheResponseBodyMatchesJSONSchema(String schemaFile) {
        if (!"NA".equalsIgnoreCase(schemaFile)) {
            String schemaPath = "Schema/" + schemaFile + ".json";
            response.then().assertThat().body(matchesJsonSchemaInClasspath(schemaPath));
            TestContextLogger.scenarioLog("API", "Response body matches schema");
        } else {
            TestContextLogger.scenarioLog("API", "Response body does not have schema to validate");
        }
    }

    @Then("User verifies field {string} has value {string}")
    public void userVerifiesFieldHasValue(String jsonPath, String expectedValue) {
        response.then().body(jsonPath, equalTo(expectedValue));
        TestContextLogger.scenarioLog("API", "Field " + jsonPath + " has value: " + expectedValue);
    }

    @Then("User verifies fields in response: {string} with content type {string}")
    public void userVerifiesFieldsInResponseWithContentType(String contentType, String fields) throws IOException {
        // If NA, skip verification
        if ("NA".equalsIgnoreCase(contentType) || "NA".equalsIgnoreCase(fields)) {
            return;
        }
        String responseStr = response.getBody().asString().trim();

        try {
            if ("text".equalsIgnoreCase(contentType)) {
                // For text, verify each expected value is present in response
                for (String expected : fields.split(";")) {
                    expected = replacePlaceholders(expected.trim());
                    if (!responseStr.contains(expected)) {
                        throw new AssertionError("Expected text not found: " + expected);
                    }
                    TestContextLogger.scenarioLog("API", "Text found: " + expected);
                }
            } else if ("json".equalsIgnoreCase(contentType)) {
                // For json, verify key=value pairs
                JSONObject jsonResponse;
                if (responseStr.startsWith("[")) {
                    JSONArray arr = new JSONArray(responseStr);
                    jsonResponse = !arr.isEmpty() ? arr.getJSONObject(0) : new JSONObject();
                } else {
                    jsonResponse = new JSONObject(responseStr);
                }
                for (String pair : fields.split(";")) {
                    if (pair.trim().isEmpty()) continue;
                    String[] kv = pair.split("=", 2);
                    if (kv.length < 2) continue;
                    String keyPath = kv[0].trim();
                    String expected = replacePlaceholders(kv[1].trim());
                    Object actual = JsonFileReader.getJsonValueByPath(jsonResponse, keyPath);
                    if (actual == null) {
                        throw new AssertionError("Key not found in JSON: " + keyPath);
                    }
                    if (!String.valueOf(actual).equals(String.valueOf(expected))) {
                        throw new AssertionError("Mismatch for " + keyPath + ": expected '" + expected + "', got '" + actual + "'");
                    }
                    TestContextLogger.scenarioLog("API", "Validated: " + keyPath + " = " + expected);
                }
            } else {
                throw new AssertionError("Unsupported content type: " + contentType);
            }
        } catch (AssertionError | Exception e) {
            TestContextLogger.scenarioLog("API", "Validation failed: " + e.getMessage());
            throw e;
        }
    }
Step 5: Creating API
Till now we have successfully created a feature file and a step file now in this step we will be creating a utility file. Generally, in Web automation, we have page files that contain the locators and the actions to perform on the web elements but in this framework, we will be creating a single utility file just like the step file. The utility file contains the API methods and the endpoints to perform the specific action like, POST, PUT, GET, or DELETE. The request body i.e. payload and the response body will be captured using the methods present in the utility file. So the reason these methods are created in the utility file is that we can use them multiple times and don’t have to create the same method over and over again.
package org.Spurqlabs.Utils;

import io.restassured.RestAssured;
import io.restassured.http.ContentType;
import io.restassured.response.Response;
import io.restassured.specification.RequestSpecification;

import java.io.File;
import java.util.Map;

public class APIUtility {
    public static Response sendRequest(String method, String url, Map<String, String> headers, Map<String, String> queryParams, Object body) {
        RequestSpecification request = RestAssured.given();
        if (headers != null && !headers.isEmpty()) {
            request.headers(headers);
        }
        if (queryParams != null && !queryParams.isEmpty()) {
            request.queryParams(queryParams);
        }
        if (body != null && !method.equalsIgnoreCase("GET")) {
            if (headers == null || !headers.containsKey("Content-Type")) {
                request.header("Content-Type", "application/json");
            }
            request.body(body);
        }
        switch (method.trim().toUpperCase()) {
            case "GET":
                return request.get(url);
            case "POST":
                return request.post(url);
            case "PUT":
                return request.put(url);
            case "PATCH":
                return request.patch(url);
            case "DELETE":
                return request.delete(url);
            default:
                throw new IllegalArgumentException("Unsupported HTTP method: " + method);
        }
    }
Step 6: Create a Token Generation using Playwright
In this step, we automate the process of generating authentication tokens using Playwright. Many APIs require login-based tokens (like cookies or bearer tokens), and managing them manually can be difficult — especially when they expire frequently.
The TokenManager class handles this by:
- Logging into the application automatically using Playwright.
- Extracting authentication cookies (OauthHMAC, OauthExpires, BearerToken).
- Storing the token in a local JSON file for reuse.
- Refreshing the token automatically when it expires.
This ensures that your API tests always use a valid token without manual updates, making the framework fully automated and CI/CD ready.
package org.Spurqlabs.Utils;

import java.io.*;
import java.nio.file.*;
import java.time.Instant;
import java.util.HashMap;
import java.util.Map;
import com.google.gson.Gson;
import com.google.gson.reflect.TypeToken;
import com.microsoft.playwright.*;
import com.microsoft.playwright.options.Cookie;

public class TokenManager {
    private static final ThreadLocal<String> tokenThreadLocal = new ThreadLocal<>();
    private static final ThreadLocal<Long> expiryThreadLocal = new ThreadLocal<>();
    private static final String TOKEN_FILE = "token.json";
    private static final long TOKEN_VALIDITY_SECONDS = 30 * 60; // 30 minutes

    public static String getToken() {
        String token = tokenThreadLocal.get();
        Long expiry = expiryThreadLocal.get();
        if (token == null || expiry == null || Instant.now().getEpochSecond() >= expiry) {
            // Try to read from a file (for multi-JVM/CI)
            Map<String, Object> fileToken = readTokenFromFile();
            if (fileToken != null) {
                token = (String) fileToken.get("token");
                expiry = ((Number) fileToken.get("expiry")).longValue();
            }
            // If still null or expired, fetch new
            if (token == null || expiry == null || Instant.now().getEpochSecond() >= expiry) {
                Map<String, Object> newToken = generateAuthTokenViaBrowser();
                token = (String) newToken.get("token");
                expiry = (Long) newToken.get("expiry");
                writeTokenToFile(token, expiry);
            }
            tokenThreadLocal.set(token);
            expiryThreadLocal.set(expiry);
        }
        return token;
    }

    private static Map<String, Object> generateAuthTokenViaBrowser() {
        String bearerToken;
        long expiry = Instant.now().getEpochSecond() + TOKEN_VALIDITY_SECONDS;
        int maxRetries = 2;
        int attempt = 0;
        Exception lastException = null;
        while (attempt < maxRetries) {
            try (Playwright playwright = Playwright.create()) {
                Browser browser = playwright.chromium().launch(new BrowserType.LaunchOptions().setHeadless(true));
                BrowserContext context = browser.newContext();
                Page page = context.newPage();

                // Robust wait for login page to load
                page.navigate(FrameworkConfigReader.getFrameworkConfig("BaseUrl"), new Page.NavigateOptions().setTimeout(60000));
                page.waitForSelector("#email", new Page.WaitForSelectorOptions().setTimeout(20000));
                page.waitForSelector("#password", new Page.WaitForSelectorOptions().setTimeout(20000));
                page.waitForSelector("button[type='submit']", new Page.WaitForSelectorOptions().setTimeout(20000));

                // Fill a login form
                page.fill("#email", FrameworkConfigReader.getFrameworkConfig("UserEmail"));
                page.fill("#password", FrameworkConfigReader.getFrameworkConfig("UserPassword"));
                page.waitForSelector("button[type='submit']:not([disabled])", new Page.WaitForSelectorOptions().setTimeout(10000));
                page.click("button[type='submit']");

                // Wait for either dashboard element or flexible URL match
                boolean loggedIn;
                try {
                    page.waitForSelector(".dashboard, .main-content, .navbar, .sidebar", new Page.WaitForSelectorOptions().setTimeout(20000));
                    loggedIn = true;
                } catch (Exception e) {
                    // fallback to URL check
                    try {
                        page.waitForURL(url -> url.startsWith(FrameworkConfigReader.getFrameworkConfig("BaseUrl")), new Page.WaitForURLOptions().setTimeout(30000));
                        loggedIn = true;
                    } catch (Exception ex) {
                        // Both checks failed
                        loggedIn = false;
                    }
                }
                if (!loggedIn) {
                    throw new RuntimeException("Login did not complete successfully: dashboard element or expected URL not found");
                }

                // Extract cookies
                String oauthHMAC = null;
                String oauthExpires = null;
                String token = null;
                for (Cookie cookie : context.cookies()) {
                    switch (cookie.name) {
                        case "OauthHMAC":
                            oauthHMAC = cookie.name + "=" + cookie.value;
                            break;
                        case "OauthExpires":
                            oauthExpires = cookie.name + "=" + cookie.value;
                            if (cookie.expires != null && cookie.expires > 0) {
                                expiry = cookie.expires.longValue();
                            }
                            break;
                        case "BearerToken":
                            token = cookie.name + "=" + cookie.value;
                            break;
                    }
                }
                if (oauthHMAC != null && oauthExpires != null && token != null) {
                    bearerToken = oauthHMAC + ";" + oauthExpires + ";" + token + ";";
                } else {
                    throw new RuntimeException("❗ One or more cookies are missing: OauthHMAC, OauthExpires, BearerToken");
                }
                browser.close();
                Map<String, Object> map = new HashMap<>();
                map.put("token", bearerToken);
                map.put("expiry", expiry);
                return map;
            } catch (Exception e) {
                lastException = e;
                System.err.println("[TokenManager] Login attempt " + (attempt + 1) + " failed: " + e.getMessage());
                attempt++;
                try { Thread.sleep(2000); } catch (InterruptedException ignored) {}
            }
        }
        throw new RuntimeException("Failed to generate auth token after " + maxRetries + " attempts", lastException);
    }

    private static void writeTokenToFile(String token, long expiry) {
        try {
            Map<String, Object> map = new HashMap<>();
            map.put("token", token);
            map.put("expiry", expiry);
            String json = new Gson().toJson(map);
            Files.write(Paths.get(TOKEN_FILE), json.getBytes());
        } catch (IOException e) {
            e.printStackTrace();
        }
    }

    private static Map<String, Object> readTokenFromFile() {
        try {
            Path path = Paths.get(TOKEN_FILE);
            if (!Files.exists(path)) return null;
            String json = new String(Files.readAllBytes(path));
            return new Gson().fromJson(json, new TypeToken<Map<String, Object>>() {}.getType());
        } catch (IOException e) {
            return null;
        }
    }
}
Step 7: Create Framework Config File
A good tester is one who knows the use and importance of config files. In this framework, we are also going to use the config file. Here, we are just going to put the base URL in this config file and will be using the same in the utility file over and over again. The config file contains more data than just of base URL when you start exploring the framework and start automating the new endpoints then at some point, you will realize that some data can be added to the config file.
Additionally, the purpose of the config files is to make tests more maintainable and reusable. Another benefit of a config file is that it makes the code more modular and easier to understand as all the configuration settings are stored in a separate file and it makes it easier to update the configuration settings for all the tests at once.
{
  "BaseUrl": "https://app.sample.com",
  "UserEmail": "************.com",
  "UserPassword": "#############",
  "ExecutionBrowser": "chromium",
  "Resources": "/src/test/resources/",
  "Query_Parameters": "src/test/resources/Query_Parameters/",
  "Request_Bodies": "src/test/resources/Request_Bodies/",
  "Schema": "src/test/resources/Schema/",
  "TestResultsDir": "test-output/",
  "headers": "src/test/resources/headers/",
  "DealDetails": "DealDetails.json",
  "UploadDocUrl": "/api/v1/documents"
}
Step 8: Execute and Generate Cucumber Report
At this stage, we create the TestRunner class, which serves as the entry point to execute all Cucumber feature files. It uses TestNG as the test executor and integrates Cucumber for running BDD-style test scenarios.
The @CucumberOptions annotation defines:
- features → Location of all .feature files.
- glue → Packages containing step definitions and hooks.
- plugin → Reporting options like JSON and HTML reports.
After execution, Cucumber automatically generates:
- Cucumber.json → For CI/CD and detailed reporting.
- Cucumber.html → A user-friendly HTML report showing test results.
This setup makes it easy to run all API tests and view clean, structured reports for quick analysis.
package org.Spurqlabs.Core;
import io.cucumber.testng.AbstractTestNGCucumberTests;
import io.cucumber.testng.CucumberOptions;
import org.testng.annotations.AfterSuite;
import org.testng.annotations.BeforeSuite;
import org.testng.annotations.DataProvider;
import org.Spurqlabs.Utils.CustomHtmlReport;
import org.Spurqlabs.Utils.ScenarioResultCollector;

@CucumberOptions(
        features = {"src/test/resources/Features"},
        glue = {"org.Spurqlabs.Steps", "org.Spurqlabs.Core"},
        plugin = {"pretty", "json:test-output/Cucumber.json","html:test-output/Cucumber.html"}
)

public class TestRunner {}
Running your test
Once the framework is set up, you can execute your API automation suite directly from the command line using Maven. Maven handles compiling, running tests, and generating reports automatically.
Run All Tests –
To run all Cucumber feature files:
mvn clean test - clean → Deletes old compiled files and previous reports for a fresh run.
- test → Executes all test scenarios defined in your project.
After running this command, Maven will trigger the Cucumber TestRunner, execute all scenarios, and generate reports in the test-output folder.
Run Tests by Tag –
Tags allow you to selectively run specific test scenarios or features.
You can add tags like @api1, @smoke, or @regression in your .feature files to categorize tests.
Example:
@api1
Scenario: Verify POST API creates a record successfully
  Given User sends "POST" request to "/api/v1/create" ...
  Then User verifies the response status code is 201
To execute only scenarios with a specific tag, use:
mvn clean test -Dcucumber.filter.tags="@api1" - The framework will run only those tests that have the tag @api1.
- You can combine tags for more flexibility:
- @api1 or @api2 → Runs tests with either tag.
- @smoke and not @wip → Runs smoke tests excluding work-in-progress scenarios.
This is especially useful when running specific test groups in CI/CD pipelines.
View Test Reports
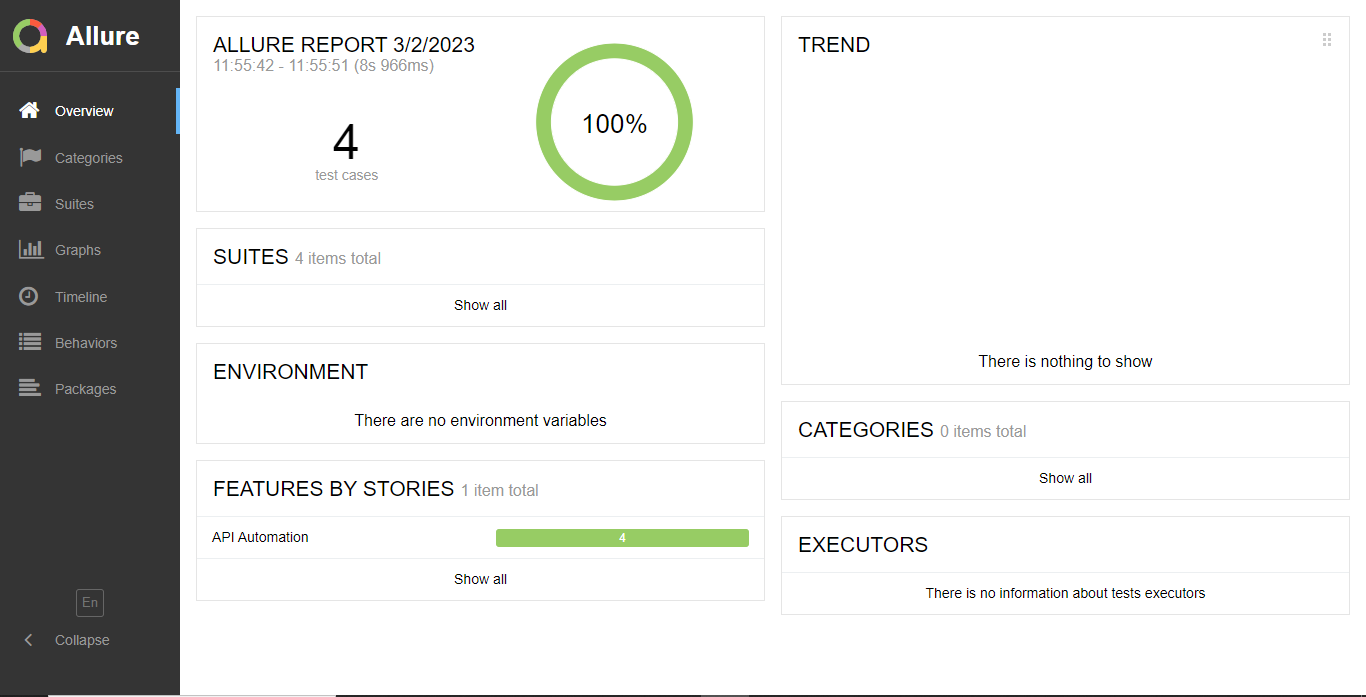
API Automation Testing Framerwork Report – After the execution, Cucumber generates detailed reports automatically in the test-output directory:
- Cucumber.html → User-friendly HTML report showing scenario results and logs.
- Cucumber.json → JSON format report for CI/CD integrations or analytics tools.
You can open the report in your browser:
project-root/test-output/Cucumber.html
This section gives testers a clear understanding of how to:
- Run all or specific tests using tags,
- Filter executions during CI/CD, and
- Locate and view the generated reports.

Reference Framework GitHub Link – https://github.com/spurqlabs/APIAutomation_RestAssured_Cucumber_Playwright
Conclusion
API automation testing framework ensures that backend services are functioning properly before the application reaches the end user.
Therefore, by integrating Cucumber, RestAssured, and Playwright, we have built a flexible and maintainable test framework that:
- Supports BDD style scenarios.
- Handles token-based authentication automatically.
- Provides reusable utilities for API calls.
- Generates rich HTML reports for easy analysis.
This hybrid setup helps QA engineers achieve faster feedback, maintain cleaner code, and enhance the overall quality of the software.
I am a Jr. SDET Engineer with experience in Manual and Automation Testing (UI & API). Skilled in Selenium, Playwright, Cucumber, Java, Postman, and SQL for developing and executing automated test cases. Proficient with GitHub, Bitbucket, and CI/CD tools like GitHub Actions, with hands-on experience in Regression testing, Defect tracking, and delivering high-quality software solutions.