
Desktop Automation Made Easy: A Winium, Java, and BDD Guide
Introduction:
Desktop application test automation can be a tedious task as it’s hard to locate the elements and interact with those elements. There are plenty of tools available for automating desktop applications. Winium is one of those tools which is a selenium-based tool. So for those who don’t have an idea about Selenium, Selenium is a web application test automation tool that supports almost all programming languages. (Wish to learn more about selenium? Check out the link here) If you are familiar with the Selenium tool then it’s going to be easy for you to understand the workings of the Winium tool as most of the methods are common and if you are not familiar with Selenium no worries, I have got you covered.
Coming back to our topic, In this blog we will see how we can create a robust test automation framework for automating desktop applications using Winium a desktop application automation tool, Java as a programming language, Maven, as a dependency management tool, Cucumber as a BDD (Behavior Driven Development) tool. We are going to build a test automation framework from scratch. Even if you don’t have any idea on how to create a framework no worries.
Before we start building the framework let’s complete the environment set-up. So for this, we will have to install some tools. Below I am sharing the URLs of the tools we are using just in case if you want to know more about these tools then you can visit these official web pages.
- Winium Driver- https://github.com/2gis/Winium.Desktop
- Cucumber – https://cucumber.io/
- Java – https://www.java.com/en/
- Maven – https://maven.apache.org/
Setting up the environment for Desktop Automation:
Java Set-up :
- As we are using Java programming it is a must to have JDK installed on the system.
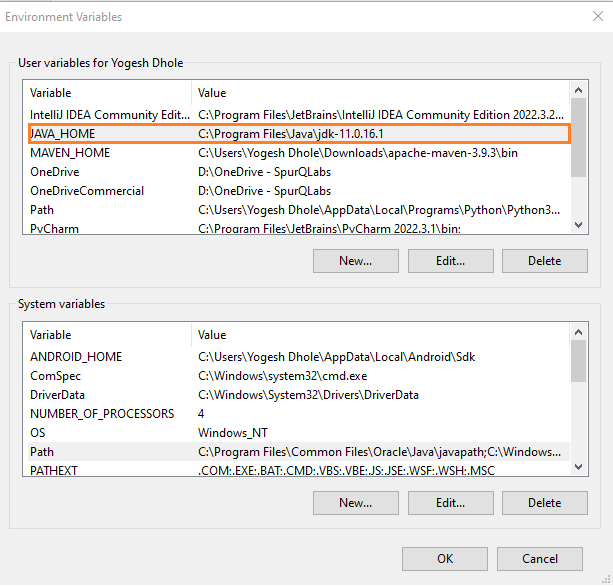
- You can download the JDK (Make sure the version is greater than 8) For instance I have the Java 11.0.16.1 version set up on my system.
- Use this link to download the Java SE Development Kit – https://www.oracle.com/in/java/technologies/javase/jdk11-archive-downloads.html
- Once the download is completed the next step is setting up the path in the environment variables. Check the below screenshots to set up the path in your system environment variables

- Once you are done with the above steps then you should see the below information in the command prompt.

Maven Set-up :
- Once you are done with Java Installation and set up the next step is to do the installation and set up the maven.
- To download the maven you can visit this official web page – https://maven.apache.org/download.cgi
- Again after installation, we have to set up the environment variable path for our system.
- See the below screenshots for your reference.


Intellij Idea IDE Set-up :
- For this framework, I am using Intellij Idea IDE. You can download and set up IDE using the below link.
- https://www.jetbrains.com/idea/download/?section=windows
Winium Driver Set-up :
- To interact with the desktop elements we need a winium driver just like we need the browser drivers to automate the web pages.
- To download the winium driver use this link – https://github.com/2gis/Winium.Desktop/releases
Inspect.Exe Set-up :
- We need an inspector to inspect the desktop application elements. We use different approaches and tools to inspect and locate the web page elements.
- Here we will use the Inspect.exe tool to inspect and locate the desktop application elements.
- Use this link to download and install the tool – https://github.com/blackrosezy/gui-inspect-tool/blob/master/Inspect.exe
- Not only that there are other desktop application element inspection tools.
- Once you are done with the above steps then we can start building the automation framework.
Implementing BDD with Cucumber for Desktop Automation:
The BDD (Behavior-Driven-Development) is a software development approach that focuses on collaboration among stakeholders, including developers, QA engineers, and business analysts. The reason behind this is that in the BDD approach, we use natural language specifications to describe software behaviour from the end user’s perspective. I believe this helps in creating a shared understanding of requirements and promotes effective communication throughout the development lifecycle. Let’s see this in detail,
Feature File Creation :
- Feature files are the main component of the BDD cucumber framework we can even say they are the heart of this cucumber framework.
- These files are written using gherkin language which describes the high-level functionalities of the application.
- Cucumber is a widely used BDD tool as it allows us to write test cases (scenarios) in plain tests using the Gherkin syntax.
- This is because Gherkin uses keywords like, Given, When, And, and Then to structure scenarios, making it easy to read and understand by both technical and non-technical stakeholders.
- Here is the one scenario that I have created for this framework.
@winiumApp
Feature: To verify the draw functionality of AutoCAD software
 As a User I want to launch the application
 and validate that I can access the different functionalities of the application.


 @smoke
 Scenario: Verify user can launch and open the new document using microsoft word application
   Given User launches the microsoft word application
   When User verifies the landing screen is visible with "Recent" opened document list
   And User clicks on "Blank document" option to add blank document
   Then User verifies that "Page 1 content" a new page for opened blank page is visible
Step Definition File Creation :
- Yes, that’s correct. Step definition files contain code that maps the steps in the feature file to automation code.
- These files are written using the programming language used in the automation framework, in this case, Java.
- The step definitions are responsible for interacting with the elements of the application and performing actions on them such as clicking, entering text, etc.
- They also contain assertions to check if the expected behaviour is observed in the application.
package com.SpurCumber.Steps;

import com.SpurCumber.Pages.DemoWiniumAppPage;
import com.SpurCumber.Utils.ScreenshotHelper;
import com.SpurCumber.Utils.TestContext;
import io.cucumber.java.en.And;
import io.cucumber.java.en.Given;
import io.cucumber.java.en.Then;
import io.cucumber.java.en.When;
import org.testng.Assert;


public class DemoWiniumAppSteps extends TestContext {
   private final DemoWiniumAppPage demoWiniumAppPage;

   public DemoWiniumAppSteps() {
       demoWiniumAppPage = new DemoWiniumAppPage(winiumdriver);
   }
   @Given("User launches the microsoft word application")
   public void userLaunchesTheMicrosoftWordApplication() {
       scenario.log("The application is launched successfully!");
       ScreenshotHelper.takeWebScreenshotBase64(winiumdriver);
       ScreenshotHelper.captureScreenshotAllure(winiumdriver, "User launches the microsoft word application");
   }

   @When("User verifies the landing screen is visible with {string} opened document list")
   public void userVerifiesTheLandingScreenIsVisible(String arg0) throws InterruptedException {
       Assert.assertTrue(demoWiniumAppPage.verifyScreen(arg0));
       ScreenshotHelper.takeWebScreenshotBase64(winiumdriver);
       ScreenshotHelper.captureScreenshotAllure(winiumdriver, "User verifies the landing screen is visible with "+arg0+" opened document list");
   }

   @And("User clicks on {string} option to add blank document")
   public void userClicksOnOptionToAddBlankDocument(String arg0) throws InterruptedException {
       demoWiniumAppPage.clickBtnByName(arg0);
       ScreenshotHelper.takeWebScreenshotBase64(winiumdriver);
       ScreenshotHelper.captureScreenshotAllure(winiumdriver, "User clicks on "+arg0+" option to add blank document");
   }

   @Then("User verifies that {string} a new page for opened blank page is visible")
   public void userVerifiesThatANewPageForOpenedBlankPageIsVisible(String arg0) throws InterruptedException {
       Assert.assertTrue(demoWiniumAppPage.verifyScreen(arg0));
       ScreenshotHelper.takeWebScreenshotBase64(winiumdriver);
       ScreenshotHelper.captureScreenshotAllure(winiumdriver, "User verifies that "+arg0+" a new page for opened blank page is visible");
   }
}
Hooks File Creation :
- In Cucumber, hooks are methods annotated with @Before and @After that run before and after each scenario.
- To ensure consistency between test environments, these hooks are used for setting up and taking down tests.
- The application can be initialized before and cleaned up after each scenario using hooks, for example.
package com.SpurCumber.Steps;
import com.SpurCumber.Utils.TestContext;
import com.SpurCumber.Utils.WiniumUtil;
import io.cucumber.java.After;
import io.cucumber.java.Before;
import io.cucumber.java.Scenario;
import java.io.IOException;

public class BaseSteps extends TestContext {
   @Before("@winiumApp")
   public void InitializeWiniumApp(Scenario scenario1) throws IOException, InterruptedException {
       scenario = scenario1;
       WiniumUtil.WiniumServerInit();
       Thread.sleep(3000);
       winiumdriver = WiniumUtil.WiniumIniit();
   }

   @After("@winiumApp")
   public void TearDownWiniumApp() {
       WiniumUtil.stopWiniumDriver();
       WiniumUtil.WiniumTearDown();
   }
}
Implementing Page Object Model (POM) for Desktop Automation:
The Page Object Model (POM) is a design pattern that assists in building automation frameworks that are scalable and maintainable. In POM, we create individual page classes for each application page or component, which encapsulates the interactions and elements associated with that particular page. This approach improves code readability, reduces code duplication, and enhances test maintenance.
package com.SpurCumber.Pages;

import org.openqa.selenium.WebElement;
import org.openqa.selenium.winium.WiniumDriver;

public class DemoWiniumAppPage {

   private final WiniumDriver winiumdriver;

   public DemoWiniumAppPage(WiniumDriver _winiumdriver) {
       this.winiumdriver = _winiumdriver;
   }

   public Boolean verifyScreen(String locator) throws InterruptedException {
       WebElement Screen = winiumdriver.findElementByName(locator);
       return Screen.isDisplayed();
   }

   public void clickBtnByName(String locator) throws InterruptedException {
       WebElement element = winiumdriver.findElementByName(locator);
       Thread.sleep(3000);
       element.click();
   }
}
Creating Utility Files to Support Framework:
In a test automation framework, utility files provide reusable functionalities, configurations, and helper methods to streamline the development, execution, and maintenance of test scripts. As a result, they enhance the efficiency, scalability, and maintainability of the automation framework. Listed below are a few common utility files, along with their functions:
Winium Util File :
- This utility file handles the launch and termination processes of the desktop application, as well as the Winium driver
- When we use Winium as a desktop application automation tool we have to start the server. (Winium Driver).
- Either we can do this manually before starting the execution of the test case or we can do this through automation as well.
- In the below utility file there are methods created for launching the desktop application and Winium driver (server).
package com.SpurCumber.Utils;

import org.openqa.selenium.winium.DesktopOptions;
import org.openqa.selenium.winium.WiniumDriver;
import java.net.URL;
public class WiniumUtil {

   private static WiniumDriver winiumdriver = null;
   private static Process winiumDriverProcess;

   public static WiniumDriver WiniumIniit() {
       try {
           DesktopOptions option = new DesktopOptions();
           option.setApplicationPath("C:\\ProgramData\\Microsoft\\Windows\\Start Menu\\Programs\\Word.lnk");
           winiumdriver = new WiniumDriver(new URL("http://localhost:9999"), option);
       } catch (Exception e) {
           e.printStackTrace();
       }
       return winiumdriver;
   }

   public static void WiniumTearDown() {
       if (winiumdriver != null) {
           winiumdriver.quit();
       }
       winiumdriver = null;
   }

   public static void WiniumServerInit() {
       try {
           String driverpath = CommonUtil.getResourceDirPath("Winium.Desktop.Driver.exe");
           String command = driverpath + " -p " + "9999";
           winiumDriverProcess = new ProcessBuilder("cmd.exe", "/c", command).start();
           Thread.sleep(5000);
       } catch (Exception e) {
           e.printStackTrace();
       }
   }

   public static void stopWiniumDriver() {
       try {
           winiumDriverProcess.destroy();
           Thread.sleep(3000);
       } catch (Exception e) {
           e.printStackTrace();
       }
   }
}
Common Util File :
- This common util file reads or retrieves the values and files present in a particular folder (referenced here as the resource folder).
- This file can further serve as a basis for developing additional common methods usable throughout the framework.
package com.SpurCumber.Utils;

import java.io.File;
import java.nio.file.Paths;

public class CommonUtil {

   public static String getResourceDirPath(String parameter) {
       String assemblyLocation = System.getProperty("user.dir");
       String path = Paths.get(assemblyLocation+"/src/test/resources/"+parameter).toString();
       return new File(path).getAbsolutePath();
   }
}
Test Runner File :
- The TestRunner class executes Cucumber tests with specified configuration settings, including the location of feature files, step definitions package, inclusion tags, and report generation plugins.
- The seamless integration of Cucumber tests into TestNG makes testing and reporting easy.
package com.SpurCumber.Utils;

import io.cucumber.testng.AbstractTestNGCucumberTests;
import io.cucumber.testng.CucumberOptions;
import org.testng.annotations.DataProvider;


@CucumberOptions(features = {"src/test/java/com/SpurCumber/Features"},
       glue = ("com.SpurCumber.Steps"),tags="@winiumApp",
       plugin = { "pretty","io.qameta.allure.cucumber7jvm.AllureCucumber7Jvm","pretty", "json:test-output/Cucumber.json","html:STDOUT","html:test-output/Cucumber.html" })
public class TestRunner extends AbstractTestNGCucumberTests {

   @DataProvider
   @Override
   public Object[][] scenarios() {
       return super.scenarios();
   }
}
Executing Tests:
Once we have defined the test scenarios, we will use Maven commands to execute them. Maven is a robust tool that manages project dependencies and automates the build process. With Maven, we can run automated tests with ease and ensure a smooth and efficient testing process.
Configuring Maven POM File(Pom.xml):
- In the project’s Maven Project Object Model (POM) file, we define the necessary configurations for test execution.
- This includes specifying the test runner class, defining the location of feature files and step definitions, setting up plugins for generating test reports, and configuring any additional dependencies required for testing.
<project xmlns="http://maven.apache.org/POM/4.0.0" xmlns:xsi="http://www.w3.org/2001/XMLSchema-instance"
        xsi:schemaLocation="http://maven.apache.org/POM/4.0.0 http://maven.apache.org/xsd/maven-4.0.0.xsd">
   <modelVersion>4.0.0</modelVersion>
   <groupId>com.SpurQLabs</groupId>
   <artifactId>SpurCumber</artifactId>
   <version>1.0-SNAPSHOT</version>
   <properties>
       <maven.compiler.source>11</maven.compiler.source>
       <maven.compiler.target>11</maven.compiler.target>
   </properties>
   <dependencies>
       <dependency>
           <groupId>io.cucumber</groupId>
           <artifactId>cucumber-java</artifactId>
           <version>7.12.0</version>
       </dependency>
       <dependency>
           <groupId>io.cucumber</groupId>
           <artifactId>cucumber-core</artifactId>
           <version>7.11.1</version>
       </dependency>
       <dependency>
           <groupId>io.cucumber</groupId>
           <artifactId>cucumber-testng</artifactId>
           <version>7.11.1</version>
       </dependency>
       <dependency>
           <groupId>io.cucumber</groupId>
           <artifactId>cucumber-picocontainer</artifactId>
           <version>7.11.1</version>
           <scope>test</scope>
       </dependency>
       <dependency>
           <groupId>io.rest-assured</groupId>
           <artifactId>json-path</artifactId>
           <version>5.3.0</version>
           <scope>test</scope>
       </dependency>
       <dependency>
           <groupId>io.rest-assured</groupId>
           <artifactId>json-schema-validator</artifactId>
           <version>5.3.0</version>
           <scope>test</scope>
       </dependency>
       <dependency>
           <groupId>org.testng</groupId>
           <artifactId>testng</artifactId>
           <version>7.7.1</version>
           <scope>test</scope>
       </dependency>
       <dependency>
           <groupId>io.qameta.allure</groupId>
           <artifactId>allure-cucumber7-jvm</artifactId>
           <version>2.24.0</version>
           <scope>test</scope>
       </dependency>
       <!-- https://mvnrepository.com/artifact/io.qameta.allure/allure-java-commons -->
       <dependency>
           <groupId>io.qameta.allure</groupId>
           <artifactId>allure-java-commons</artifactId>
           <version>2.21.0</version>
       </dependency>
       <dependency>
           <groupId>org.seleniumhq.selenium</groupId>
           <artifactId>selenium-java</artifactId>
           <version>3.141.59</version>
           <scope>test</scope>
       </dependency>
       <!-- https://mvnrepository.com/artifact/com.github.2gis.winium/winium-webdriver -->
       <dependency>
           <groupId>com.github.2gis.winium</groupId>
           <artifactId>winium-webdriver</artifactId>
           <version>0.1.0-1</version>
       </dependency>

   </dependencies>
   <build>
       <plugins>
           <plugin>
               <groupId>org.apache.maven.plugins</groupId>
               <artifactId>maven-compiler-plugin</artifactId>
               <version>3.8.1</version>
               <configuration>
                   <source>11</source>
                   <target>11</target>
               </configuration>
           </plugin>
           </plugins>


   </build>
   <repositories>
       <repository>
           <id>clojars</id>
           <name>Clojars</name>
           <url>https://repo.clojars.org/</url>
       </repository>
   </repositories>
</project>
Running Tests with Maven Commands:
Once you configure the automated tests in the Maven POM file, you can run them using Maven commands from the terminal or command prompt. Common Maven commands used for test execution include:
- mvn test – This command runs all the tests from the project.
- mvn clean test – This command first cleans the project (removes the target directory) and then runs the tests.
- mvn test “-Dcucumber.filter.tags=@tagName” – This command runs tests with specific Cucumber tags.
Generating Cucumber Reports:
Cucumber provides built-in support for generating comprehensive test reports. By configuring plugins in our automation framework, we can generate detailed reports that showcase the test results, including passed, failed, and pending scenarios. These reports offer valuable insights into the test execution, helping us identify issues, track progress, and make data-driven decisions for test improvements.


Conclusion:
Automating desktop applications with Winium, Java, and Behavior-Driven Development (BDD) using Cucumber is a strategic approach that offers numerous benefits to software development and testing teams. By combining these technologies and methodologies, we create a robust automation framework that enhances software quality, reduces manual efforts, and promotes collaboration across teams.
In conclusion, automating desktop applications with Winium, Java, and BDD using Cucumber empowers teams to deliver high-quality software efficiently. By leveraging the strengths of each technology and following best practices such as the Page Object Model and Maven integration, we create a solid foundation for successful test automation that aligns with business goals and enhances overall product quality.
Source Code:
You can access the complete source code of the created automation framework for desktop applications using Winium, Java, and BDD with Cucumber on GitHub at https://github.com/spurqlabs/Desktop-App-Winium-Java-Cucumber The framework includes feature files, step definitions, page classes following the Page Object Model, Maven dependencies, and configuration files for generating Cucumber reports. Feel free to explore, fork, and contribute to enhance the framework further.
An SDET Engineer with hands-on experience in manual, automation, API, Performance, and Security Testing. The technologies I have worked on include Selenium, Playwright, Cypress, SpecFlow, Cucumber, JMeter, K6, OWASP ZAP, Appium, Postman, Maven, Behave, Pytest, BrowserStack, SQL, GitHub, Java, JavaScript, Python, C#, HTML, CSS. Also, I have hands-on experience in CI/CD the technologies I have used for CI/CD include Azure DevOps, AWS, and Github. Apart from this, I like to write blogs and explore new technologies.