Understanding 2FA Authenticator Apps and Time-based One-Time Passwords (TOTP)
2FA Login using TOTP: In an era where cybersecurity is paramount, two-factor authentication (2FA) has become a cornerstone of online security. Authenticator apps and Time-based One-Time Passwords (TOTP) offer an additional layer of protection beyond traditional password-based security measures. This guide aims to elucidate the concept of 2FA authenticator apps, delve into the workings of TOTP, and provide insights into their importance in digital security.
What are 2FA Authenticator Apps?
Authenticator apps generate time-based one-time passwords (TOTPs) on mobile devices for authentication. They serve as a secure means of implementing 2FA, requiring users to provide both something they know (their password) and something they have (their mobile device with the authenticator app installed).
How Do 2FA Authenticator Apps Work?
Initialization: When setting up 2FA for an online account, users typically scan a QR code or manually enter a secret key provided by the service into their authenticator app.
Code Generation: Once initialized, the authenticator app generates TOTPs based on a shared secret key and the current time. These TOTPs are typically six-digit codes that change every 30 seconds.
Authentication: During login, users enter the current TOTP from their authenticator app along with their password. The service verifies the entered TOTP against the expected value based on the shared secret key.
Time-based One-Time Passwords (TOTP):
TOTP generates short-lived authentication codes using a shared secret key and the current time. The algorithm combines the secret key with the current time interval to produce a unique, one-time password that is valid only for a brief period, typically 30 seconds. TOTP ensures that even if an attacker intercepts a generated code, it quickly becomes obsolete, enhancing security.
Importance of Authenticator Apps and TOTP:
Enhanced Security: Authenticator apps provide an additional layer of security beyond passwords, significantly reducing the risk of unauthorized access to online accounts.
Protection Against Phishing: Because TOTP codes generate locally on your device and change with time, they resist phishing attacks that aim at stealing static passwords.
Convenience: Authenticator apps offer a convenient and user-friendly method of implementing 2FA, eliminating the need to rely on SMS-based authentication methods that may be vulnerable to SIM swapping attacks.
Authenticator apps and Time-based One-Time Passwords (TOTP) play a crucial role in safeguarding online accounts against unauthorized access and cyber threats. By incorporating 2FA with authenticator apps into their security protocols, individuals and organizations can significantly enhance their digital security posture in an increasingly interconnected world.
The protocol (otpauth) signals that an authenticator app should open this URL (DOMAIN).
the type (totp)
a label (USERNAME) that is a colon-separated combination of issuer and username
a secret (SECRET)
the issuer
The key element for logging in and automating the TOTP process is the supplied secret.
However, what’s the utilization method for this secret?
When you scan the QR code with an authenticator app, it combines the secret with the current time to create a unique password. The app then stores the second-factor secret, shows the issuer and username, and generates a new passcode every 30 seconds (though this time frame can be changed).That’s the gist of it!
You can then employ the passcode as a secondary login factor, providing assurance to services that it is indeed you are accessing your account.
Automating Login with Playwright for 2FA-Secured Websites
Automating the login process for websites secured with two-factor authentication (2FA) can streamline testing and administrative tasks. Playwright, a powerful automation library, provides the tools necessary to automate interactions with web pages, including those requiring 2FA.
Prerequisites:
Install Node.js: Make sure Node.js is installed on your system. You can download it from nodejs.org.
Set Up Playwright: Install Playwright using npm, the Node.js package manager, by running the following command in your terminal:
// Navigate to login page
await page.goto('https://example.com/login');
Enter Username and Password:
// Enter username and password
     await page.fill('#username', 'your_username');
     await page.fill('#password', 'your_password');
Click on the Login Button:
// Click on the login button
     await page.click('#loginButton');
Handle 2FA Authentication:
Playwright supports interacting with elements on the page to handle 2FA. You can wait for the 2FA input field to appear and then fill it with the code.
The new OTPAuth.TOTP() syntax indicates that an instance of the TOTP class from the OTPAuth library is being created.
This instance is configured with various parameters such as issuer, label, algorithm, digits, period, and secret, which are used to generate and validate one-time passwords for authentication purposes.
In essence, new OTPAuth.TOTP() initializes a new TOTP (Time-based One-Time Password) object, allowing the application to generate OTPs for user authentication.
totp.generate() is a method call on the totp object. This method is provided by the OTPAuth library and is used to generate a one-time password (OTP) based on the TOTP algorithm.
The generate() method computes the current OTP value based on the TOTP parameters configured earlier, such as the secret key, time period, and algorithm. This OTP is typically used for user authentication purposes.
Once token holds the generated OTP, it can be used in the subsequent lines of code for filling an authentication code input field and submitting it for authentication.
Here’s the final code.
import * as OTPAuth from 'otpauth';
export class LoginPage {
  readonly page: Page;
  private readonly loginButton: Locator;
  private readonly userNameInput: Locator;
  private readonly passwordInput: Locator;
  private readonly emailDisplay: Locator;
  private userEmail: any;
  private readonly authCode: Locator;
  private readonly submitAuthCode: Locator;

  constructor(page: Page) {
    this.page = page;
    this.loginButton = page.getByTestId(AppUniqueId.login_submitButton);
    this.userNameInput = page.getByTestId(AppUniqueId.login_username);
    this.passwordInput = page.getByTestId(AppUniqueId.login_password);
    this.emailDisplay = page.getByTestId(AppUniqueId.personalDetails_email);
    this.authCode = page.locator('#root > div > div > section > main > div > div > div > input');
    this.submitAuthCode = page.locator('#root > div > div > section > main > div > div > button');
  }
  async waitFor(ms: number) {
    return new Promise(resolve => setTimeout(resolve, ms));
}
  async loginUserUI(childUser: User) {
    let totp = new OTPAuth.TOTP({
      issuer: "ISSUER",
      label: "LABLE",
      algorithm: "SHA1",
      digits: 6,
      period: 30,
      secret: "XXXXXXXXXX”
    });
    await this.userNameInput.fill(await childUser.username);
    await this.passwordInput.fill(await childUser.password);
    await this.loginButton.click();
    try{
      let token = totp.generate()
      await this.authCode.fill(token, { timeout: 5000});
      await this.submitAuthCode.click()
    }catch(err)
    {

    }
  }
  async verifyLoginUserEmail(childUser: User) {
    this.userEmail = childUser.username;
    try{
         await this.page.locator("div[class='col-sm-12 d-flex impersonation-bar'] a").click()
     }catch(err)
      {

      }
  }
}
Conclusion:
Automating login for 2FA-secured websites using Playwright can enhance efficiency and productivity in various scenarios, from testing to administrative tasks. By following the steps outlined above, you can create robust automation scripts tailored to your specific requirements. https://github.com/apurvakolse/playwright-typescript-totp
Feel free to customize and expand upon these steps to suit your needs and the specific requirements of the website you’re working with.
Disclaimer: Ensure that you have the necessary permissions to automate interactions with websites, and use this knowledge responsibly and ethically.
Apurva is a Test Engineer, with 3+ years of experience in Manual and automation testing. Having hands-on experience in testing Web as well as Mobile applications in Selenium and Playwright BDD with Java. And loves to explore and learn new tools and technologies.
In this Blog will learn How to create a BDD automation framework using Cucumber in JavaScript and Playwright. The playwright is an open-source automation tool. Playwright offers several features that make it stand out are Multi-browser support, Automatic waiting Headless and headful mode, etc. Cucumber is a popular open-source BDD(Behavior Driven Development) testing framework, Which helps build a framework that can be easily understood by both technical and non-technical stakeholders.
Prerequisite:
To get started with Cucumber BDD with playwright-js we need to have the following things installed.
2)Node.js: It is a cross-platform JavaScript runtime environment that allows developers to run JavaScript code outside of a web browser. To get Node.js you can visit: https://nodejs.org/en/download To check Node.js is installed on your system you can use the command ‘node –version’ on CMD or VS Code Terminal.
3)Cucumber (Gherkin) Full Support Extention: This extension provides support for the Cucumber (Gherkin) language to VS Code. To get the extension click on the extension icon on the left side panel of VS Code, search for the extension and install it.
Project setup:
Before starting with framework development we need to create a folder structure.
Create a folder structure with the following steps: 1) Create a folder as ‘Playwright-JS-Demo’, 2) In VS Code open the Playwright-JS-Demo folder 3) Install Playwright and Cucumber by executing the following commands in terminal a. npm init playwright@latest
b.npm i @cucumber/cucumber After execution of these commands, you can see package.json, node_modules, and playwright.config.js is created in the folder structure.
4) once you open the project, create a folder structure as below.
As our project structure is ready, we can start with the framework.
1. TestHooks.js:
Test Hooks mainly contain methods to execute Before and After every execution.
The Before hook gets executed before each Scenario in a cucumber test suite.
In this hook, a new Chrome browser instance is launched for every Test Case.
A new page is created in context with ‘await context.newPage()‘ and assigned to the global variable ‘page‘, which is accessible for any Test Case. This ensures that the browser page is available for each scenario in the test suite.
Once execution is done After the method gets executed It closes the current browser instance.
With Cucumber-BDD we can write scenarios in understandable language. Here I have created a Scenario for OrangeHRM Login.
We can create a separate scenario for each functionality.
Every step in a Feature File describes the action we are going to perform on UI.
In the feature file, we can add specific tags for scenarios or complete feature file ex. @login, @smoke.
If you add a tag for a specific scenario then it will only execute the particular scenario. But if you add tags for the Feature It will execute all the Scenarios from the Feature File.
It will make test execution easy if you want to execute test cases for specific functionality.
Feature: Login Feature
@login
Scenario: Login to OrangeHRM
 When I Visit the OrangeHRM login page
 And I enter username
 And I enter Password
 And I click on Login button
Then I verify dashboard URL
3. LoginSteps.js:
Essentially, the purpose of the step file is to attach steps from the feature file to the page file, where actual implementation is available.
We use the “Given-When-Then” (BDD) format to write step definitions. The required statement imports the necessary modules like:
Cucumber library that contains definitions for When Then etc.
A custom LoginPage module that likely contains functions for interaction with the login page.
The steps with ‘When’ are related to the user actions like navigation, clicking on the button, and filling in the information in input boxes, etc. The steps with ‘Then’ are related to the verifications or Assertions, just like in this case I have verified if the Login is successful.
The page file contains the actual implementation of the scenario, We also defined all the functions needed for test execution. Additionally, the LoginPage class contains functions that interact with the login page elements, like navigation to the Login page, entering the username and password, clicking the login button, and verifying the dashboard URL. Moreover, the playwright provides different functions to handle the UI elements and pages. For this test case I have used goto(), click(), fill() waitFor().
process.env.WEB_URL, process.env.WEB_USERNAME and process.env.WEB_PASSWORD are the variables we are accessing from the .env file. (The use of the .env file is explained below in point no 6).
To access the .env file I have imported const path = require(‘path’);
In this file, we specify the paths of all the required files. It helps to identify files in the framework. Whenever you create any new file in the framework, you have to add a path for that new file in this Cucumber.json file so that it can be accessible during the test case execution.
.env file is a Configuration file that contains environment variables. Using a .env file is a best practice for keeping sensitive information separate from the code. Moreover, for this framework, we have stored information like URL to navigate and username and password to Login into the OrangeHRM Web application.
We are executing the ‘npx’ command to run the cucumber-js package which is a test framework for BDD. 1) –require ./steps/*.js specifies The step files from the specified path that should be loaded. 2)–tags @login specifies scenarios with @login tags are going to be executed. You can add more than one tag if needed.
3)–publish flag specifies that test results should be published to the Cucumber Cloud which is a service for storing and analyzing test results.
To start execution you can execute the command ‘npm run test’ in the terminal. Once execution is completed you can see the link for cucumber reports is available in the terminal. By clicking on this link you can see the execution report.
This is how the report looks when you click on the above URL
In conclusion, the BDD automation framework using Cucumber in JavaScript and Playwright helps improve the quality and efficiency of their testing process. This framework will help you to write test cases for any web application very efficiently, It also provides a great reusability of code.
Priyanka is an SDET with 1+ years of hands-on experience in Manual, Automation, and API testing. The technologies she has worked on include Selenium, Playwright, Cucumber, Appium, Postman, SQL, GitHub, and Java. Also, she is interested in Blog writing and learning new technologies.
For any web automation testing, the one and most important task is to identify and use robust locators to identify web elements so that your automated tests do not fail with “Unable to locate element”. In this article, we are providing you with the techniques that every tester should learn to create those robust locators. As we already know this can be done using different locator strategies. In this blog, we are going to learn about XPath. Before we dive into the topic of our discussion let’s just get more familiar with Xpaths. Let’s start with,
What is XPath?
XPath (XML Path Language) is an expression language that allows the processing of values conforming to the data model defined in the XQuery and XPath Data models. Basically, it is a query language that we use to locate or find an element present on the webpage. It is defined by the World Wide Consortium (W3C). Now, let’s discuss why Xpaths are necessary.
Why is XPaths necessary?
Xpaths are the most widely used locators in automation though there are other locators like id, name, class name, tag name, and so on. Also, it is used when there are no unique attributes available to locate the web element. It allows identification with the help of the visible test present on the screen with the help of Xpath function text().
Before explaining the importance of XPath let’s just go through the different types of locators available for automation testing.
In this blog, we will learn about the different types of Xpaths and how to implement them so that we can locate our web elements quickly using the selenium web driver. Basically, there are two types of Xpaths
1. Absolute XPath:
In this type, The XPath starts from the beginning or from the root node of the HTML DOM structure. It is a direct way to locate or find the web element but the disadvantage of absolute XPath is that as we are creating it from the start of the HTML DOM structure if there are any changes introduced in the created path of the web element then it gets failed. In this type of locator, we only use tags or nodes. The main advantage of this is that we can select a web element from the root node as it starts with the single forward slash “ / ”.
Example:
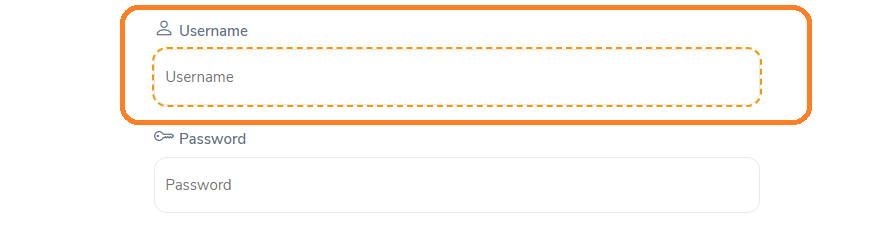
Here is an example of an absolute Xpath for an input field box.
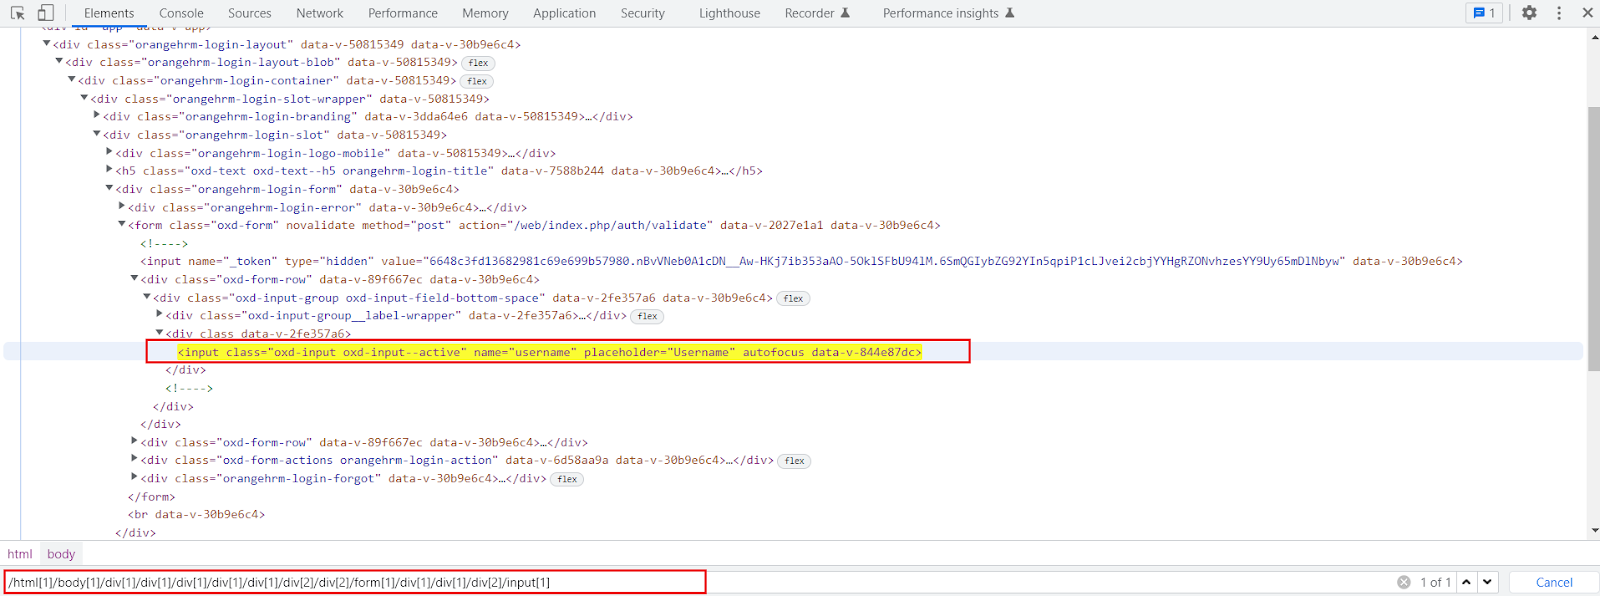
The absolute XPath is: /html[1]/body[1]/div[1]/div[1]/div[1]/div[1]/div[1]/div[2]/div[2]/form[1]/div[1]/div[1]/div[2]/input[1]
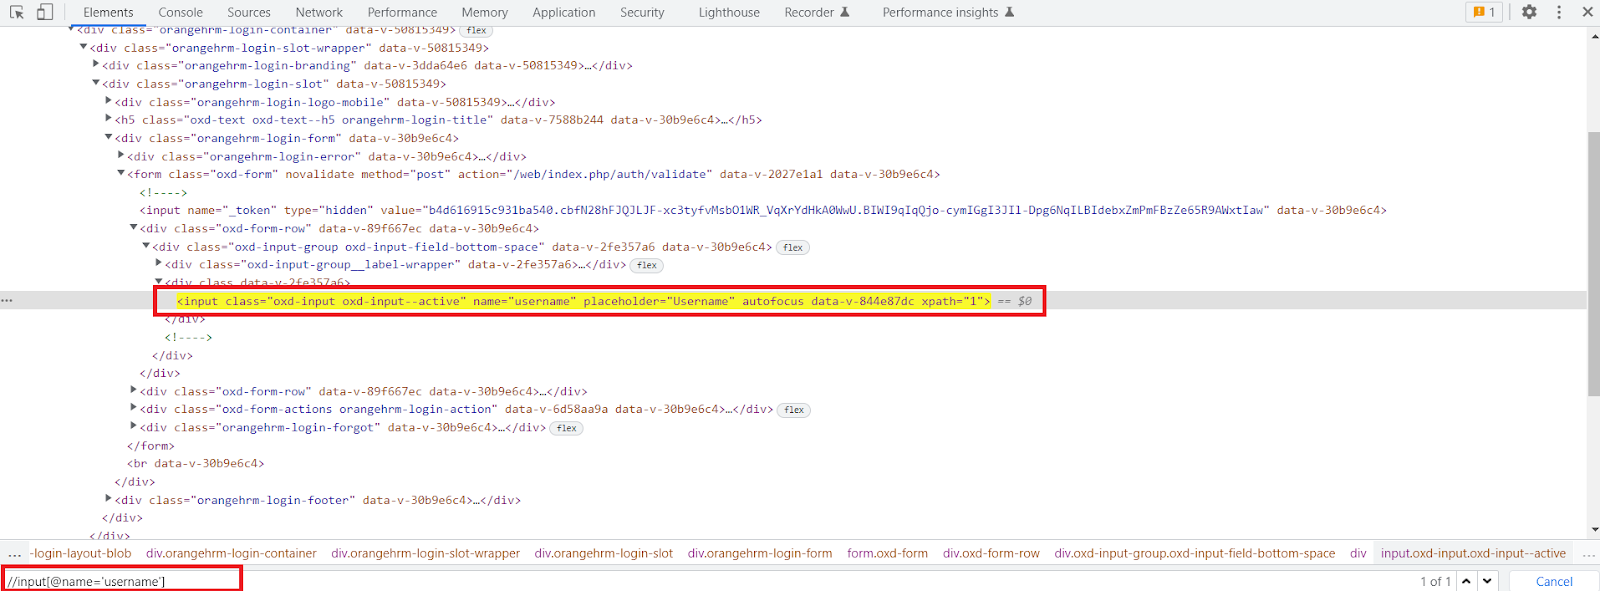
2. Relative Xpath:
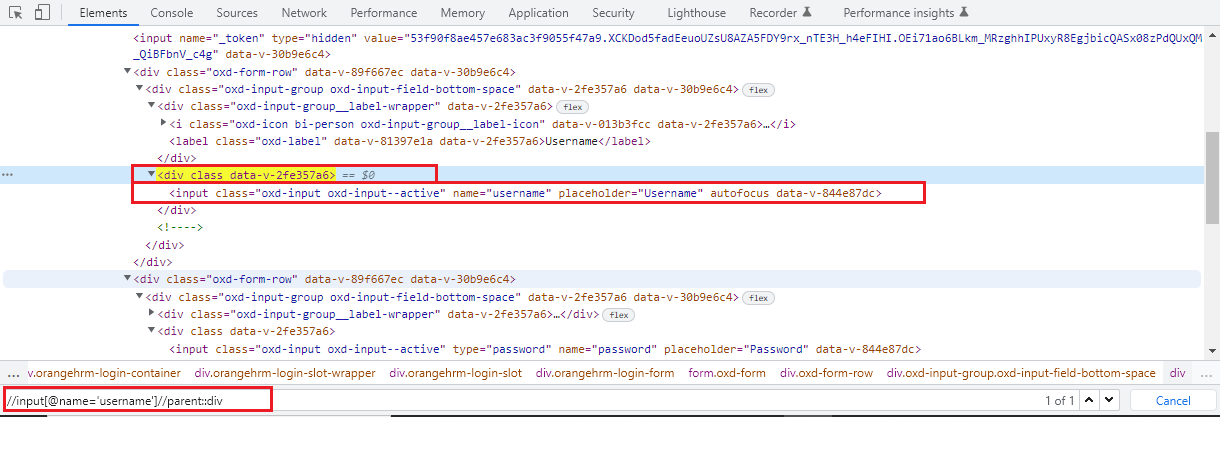
Compared to an absolute XPath the relative XPath does not start from the beginning of the HTML DOM structure. It starts from where the element is present e.g. from the middle of the HTML DOM structure if the element is located there. We don’t have to travel from the start of the HTML DOM structure. The relative Xpath starts with a double forward slash “ // “ and it can locate and search the web element anywhere on the webpage. Relative XPath directly jumps to elements on DOM. The other difference between absolute and relative XPath is that in absolute XPath we use tags or nodes but in relative XPath we use attributes.
Example:
We are writing the relative XPath for the same input field for which earlier we created an absolute XPath.
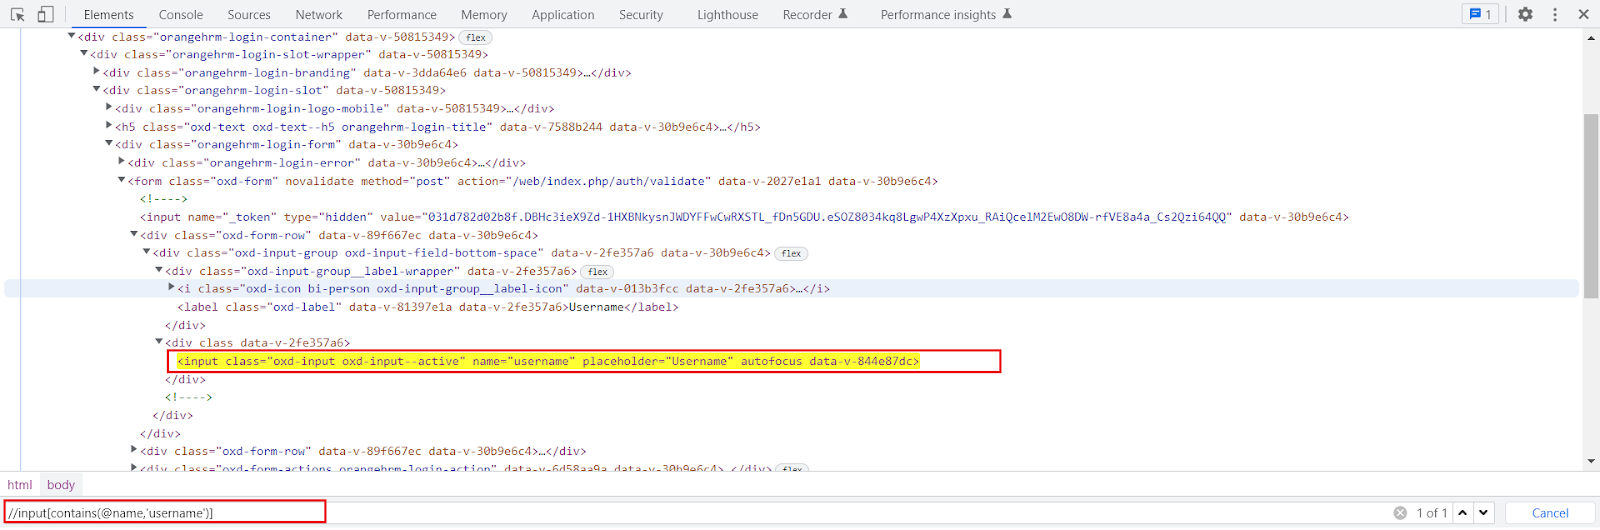
Relative XPath is:
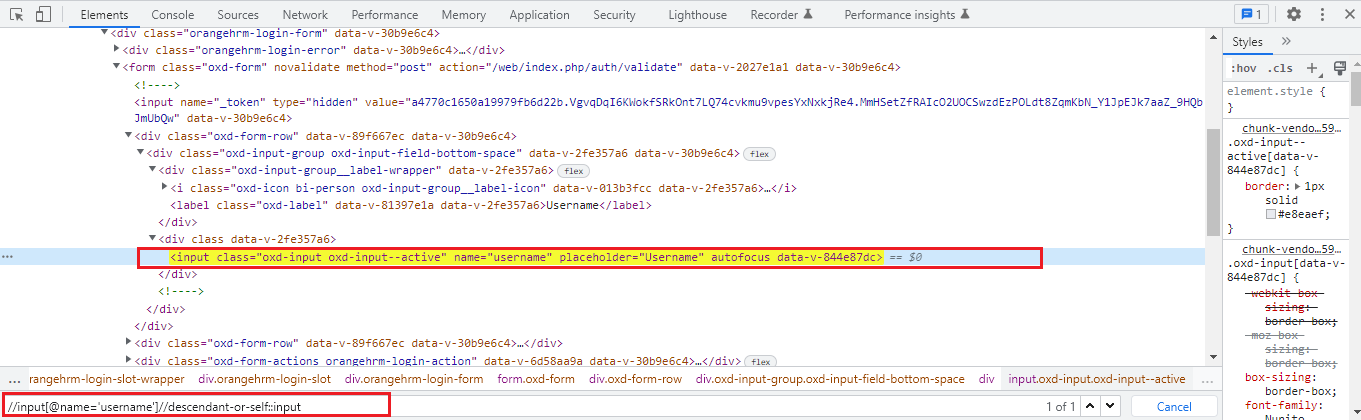
//input[@name=’username’]
XPath Functions:
It is not always possible to locate a web element using relative XPath that is because at some times while locating a particular web element there is the possibility of elements that have similar properties, for example, the same id, name, or same class name. So, here the basic XPath won’t work efficiently for finding that web element. Xpath functions are used to write the efficient XPath by locating a web element with a unique value. Basically, there are three types of XPath functions as follows,
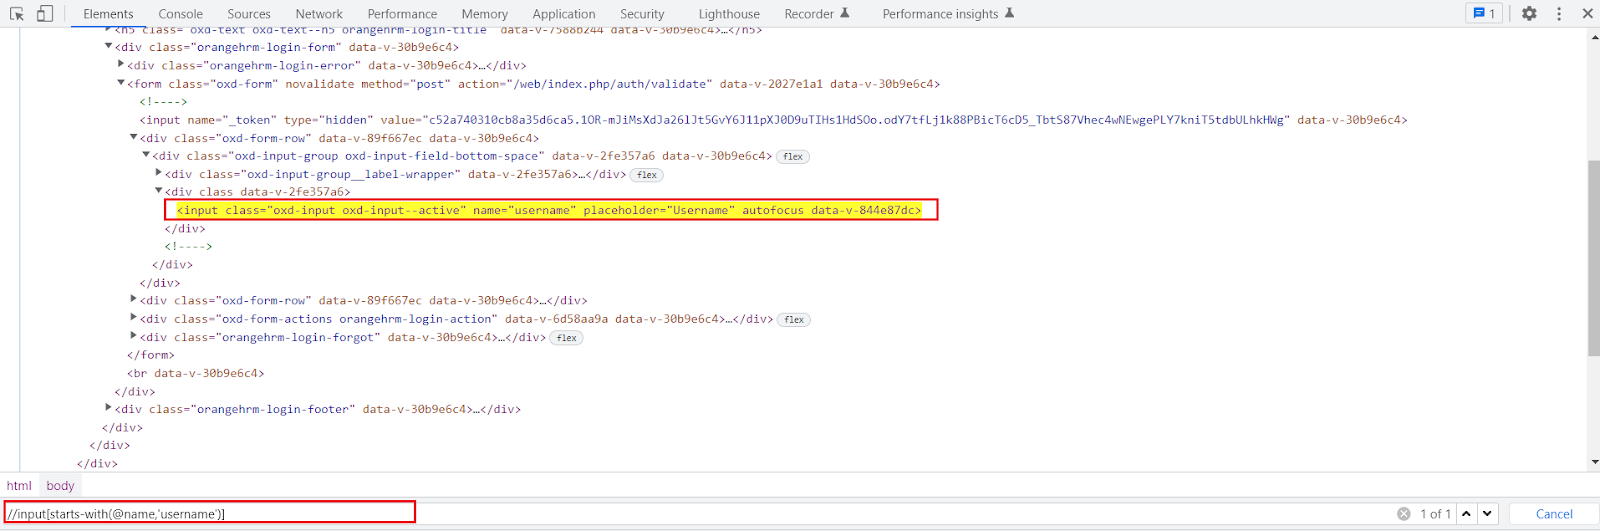
a. starts-with() Function:
starts-with() function is very useful in locating dynamic web elements. It is used to find the element in which the attribute value starts with some particular character or text.
While working on the dynamic web page the starts-with function plays an important role. We can use it to match the starting value of a web element that remains static.
It can also locate the web element whose attribute value is static.
Just like the start-with() function explained above, the contains() function is also used to create a unique expression to locate a web element.
It is used when if a part of the value of an attribute changes dynamically the function can navigate to the web element with the partial text present.
We can provide any partial attribute value to locate the web element.
It accepts two parameters the first one is the attribute of the tag must validate to locate the web element and the second one is the value of an attribute is a partial value that the attribute must contain.
Syntax:
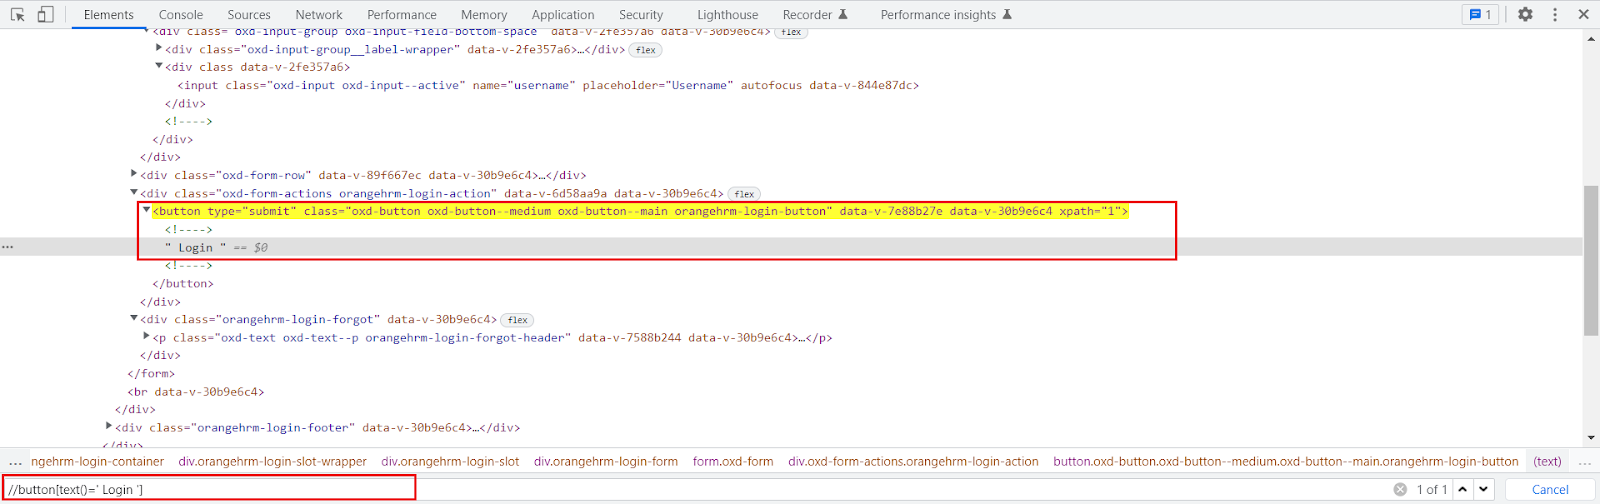
Xpath = //tagname[contains(@attribute,’value’)]
Example:
//input[contains(@name,’username’)]
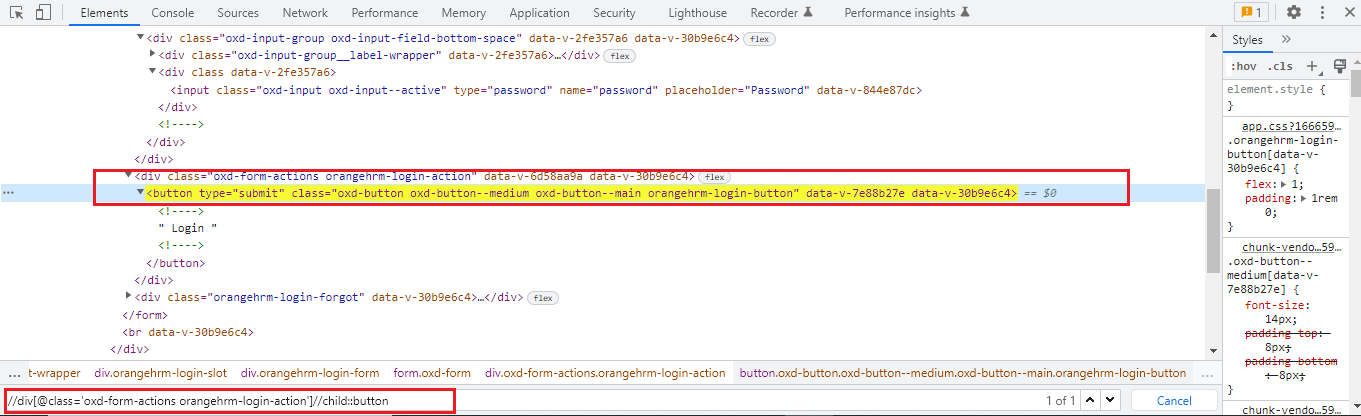
c. text() Function:
text() Function:
The text() function is used to locate web elements with exact text matches.
The function only works if the element contains the text.
This method returns the text of the web element when identified by the tag name and compared it with the value provided on the right side.
Syntax:
Xpath = //tagname[text()=’Actual text present’]
Example:
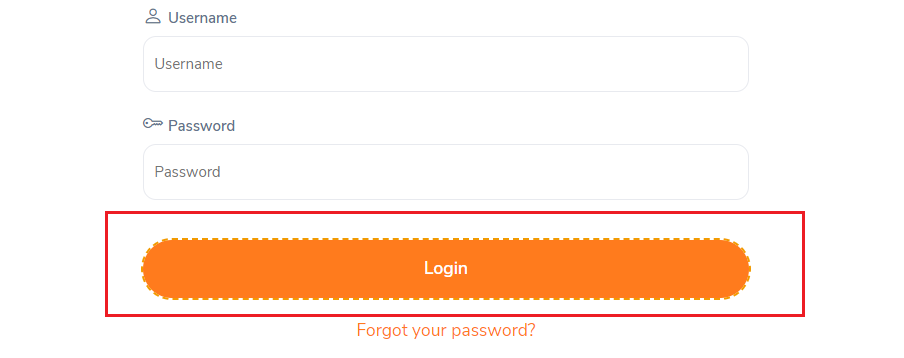
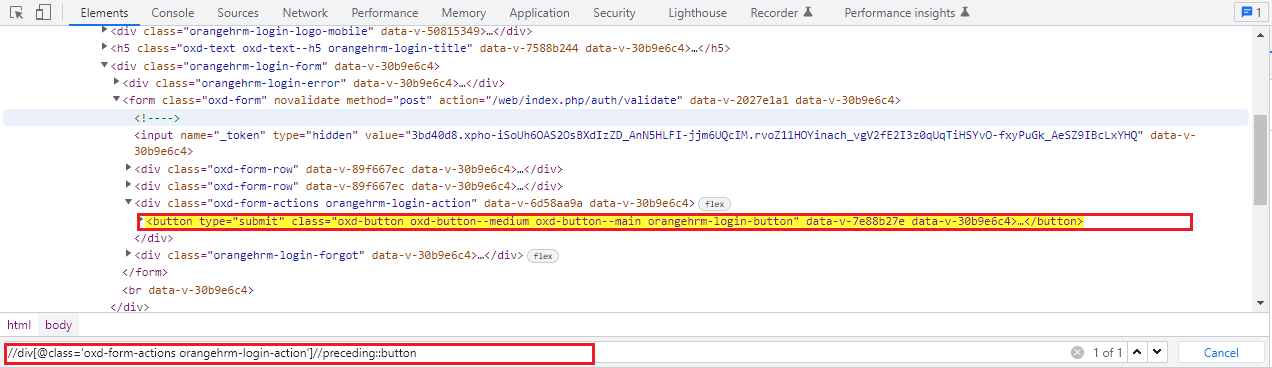
//button[text()=’ Login ‘]
How to use AND & OR in XPath:
AND & OR expressions can also be used in selenium Xpath expressions. Very useful if you want to use more than two attributes to find elements on a webpage.
The OR expression requires two conditions and it will check whether the first condition in the statement is true if so then it will locate that web element and if not then it will go for the second condition and if that is true then also it will locate that web element. So, here the point we should remember is that when we are using the OR expression at least either of two of the conditions should be true then, and then only it will find and locate that web element.
Syntax:
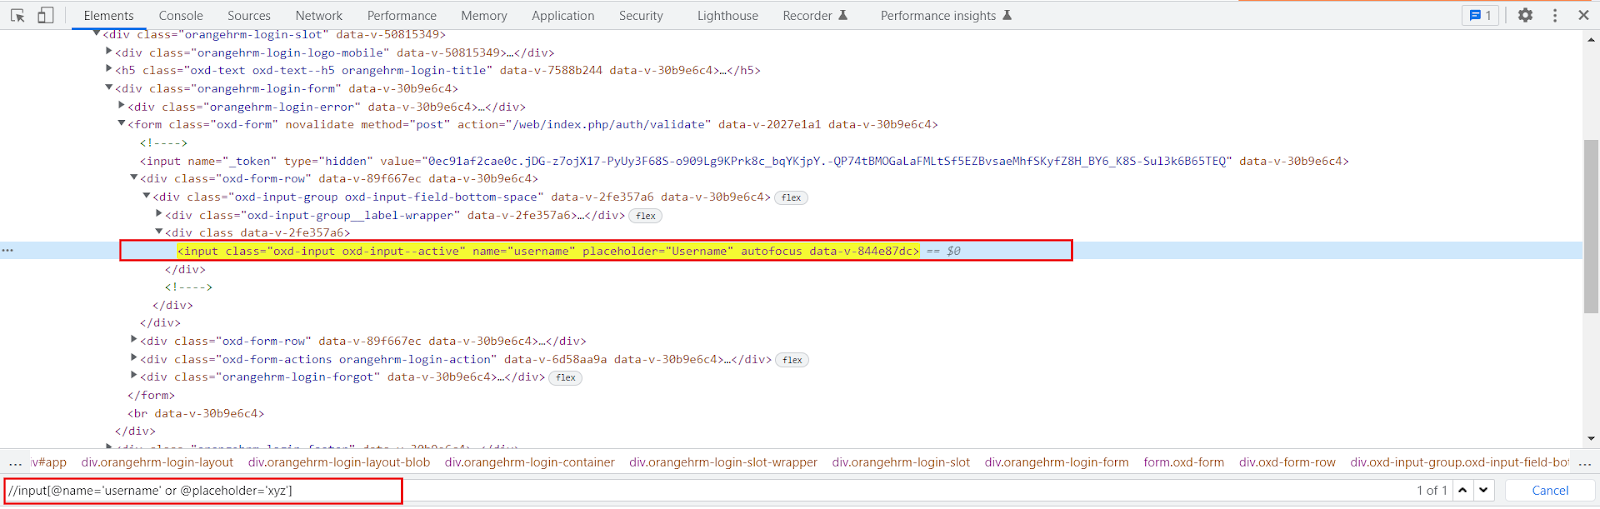
Xpath = //tagname[@attribute=’Value’ or @attribute=’Value’]
Example:
//input[@name=’username’ or @placeholder=’xyz’]
Here the first condition is true and the second one is false still the web element got located.
Just like the OR expression the AND expression also requires two conditions but the catch here is that both the provided condition must be true then and then only the web element will get located. If either of the conditions is false then it will not locate that web element.
Syntax:
Xpath = //tagname[@attribute=’Value’ and @attribute=’Value’]
Example:
//input[@name=’username’ and @placeholder=’Username’]
In this case, both the condition provided for an AND expression is true hence the web element got located.
XPath Axis:
It is a method to identify those dynamic elements that are impossible to find by normal XPath methods. All the elements are in a hierarchical structure and can be either located using absolute or relative Xpaths but it provides specific attributes called XPath axis to locate those elements with unique XPath expressions. The axes show a relationship to the current node and help locate the relative nodes concerning the tree’s current node. The dynamic elements are those elements on the webpage whose attributes dynamically change on refresh or any other operations. The HTML DOM structure contains one or more element nodes and they are known as trees of nodes. If an element contains the content, whether it is other elements or text, it must be declared with a start tag and an end tag. The text defined between the start tag and the end tag is the element content.
Types of XPath Axis:
1. Parent Axis XPath:
With the help of the parent axis XPath, we can select the parent of the current node. Here, the parent node can be either a root node or an element node. The point to consider here is that for all the other element nodes the maximum node the parent axis contains is one. Also, the root node of the HTML DOM structure has no parent hence the parent axis is empty when the current node is the root node.
As we have seen using the parent axis XPath actually we are creating an XPath by the following bottom-up approach but here in the child axis case, we are going to follow the top-down approach to create an XPath. The child axis selects all the child elements present under the current node. We can easily locate a web element as a child of the current node.
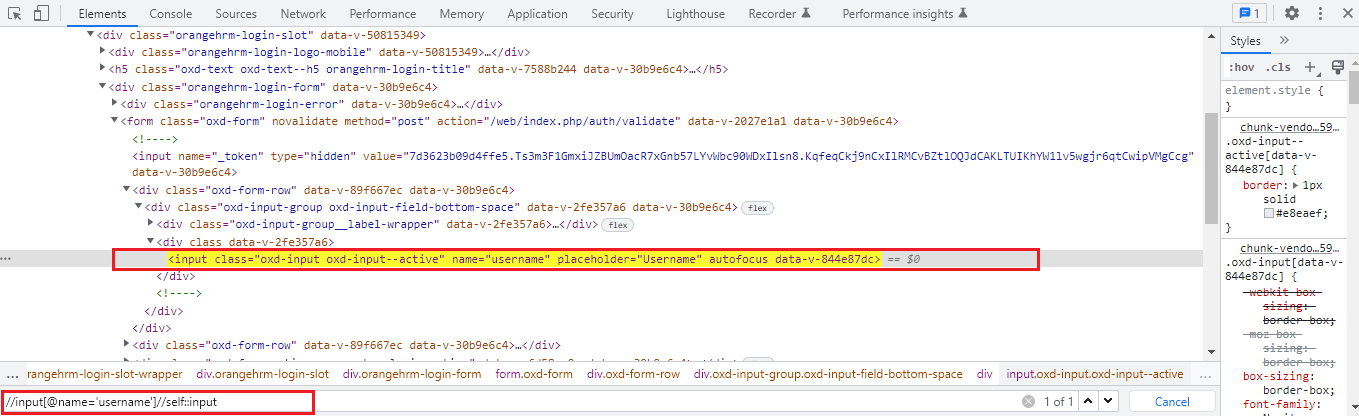
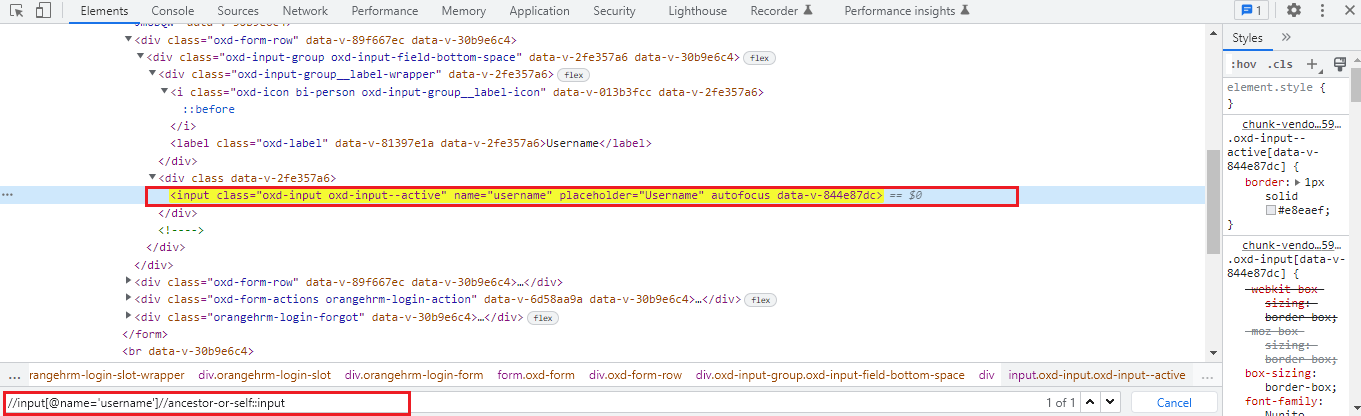
This type of XPath uses its own current node and selects the web element belonging to that current node. You will always observe only one node that represents the self-web element. The tag name we provide at the start and at the end of XPath are the same as they are on the self-axis of the current node. However, this provides the confirmation of the element present when there is more than one element present having the same value and attribute.
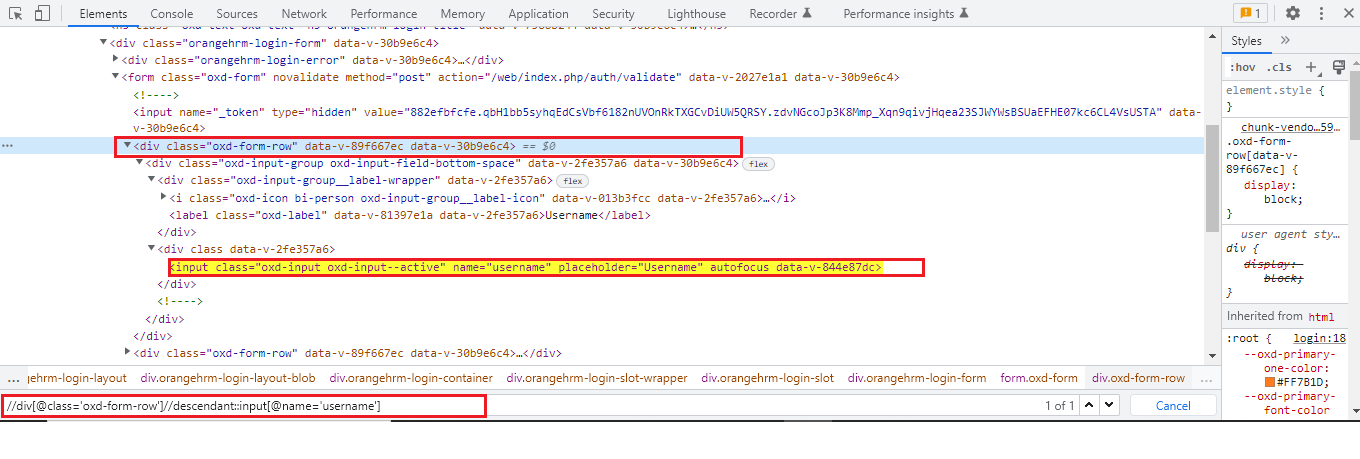
Using this axis we can select the current node and all its descendants i.e. child, grandchild, etc just like a descendant axis. The point to be noticed here is the tag name for descendants and self are the same.
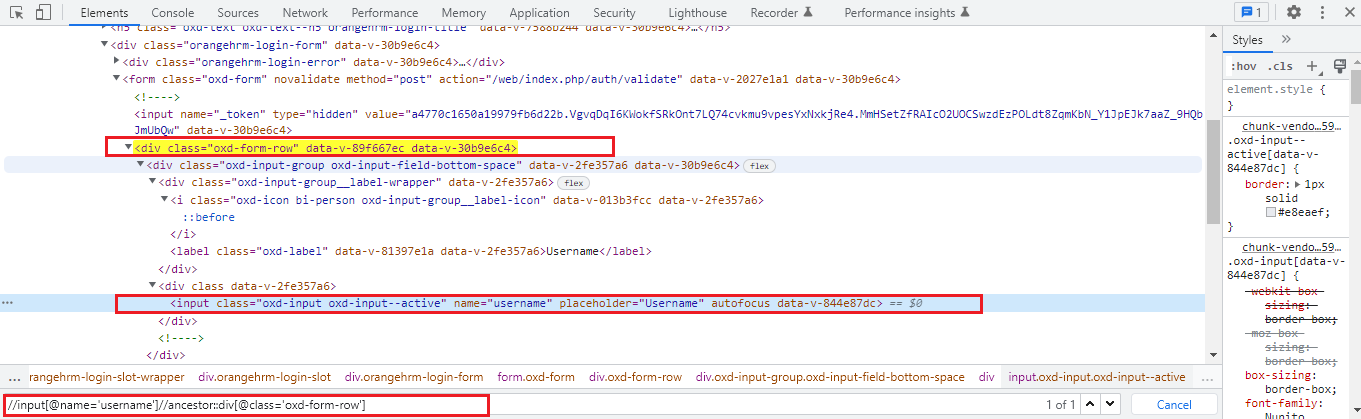
As we understand how the descendant axis works now, the ancestor axis works exactly opposite to that of the descendant axis. It will select or locate all ancestors elements i.e. parent, grandparent, etc of the current node. This axis contains the root node too.
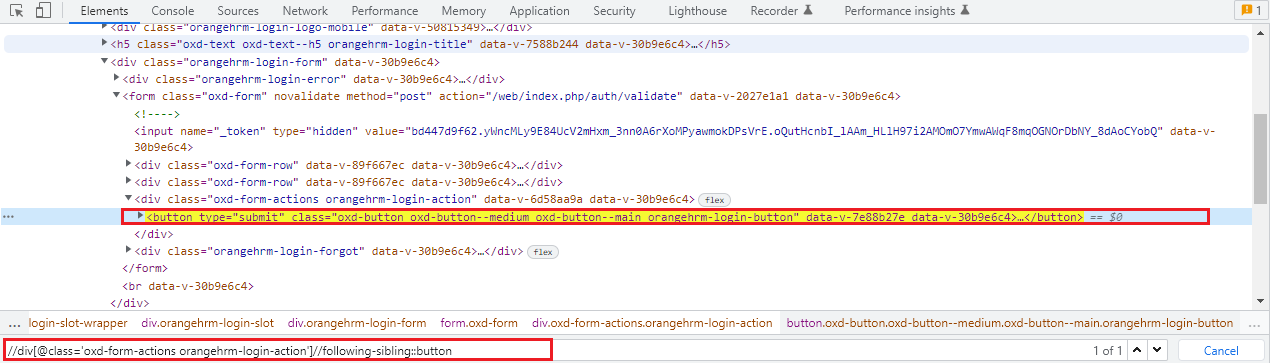
Using the following sibling axis method we can select all the nodes that have the same parent as that of the current node and that appear after the current node.
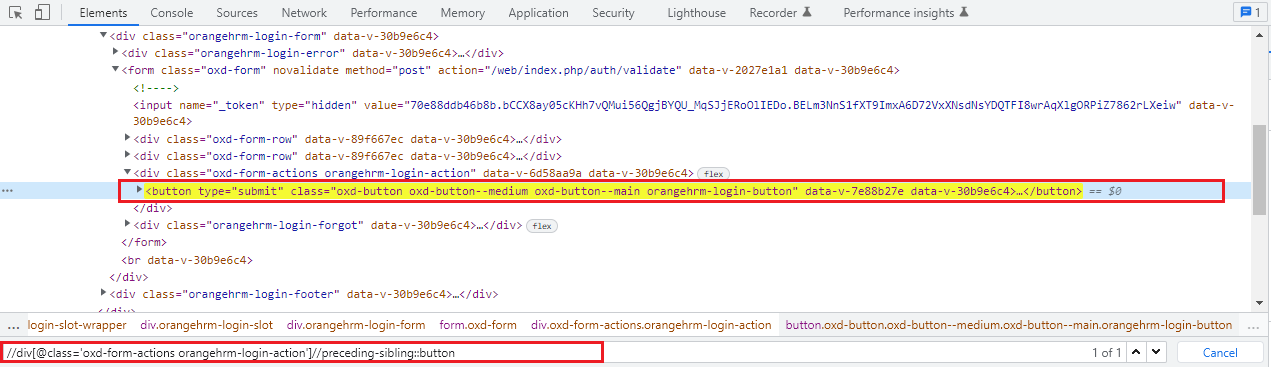
Using the following sibling axis method we can select all the nodes that have the same parent as that of the current node and that appear before the current node. It works opposite to that of the following sibling axis XPath.
You can try all of these examples mentioned above with the Orange HRM Demo website here.
Conclusion:
In conclusion, XPath is an essential tool for web automation testing when using Selenium, Playwright, and Cypress. It allows for more flexibility and specificity in locating elements on a web page. Understanding the different types of XPath expressions and how to use them can greatly improve the efficiency and effectiveness of the automation testing process. It can be particularly useful in situations where elements do not have unique CSS selectors, or when the structure of the HTML changes frequently. With the knowledge of XPath, you can write more robust and stable automation tests.
An SDET Engineer with hands-on experience in manual, automation, API, Performance, and Security Testing. The technologies I have worked on include Selenium, Playwright, Cypress, SpecFlow, Cucumber, JMeter, K6, OWASP ZAP, Appium, Postman, Maven, Behave, Pytest, BrowserStack, SQL, GitHub, Java, JavaScript, Python, C#, HTML, CSS. Also, I have hands-on experience in CI/CD the technologies I have used for CI/CD include Azure DevOps, AWS, and Github. Apart from this, I like to write blogs and explore new technologies.
Most of us are familiar with API testing tools like Postman, SoapUI, etc, and API automation libraries like RestAssured and Karate to automate API test cases. A recent entrant in this category is Playwright. The playwright is an Automation Tool provided by Microsoft. It provides cross-browser testing using which we can perform testing on multiple browsers like Chromium, Webkit, Firefox, etc. playwright supports cross-language testing (Java, Node.js, Python, .NET, etc.). However, very few of us know that it can actually do an API Test automation of methods GET, PUT, POST, and DELETE. Let’s see how it can be done.
Can we perform API testing using Playwright?
The playwright provides inbuilt support for API testing that’s why we don’t need any external libraries to handle API. The playwright doesn’t use any browser to call API. It sends requests using Node.js which provides faster execution.
In this tutorial, we will explore basic API methods with the help of Playwright- java. Below are the Four methods.
GET
POST
PUT
DELETE
Pre-requisite:
To get started with API automation with playwright-java first we need playwright to be installed in your system, to do this we can simply add the following dependency in the pom.xml file.
Along with the playwright, we have to add Testing and JSON dependencies.
Now let’s see how we can start API automation testing with Playwright-java.
1. GET:
By providing an API endpoint we can read data using a GET request. We must pass a few parameters to get the required data from the API.
We can verify the request by asserting the Response Code. The response code for a successful GET Request is 200. You can also assert a text inside the JSON body response.
For Example, I am using postman here to send a GET request to ” ‘/api/users/4’ endpoint of a sample API URL ‘https://reqres.in’
The below code shows the implementation of the GET method through Playwright.
To verify the response data we are parsing the response to JSON Object so that we can verify specific key-value pairs.
2. POST:
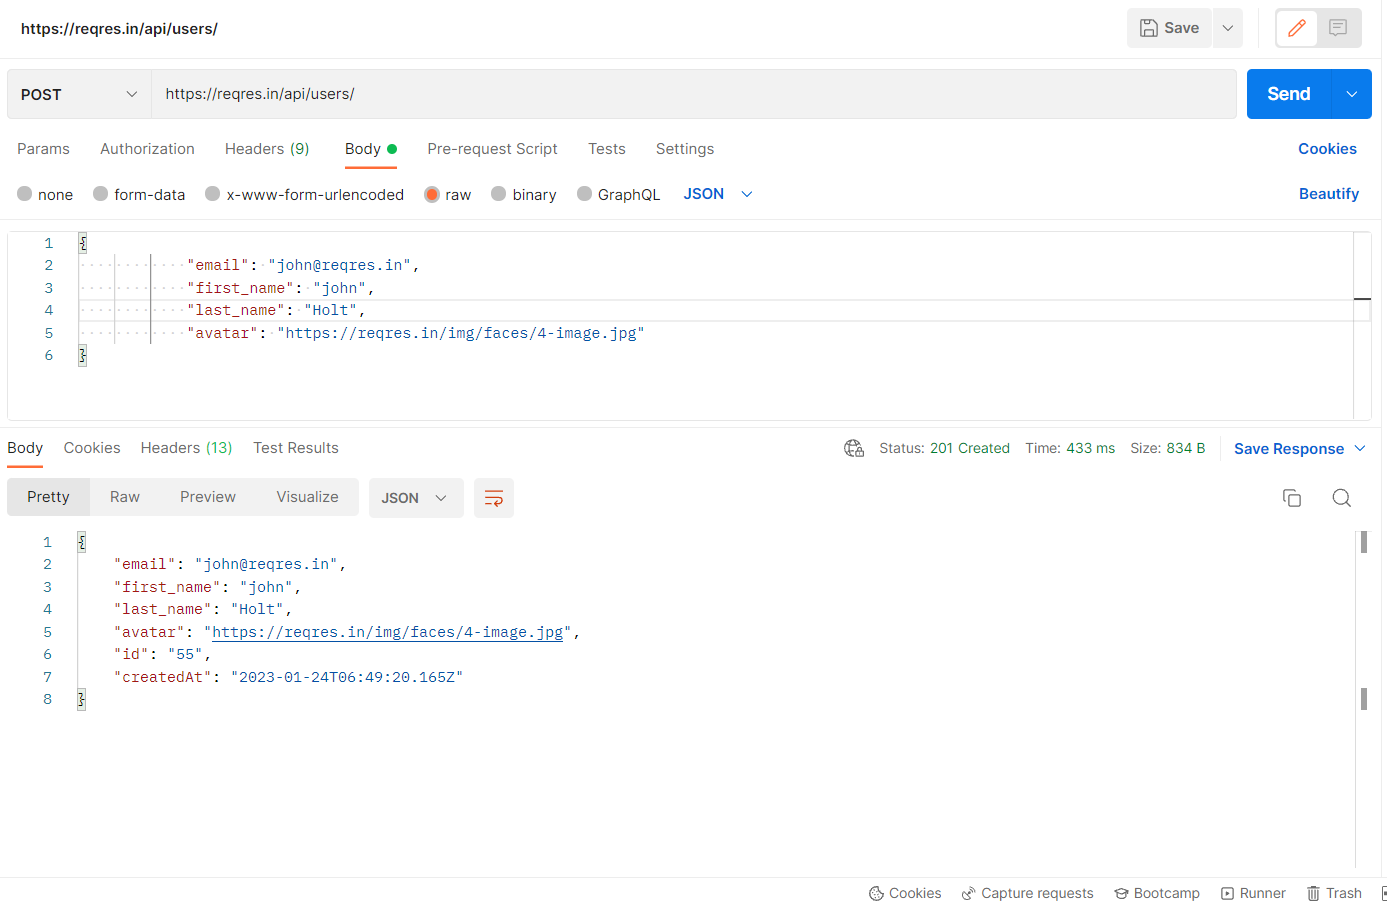
POST method is used to add a new record via API where we have to pass data as payload ex. first name, last name, etc. The response code for a successful POST Request is 201.
For example, I am sending a POST request to ‘/api/users/’ endpoint with base URL ‘https://reqres.in‘ and the body as given below in the screenshot:
To pass the data payloads to the POST/PUT method, first, we have to create a POJO class which will help to create methods to get and set payloads. below we have created a POJO class employee which will help to get and set data to both POST and PUT calls.
public class Employee {
// private variables or data members of pojo class
private String email;
private String first_name;
private String last_name;
private String avatar;

public String getEmail() {
   return email;
}
public void setEmail(String email) {
   this.email = email;
}
public String getFirstName() {
   return first_name;
}
public void setFirstName(String firstName) {
   this.first_name = firstName;
}
public String getLastName() {
   return last_name;
}
public void setLastName(String lastName) {
   this.last_name = lastName;
}
public String getAvatar() {
   return avatar;
}
public void setAvatar(String avatar) {
   this.avatar = avatar;
}
}
The below code will help you with the POST method through Playwright.
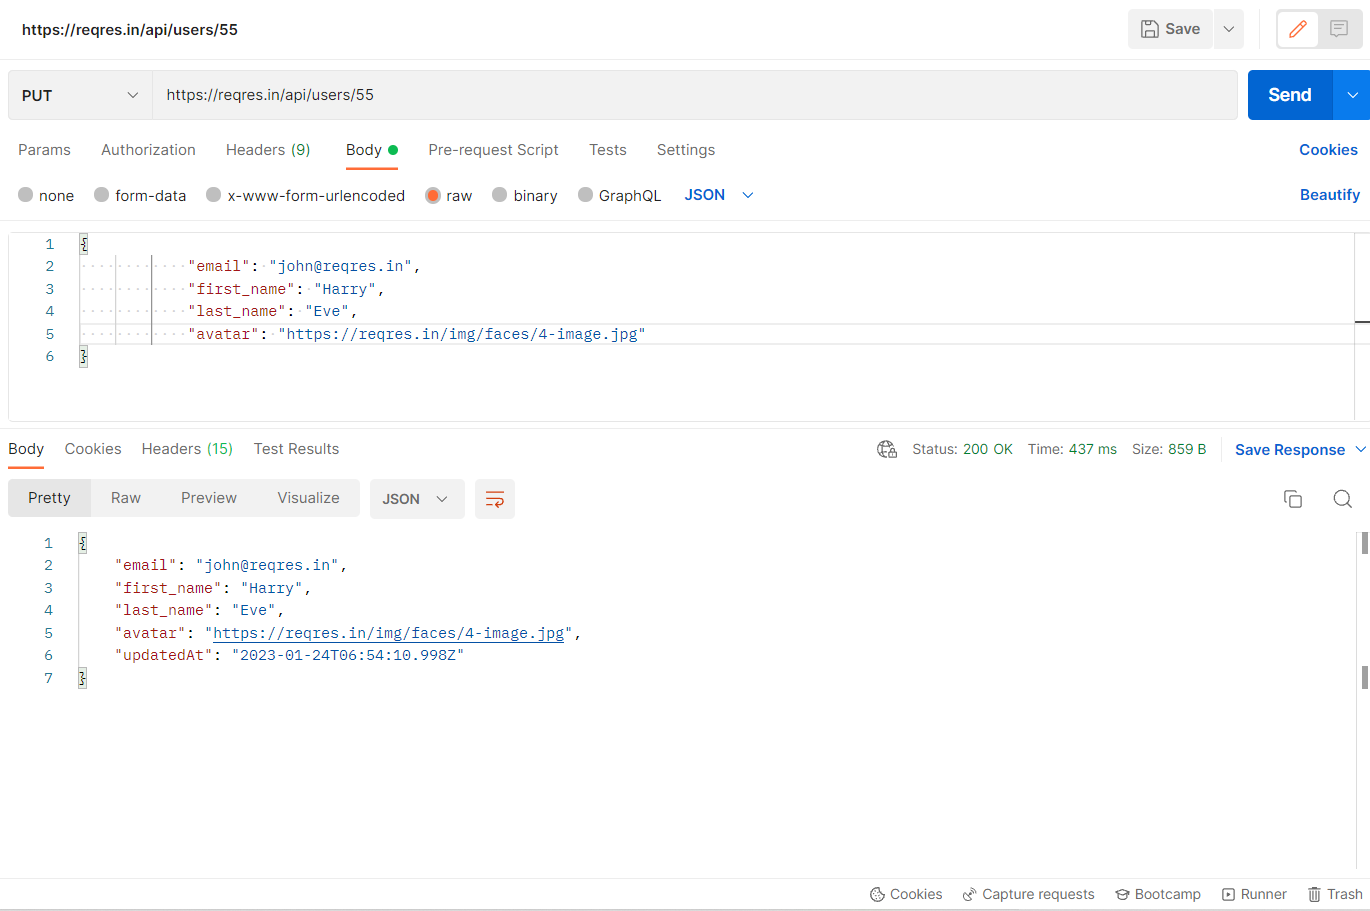
PUT Request is used to update the existing records via the API. we have to pass the data we want to update as a payload ex. first name, last name, etc. The response code for a successful PUT Request is 200.
For example, I am sending a POST request to ‘/api/users/55’ endpoint with the base URL ‘https://reqres.in’ and the body as given below in the screenshot:
The below example shows the implementation of the PUT method. We need to use the above POJO class to pass the data as a payload to the PUT call.
We can delete existing records using the API by using DELETE Request. Ideally, you must have added a record before you delete it. Hence you would need to append an ID to the DELETE URL. To delete the record using API first we need to pass the record URI (Universal Resource Identifier). The response code for a successful DELETE Request is 200.
For example, I am sending a POST request to ‘https://retoolapi.dev’ endpoint with base URL ‘/3njSPM/calc/43’ and the body as given below in the screenshot:
Following is the code for the DELETE method in Playwright
After performing a DELETE call we can perform a GET call on the same endpoint to verify data is actually deleted. For this GET call, we will get response code 204 as the content is not found.
GET, PUT, POST, and DELETE are the basic CRUD API methods used in any Web application. With the help of the inbuilt functionalities of Playwright, API Automation Testing became much easier and faster.
Priyanka is an SDET with 1+ years of hands-on experience in Manual, Automation, and API testing. The technologies she has worked on include Selenium, Playwright, Cucumber, Appium, Postman, SQL, GitHub, and Java. Also, she is interested in Blog writing and learning new technologies.
Any test automation report, without screenshots, would look dull and will not provide enough information on where the test failed. If you add only screenshots, it will make the report information-rich. Now, if your tool has the capability to record the video as well, then it will be cherry on the top. A playwright is an automation tool that has these features integrated in-built. Here we will cover various types of screenshots that can be attached and how to record the video. This blog will help you to learn the steps to include Capture screenshots and videos in java playwright.
Playwright contains the following inbuilt functionalities:
Here, we are exploring the functionality to capture the snapshots and how to attach them to the Cucumber report. You must have the Cucumber report set up in your framework in order to accomplish this.
Let’s, Understand first how to Capture screenshots and videos in java playwright.
1. Page Screenshot:
As you are all aware, we usually use this screenshot to attach what is visible on the screen for verification purposes.
public static List takeScreenShots() throws IOException
    {
	public static byte[] array;
        long millisStart = Calendar.getInstance().getTimeInMillis();
        array = page.screenshot(new Page.ScreenshotOptions().setFullPage(false).setPath(Paths.get("test-output/ScreenShots/" + millisStart + ".png")));
        List output = new ArrayList();
        output.add(array);
        output.add(millisStart + ".png");
        return output;
    }
2. Full Page Screenshot:
If your test requires you to attach a screenshot of the entire page, top to bottom. So this method will guide you easily. The code below helps to take a snapshot of the entire page, no matter how long it is, because setFullPage is set to ‘true’.
public static List takeScreenShots() throws IOException
    {
	public static byte[] array;
        long millisStart = Calendar.getInstance().getTimeInMillis();
        array = page.screenshot(new Page.ScreenshotOptions().setFullPage(true).setPath(Paths.get("test-output/ScreenShots/" + millisStart + ".png")));
        List output = new ArrayList();
        output.add(array);
        output.add(millisStart + ".png");
        return output;
    }
However, now you can see that the full scrollable page has been captured in this step.
3. Element Screenshot:
So here, now you can also capture a screenshot of a specific element with the help of a playwright. In the below code, you can see that a locator path is sent as a parameter to the .screenshot() method.
page.locator("locator of that element").screenshot(new Locator.ScreenshotOptions().setPath(Paths.get("test-output/ScreenShots/screenshot.png")));
Here, we can see that the screenshot has captured only the element given in the locator.
4. Attaching Screenshot to Cucumber Report:
Now, we are going to discuss how to attach these screenshots to the cucumber report.
The first step is to set up your framework for the cucumber report, and this blog does a great job of explaining how to do that. This will allow you to add a screenshot to the Cucumber report using the code below. In general, this code is placed in your after hooks (AfterScenario, AfterStep, After). In the code below, I recently added a current millisecond time as the file name. However, you can customize the file names to your choice.
public void screenshots(Scenario scenario) throws IOException
    {
        WebUtil.takeScreenShots();
        long millisStart = Calendar.getInstance().getTimeInMillis();
        scenario.attach(array, "image/png",millisStart+".png" );
    }
Therefore, you can now view the Cucumber report with the screen attach to the report. while you click on the expand icon, You may see the screenshot as well.
5. Video Recording:
Now, here the playwright has the ability to record the video which will make it easier for the tester to understand their execution results. Then we’ll see how you fit that video into your report.
First, you must declare the context properties on your browser as shown in the below code. Or, you can simply update your context option where you can begin your context on the browser. Typically this method is called inside Before hooks.
Now the above code will help you to record the video and it’s going to execute the test. After that, it will automatically be stored on the path which is shown in the code. Moreover, you must see that the context of your browser is closed after it will be stored.
The below lines of code demonstrate how to convert a recorded video into bytes. These bytes can then be used to attach the recorded video to a report or perform other operations.
public static byte[] encodeVideo(Path path) throws IOException {
    FileInputStream fis = new FileInputStream(String.valueOf(path));
    ByteArrayOutputStream bos = new ByteArrayOutputStream();
    byte[] b = new byte[1024];

    for (int readNum; (readNum = fis.read(b)) != -1; ) {
        bos.write(b, 0, readNum);
    }

    byte[] bytes = bos.toByteArray();
    return bytes;
}
After recording it from your project structure, you must use the following code to attach the video to the cucumber report. The tearDown method’s execution video attaching code is described below. This code will be easier to perform once the tearDown method has been completed and your video has been recorded and attached to the report. Normally, this teardown method is written using After hooks.
Now, the screenshots and videos will appear in the cucumber report as shown in the picture below. This video will be available as part of the report.
Conclusion:
Here, we see that the playwright automation tool allows us to take several screenshots as needed. How to record Capture screenshots and videos in java playwright which can help you to identify failures’ underlying causes without having to look at the report itself.
Swapnil is an SDET with 1+ years of hands-on experience in Manual, Automation, and API testing. The technologies I have worked on include Selenium, Playwright, Cucumber, Appium, Postman, SQL, GitHub, Java, and Python. Also, I love Blog writing and learning new technologies.