“Cypress Testing – Assertions Techniques Best Practices and Tips” focuses on enhancing the efficiency and effectiveness of test assertions in Cypress, a popular JavaScript end-to-end testing framework.
Cypress testing plays a crucial role in ensuring the reliability and correctness of web application tests. Developers and testers use these to validate expected outcomes, allowing them to assert conditions about the application’s state during test execution. Automation Testing.
We can summarise the key features of Assertions in Cypress Testing as:
Rich Assertions: Comprehensive checks for element properties (existence, visibility, text content, attributes).
Seamless Integration: Assertions smoothly blend into test syntax, improving readability and maintenance.
Automatic Retry: Robust handling of asynchronous tasks, minimizing test flakiness.
Expressive Tests: Empowers developers to create clear, comprehensive, and efficient tests, boosting confidence in the testing process.
<button id="myButton">Visible Button</button>
<button id="hiddenButton">Hidden Button</button>

//To check visibility of element
cy.get(' button#myButton ').should('be.visible')
//To check invisibility of element
cy.get('button#hiddenButton').should('not.be.visible');
Verify that an element is hidden:
Syntax: .should(‘be.hidden)
Example:
<body>
    <div id="hiddenElement">This element is hidden</div>
</body>
cy.get('#hiddenElement').should('be.hidden');
Verify that an element has the expected value that the user has entered in the textbox:
Verify that a string includes the expected substring:
Syntax: .should(‘include’, ‘expectedSubstring’)
Example:
<title>Cypress Example</title>
    <body>
        <div id="myText">This is some text content.</div>
    </body>
// Verify that the text content includes the expected substring
const expectedSubstring = 'some text';
cy.get('#myText').should('include.text', expectedSubstring);
Verify that a string matches a regular expression pattern:
Syntax: .should(‘match’, /regexPattern/)
Example:
<title>Cypress Example</title>
    <body>
        <div id="myText">This is some text content.</div>
    </body>
// Verify that the text content matches a regular expression pattern
const regexPattern = /some.*content/;
cy.get('#myText').invoke('text').should('match', regexPattern);
Verify the length of an array or the number of elements matched:
<title>Cypress Example</title>
    <body>
        <input type="text" id="myInput" />
    </body>
// Focus on the input element
   cy.get('#myInput').focus();
// Verify that the input element is focused
   cy.get('#myInput').should('have.focus');
   cy.get('#myInput').should('be.focused ');
cy.get('h1')
.should('exist')  // Assertion 1: Check if the h1 element exists
.and('be.visible') // Assertion 2: Check if the h1 element is visible
.and('have.text', 'Example Domain'); // Assertion 3: Check if the h1 element has the expected text
Property Assertion in Cypress Testing
Verify that an element has the expected attribute value:
Verify that a given value is NaN, or “not a number”:
Syntax: .should(‘be.a.NaN’)
Example:
// Some operation that results in NaN, for example, dividing by zero
const result = 1 / 0;
// Verify that the result is NaN
1) cy.wrap(result).should('be.a.NaN');
2) cy.wrap(result).then(value => {
     expect(value).to.not.be.NaN;
   });
Verify an element or collection of elements is empty:
<body>
        <div id="emptyElement"></div>
        <div id="nonEmptyElement">Some content</div>
</body>
// Verify that the empty element is empty
cy.get('#emptyElement').should('be.empty');

// Verify that the non-empty element is not empty
cy.get('#nonEmptyElement').should('not.be.empty');
Verify that a numeric value is within a certain range of another value:
Syntax: .should(‘be.closeTo’, expectedValue, delta)) .should(‘be.within’, Start range, End range);
Example:
const actualValue = 15;
const referenceValue = 10;
const range = 5;

// Verify that the actual value is within the specified range of the reference value
cy.wrap(actualValue).should('be.within', referenceValue - range, referenceValue + range);
    });
// Verify that the actual value is close to the expected value within the specified delta
cy.wrap(actualValue).should('be.closeTo', 50, 2); // Verify that actual value is close to (50-2) to (50+2) i.e. 48 to 52.
In the context of Cypress Testing, the .is() block typically utilizes conditions that check various states or attributes of an element. Here are some examples of selectors and conditions you might use inside the .is() block:
Check if an element is visible:
if($element.is(':visible')){
// Code to execute when the element is visible
}
Check if a button or input is enabled:
if ($element.is(':enabled')) {
// Code to execute when the element is enabled
}
Check if an input field is readonly:
if ($element.is('[readonly]')) {
// Code to execute when the element is readonly
}
Check if an element contains specific text:
if ($element.is(':contains("Some Text")')) {
// Code to execute when the element contains the specified text
}
Check if an element has a specific attribute value:
if ($element.is('[data-type="value"]')) {
// Code to execute when the element has the specified attribute value
}
Create custom conditions based on your specific requirements:
if ($element.is('.custom-class')) {
// Code to execute when the element has a specific class
}
Conclusion:
Cypress Testing with its rich set of functionalities and integration benefits, empowers developers to create expressive and comprehensive tests. The combination of these features fosters a more efficient and confident testing process, ultimately contributing to the overall reliability of web applications.
Harish is an SDET with expertise in API, web, and mobile testing. He has worked on multiple Web and mobile automation tools including Cypress with JavaScript, Appium, and Selenium with Python and Java. He is very keen to learn new Technologies and Tools for test automation. His latest stint was in TestProject.io. He loves to read books when he has spare time.
In this blog, we have created the WebdriverIO framework, which will help to run test cases on web applications on different browsers. WebdriverIO is a popular open-source test automation framework for Node.js.Creating a test automation framework using Cucumber, JavaScript, and WebdriverIO offers several benefits that can streamline your testing process and improve the efficiency and maintainability of your automated tests. Here’s why you might want to consider using this combination:
1. BDD Approach with Cucumber:
Cucumber enables Behavior-Driven Development (BDD), allowing you to write test scenarios in a human-readable format.
2. JavaScript Language:
JavaScript is a widely used programming language for web development, making it accessible to many developers.
WebdriverIO is a popular JavaScript-based WebDriver framework that simplifies interactions with browsers and elements on web pages. It also provides a variety of built-in commands for browser automation, making test script development more efficient.WebdriverIO supports multiple testing frameworks, including Mocha and Jasmine, which can be integrated with Cucumber for BDD.
4. Cross-Browser Testing:
With WebdriverIO, you can quickly run your tests across different browsers and browser versions. This ensures that your application functions correctly and consistently across various browser environments.
5. Reusability and Maintainability:
The combination of Cucumber and WebdriverIO promotes the creation of reusable step definitions. Moreover, this modularity makes it easier to maintain test scripts and reduces duplication of code.
6. Parallel Execution:
WebdriverIO supports parallel test execution, which can significantly reduce the overall test execution time.
7. Community and Support:
Both Cucumber and WebdriverIO have active communities, which means you can find a wealth of resources, tutorials, and plugins to enhance your automation efforts.
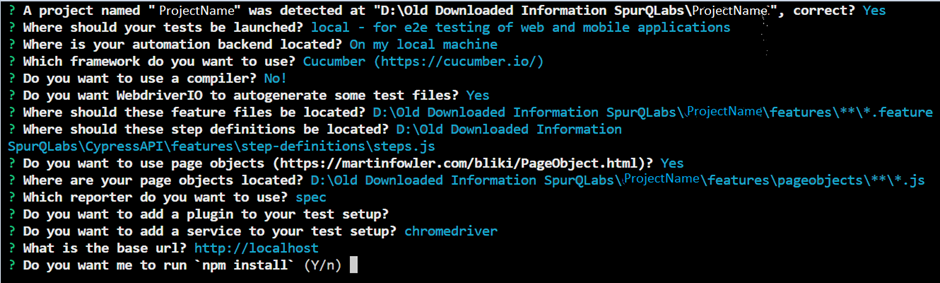
Let’s see how webdriverIO works and Its process:
Pre-requisites:
1. Make sure you have Node.js installed on your system. You can download and install it from the official website: https://nodejs.org/en/
2. Open your terminal or command prompt and create a new directory for your WebdriverIO project or else create a folder wherever you want & open it in VSCode
3. VSCode
Initialize a new npm project by running the following command: “npm init wdio .” This will create WebdriverIO packages and their installation.
Once you execute that command you will get the following message:
“Need to install the following packages:
create-wdio@8.2.3
Ok to proceed? (y)”
If you proceed by pressing “y”, you will receive a list of instructions on how to generate the framework. You can follow these instructions to create the desired WebdriverIO framework.
Once you have completed the framework generation process, it will create a package.json file that will serve as a record of your project’s dependencies. This file will help you manage and keep track of the dependencies required for your project.
“Install WebdriverIO and its CLI tool by running the following command:
“npm install webdriverio @wdio/cli –save-dev”.
This will install WebdriverIO and its CLI tool as dev dependencies and save them in your package.json file.”
Package-json:
package.json is a file used in Node.js projects that contains metadata and configuration information for the project, as well as a list of dependencies and dependencies required for the project to run. It is located in the root directory of the project and is used by package managers such as npm (Node Package Manager) to install and manage dependencies.
Wdio.conf.js:
This file contains the configuration settings that define how the test automation framework runs and interacts with the web application being tested. It has Capabilities, Specs, Framework, Reporter, Hooks, Services, etc.
So here we have selected the “cucumber” framework which will help create test cases in BDD format. Before we go into framework details, you all should know that all WebdriverIO commands are asynchronous and need to be properly handled using async/await.
The Page Object Model (POM) is a popular design pattern used in software testing to represent web pages as objects and simplify the process of automated testing. The POM structure usually includes a “pageobjects” folder, which contains classes or files that represent individual pages on a website or application. These page object classes or files encapsulate the elements and actions related to a specific page, making writing and maintaining automated tests easier. By using the POM, testers can create a more organized and maintainable framework for their test automation efforts.
1) Features
2) Steps
3) Pages
Features:
This folder contains another two folders, i.e., pageobjects, Step-definitions, and features files. The “feature” folder is typically used in the context of behavior-driven development (BDD) frameworks such as Cucumber, which uses a natural language syntax to describe test scenarios. The “feature” folder houses files that define the scenarios or features to be tested.
To create a feature file in VSCode for implementing behavior-driven development (BDD) scenarios using Cucumber, you can follow these steps:
· Open VSCode and navigate to the folder where you want to create the feature file.
· Right-click on the folder, go to “New File”, and click on it to create a new file.
· Give the file a name with the “.feature” extension, for example, “login.feature”
Feature: Checking calculator functionality

Scenario: Verify addition on calculator
Given User is on the calculator page
When User taps on "4"
And User taps on operator
And User taps on "5"
Then User verifies the answer as "9"

Scenario Outline: Verify user can perform multiple operation
Given User is on the calculator page
When User clicks on num1 "<number1>"
The user clicks on the "<operator>"
And User clicks on num2 "<number2>"
Then User verifies "<answer>"
Examples:
    | number1 |number2 | operator | answer |
    | 4       | 5      | +        | 9      |
    | 5       | 3      | -        | 2      |
    | 4       | 5      | *        | 20     |
    | 6       | 2      | /        | 3      |
In the above feature file, I have shown one simple scenario where I have performed a simple addition operation, and in the next scenario, I have created a scenario outline where different operations are performed, including addition, subtraction, multiplication, and division.
Step-definitions:
The “step-definitions” folder contains files or classes that define the behavior or actions associated with each step in the BDD scenario.
In WebDriverIO, you can generate step definitions for the given scenarios in a feature file using a tool called “cucumber-boilerplate”.
Following are the steps to generate steps in WebDriverIO using cucumber:
Install the “cucumber-boilerplate” package as a development dependency by running the following command in your project directory: “npm install cucumber-boilerplate –save-dev”
Once the installation is complete, you can generate the step definitions by running the following command: “npx cucumber-boilerplate generate”
This will prompt you to enter the path to the feature file for which you want to generate the steps.
Provide the path to the feature file (e.g., “./features/login.feature”) and press Enter.
The tool will generate the step definitions in JavaScript format, which you can then copy and paste into your WebDriverIO project’s step definition files.
const { Given, When, Then } = require('@wdio/cucumber-framework');
const addPage = require('../pageobjects/AddPage');
Given(/^User is on calculator page$/, async () => {
    await addPage.visitWeb()
  });

When(/^User taps on "(\d+)"$/, async (num) => {
    await addPage.tapNumber(num)
})

When(/^User taps on operator$/, async () => {
    await addPage.tapOperator()
}
Then(/^User verifies answer as "(\d+)"$/, async (ans) => {
    await addPage.getAns(ans)
})

When(/^User clicks on num1 "([^"]*)"$/, async (num1) => {
    await addPage.clickNum1(num1)
})

When(/^User clicks on num2 "([^"]*)"$/, async (num2) => {
    await addPage.clickNum2(num2)
})

When(/^User clicks on the "([^"]*)"$/, async(opt) =>{
   await addPage.clickOperator(opt)
})

Then(/^User verifies "([^"]*)"$/, async(ans) =>{
   await addPage.verifyAnswer(ans);
})
In the above code, you can see we have integrated steps for each line of the feature file, so we can run code in BDD format.
Page objects:
These are classes that represent a web page, containing methods and properties that interact with the page’s elements, such as buttons, links, and input fields.
const { config } = require("../../wdio.conf");
const assert = require('assert');
const addPageLoc = require("../../Locators/AddPageLocators")
const scr = require('../pageobjects/ScreenshotPage')
class AddPage{
    constructor(){
        this.plusOpt = addPageLoc.plusOpt;
        this.answer = addPageLoc.answer;
    }
    // Since we parameterized the value for the locator, we kept it as is.
    getNumber(num){
        return $('[onclick="r('+num+')"]')
    }
    async tapNumber(num){
        await this.getNumber(num).click();
        scr.takeScreenshot('tapping_number');
    }
    async tapOperator(){
        await this.plusOpt.click()
        await browser.pause(3000);
        scr.takeScreenshot('tapping_operator');
    }
    async getAns(){
        let txt = await this.answer.getText()
        console.log("Answer of addition: " +txt);
        scr.takeScreenshot('gettingTextOfElement');
    }

    async visitWeb(){
        await browser.url(config.baseUrl)
        scr.takeScreenshot('webUrl');
    }

    async clickNum1(num1){
        await this.getNumber(num1).click();
        scr.takeScreenshot('clicking_number1');
    }
    async clickNum2(num2){
        await this.getNumber(num2).click();
        scr.takeScreenshot('clicking_number2');
    }
    async clickOperator(opt){
        await $('[onclick="r(\''+opt+'\')"]').click();
        // await this.operator.replace('XXX', opt).click();
        scr.takeScreenshot('clicking_operator');
    }
    async verifyAnswer(ans){
        let result = await this.answer.getText()
        console.log("Retrieving text value from element: " +result)
        assert.equal(result,parseInt(ans));
        scr.takeScreenshot('verifyingResult');
    }
}
module.exports = new AddPage();
The browser.pause() method was used to pause it for the specified amount of time. It takes time in milliseconds.
Also, we added methods to the “AddPage” class, such as click() and setValue(), that are necessary to perform operations on web elements. Also, the setValue() method has been used for sending values for web elements.
Locators: This folder includes all the locators required to operate web elements
In the above code, we listed out all the locators in one file and then imported them into pages, removing clumsiness from the code
Now that we have completed implementing the Page Object Model (POM) design pattern, we can consider incorporating additional functionalities to further enhance the framework’s suitability and reliability.
Screenshots:
To add screenshot functionality to your code, you need to incorporate the following code into your implementation:
class ScreenshotPage{
    takeScreenshot(filename) {
        const timestamp = new Date().getTime();
        const filepath = `./screenshots/${filename}_${timestamp}.png`;
        browser.saveScreenshot(filepath);
      }
}
module.exports = new ScreenshotPage();
Import this code into the page where you need to capture a screenshot by calling takeScreenshot(‘nameOfScreenshot’).
The above image displays the screenshots it took. The sequence of screenshots offers an overview of the test case, illustrating actions taken at each step.
Cross-Browser Testing:
Cross-browser testing is a practice in software testing that involves testing a web application or website across multiple web browsers and browser versions to ensure its consistent functionality and appearance across different browser environments.
Capabilities:
In the wdio.conf.js file, make changes similar to what I have done in the ‘capabilities’ section. I have attached the following code for your reference. You can use it for assistance and make changes accordingly.
In the ‘services’ section of the wdio.conf.js file, make changes similar to what I did in the following code snippets. You can make changes accordingly and run your test cases smoothly.
The above code will assist you in implementing different browsers for testing, and you can also add others like Microsoft Edge, Safari, etc.
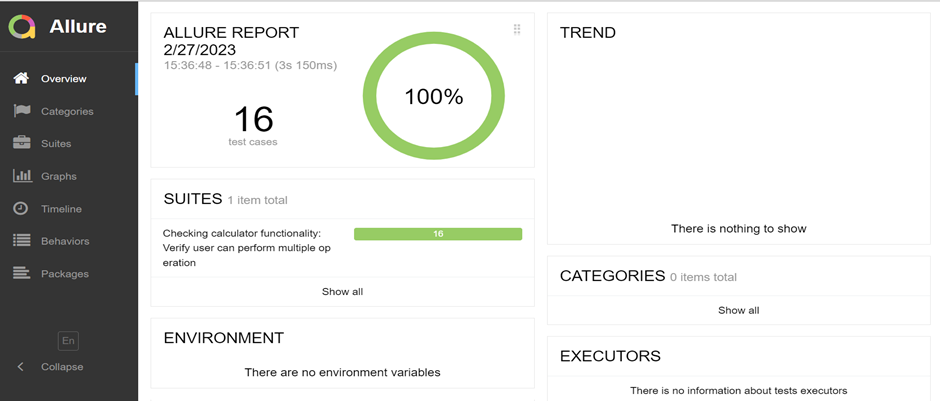
Allure_Report:
Allure Reports are often preferred over Cucumber Reports due to their visually appealing visualizations, comprehensive insights, step-by-step details, time tracking, integration capabilities, and historical trend analysis.
Once you have completed the automation process, testers need to generate reports to track the status of test cases, including pass or fail results and the exact location of failures. You can use the Allure report functionality for this purpose in your WebDriverIO project Follow these steps to include the Allure report:
1. Install the Allure Reporter plugin for WebDriverIO using the following command: “npm install @wdio/allure-reporter –save-dev”
2. Add the Allure Reporter plugin to your wdio.conf.js file as a reporter. Following is an example configuration:
In this example, we’re using the spec reporter for console output and the allure reporter for generating the allure report. The outputDir option specifies the directory where it will generate the report files.
1. Add the Allure command line tool to your project by running the following command: “npm install allure-commandline –save-dev”
2. After running your tests, generate the Allure report by running the following command: “npx allure generate allure-results –clean”
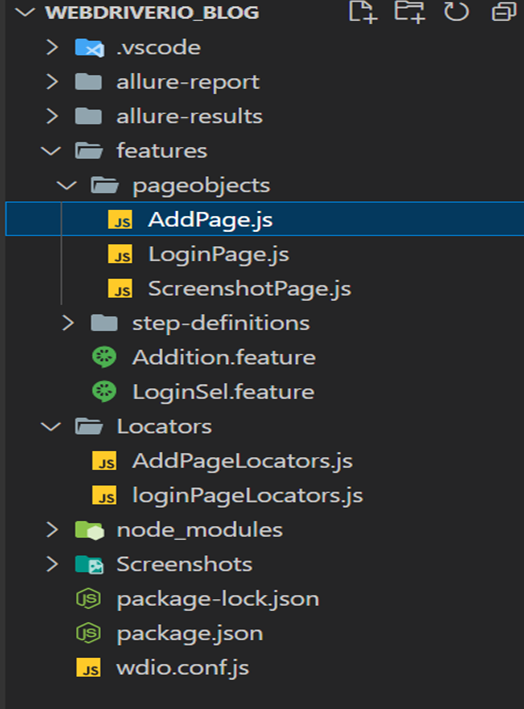
Project Folder Structure:
As we have completed the design of the folder structure for the framework, you can now see below the image of what the framework’s folder structure looks like.
The image above shows the integration of different folders in the WebdriverIO framework. I have provided explanations for each folder and its contents.
To run test cases on a browser, you can use the following commands:
· npx wdio wdio.conf.js
· npx wdio run wdio.conf.js –spec features\Addition.feature // To run a specific feature file
· npx wdio wdio.conf.js –spec ./path/to/your/test.js –browser chrome // To run on a specific browser”
Note: Please make sure to replace the path and file names with the appropriate ones for your specific setup
Conclusion:
WebdriverIO is a comprehensive and feature-rich framework that empowers developers and testers to create reliable and efficient automation tests for web applications. It is a vast ecosystem of plugins, extensive documentation, and also active community support make it a top choice for automation testing in the modern web development landscape. By adopting WebdriverIO, organizations can significantly improve their web application testing efforts and deliver high-quality software to their end-users.
Harish is an SDET with expertise in API, web, and mobile testing. He has worked on multiple Web and mobile automation tools including Cypress with JavaScript, Appium, and Selenium with Python and Java. He is very keen to learn new Technologies and Tools for test automation. His latest stint was in TestProject.io. He loves to read books when he has spare time.
The purpose of this blog is to provide a step-by-step guide on how to use Visual Studio Code for Java Selenium Automation as the Integrated Development Environment (IDE) for designing and running Selenium tests with Java. Visual Studio Code is a defacto IDE for JavaScript, however, it is rarely used for Java and Selenium automation as traditionally test automation engineers use either Eclipse or IntelliJ IDEA. Being one of the most widely used IDEs, software professionals prefer Visual Sstudio Code for its functionality.
Cross-platform support: Visual Studio Code can run on Windows, macOS, and Linux
IntelliSense: Visual Studio Code provides intelligent code completion and error detection, making it easier to write and debug code
Built-in Git integration: Visual Studio Code provides built-in support for Git, allowing you to easily version control your projects
Extensible with plugins: Visual Studio Code has a large community of developers who have created a variety of plugins to enhance the functionality of the IDE.
Fast and lightweight: The design of Visual Studio Code focuses on being fast and lightweight, making it easy to use on lower-end hardware.
Free and open-source: Visual Studio Code is free and open-source, making it accessible to everyone.
Debugging and testing: Visual Studio Code has built-in support for debugging and testing, making it easier to identify and fix bugs in your code.
Customization: You can customize Visual Studio Code with themes, keybindings, and settings, allowing you to tailor the IDE to your needs.
Here’s what you’ll need to get started with using Visual Studio Code for Java Selenium Automation:
Once you’ve installed these components, you can create a new Java project in Visual Studio Code and add the Maven libraries to it.
Following the installation of these parts, you can use Visual Studio Code to build a new Java project and add the Maven libraries to your project.
Steps to setup in Visual Studio Code for Java Selenium Automation:
Assuming Visual Studio Code is installed, let’s start the recipe step by step to create a flow for execution.
Step 1:
You need to open Visual Studio Code and locate the Marketplace.
Step 2:
Go to the search bar search for Java then Install the Extension pack for Java from the Marketplace.
Step 3:
Now, Navigate to the settings option in the lower left corner.
Step 4:
Select the command palette and look for the command create Java project.
Step 5:
Probably, here we start how to add a maven repository into the project to run the Java-Selenium test using Visual Studio Code. After selecting Create Java Project, select the “Maven” option to help you create the project.
Step 6:
After that, it will navigate to the browse folder and choose a specific folder to create your Java project. Please select a folder and open it in Visual Studio Code.
Step 7:
The screen below will appear; enter your project name and press “Enter” to open that project in Visual Sstudio Code.
Step 8:
Once you open the project, you will see the default folder structure displayed. To ensure code reusability, we create the following framework in Visual Studio Code.
Default Structure
Hybrid Framework folder structure
Hybrid Driven Framework is a combination of both the Data-Driven and Keyword-Driven frameworks. Here, we externalize the keywords, as well as the test data. Furthermore, Keywords are maintained in a separate Java class file and test data can be maintained either in a properties file/excel file/can use the data provider of a TestNG framework.
Step 9:
So, for adding Maven dependencies and how to download them
Maven is a tool for managing or building projects. When various test engineers incorporate their files into the same framework, they use it to check for compilation problems amongst framework components. Consequently, every time we make a change to the framework, we update the build status and continuously maintain the monitor, framework components, or build. As a result, there are no compilation errors in the framework, it will output a “build success” message; otherwise, it will output a “build failure” message.
Once you select Maven Project, it will create a Maven project with a pom.xml file. In the pom.xml file, you need to add the selenium dependency from the website https://mvnrepository.com/ and add it into dependency.
This dependency has been added to provide the libraries required to run the Selenium project. In a normal Selenium project, we need to download standalone libraries and then add them to external libraries, whereas here, once you add this Maven dependency, it will automatically download all libraries required for the Selenium project.
In a Maven project, you can use the Apache POI library by adding its dependency to your project’s pom.xml file. This will automatically download and include the library in your project’s classpath. Once you have added the dependency, you can start using the Apache POI APIs in your Java code to read, write, and manipulate Microsoft Office documents.
In a Maven project, you can add the Extent Reports dependency to your project’s pom.xml file to use its reporting functionality. Once you have added the dependency, you can start using the Extent Reports APIs in your Java code to create and generate detailed reports for your automation test results.
In a Maven project, you can add the TestNG dependency to your project’s pom.xml file to use its testing functionality. Once you have added the dependency, you can start using the TestNG annotations in your Java code to define your tests, test suites, and test configurations.
In a Maven project, you can add the Log4j dependency to your project’s pom.xml file to use its logging functionality. Once you have added the dependency, you can start using the Log4j APIs in your Java code to log messages to various output targets. You can configure Log4j using a configuration file such as log4j2.xml or log4j2.properties, which specifies the logging level, output target, and other logging settings.
Here, you need to run Java-selenium tests by using the pom.xml file, according to your demand and test requirements, Therefore, you can add more maven repositories.
1. Test/Java/example:
This folder contains the test source code packages and classes. Here, this contains all the data related to test cases, including page objects, base classes, and the test case class, which helps run the whole TestNG framework. However, this contains all the data related to test cases, including page objects, base classes, and the test cases class, which help run the whole TestNG framework.
Code Explanation in Demo example:
Login Page:
The base class in the main class will take care of browser setup, loading configuration files, and other reusable methods like screenshots, handling sync issues, and many more.
Using Base, we can avoid code duplication.
Reuse code as much as we can.
package com.example.Pages;
import org.openqa.selenium.WebDriver;
import org.openqa.selenium.WebElement;
import org.openqa.selenium.support.FindBy;
import org.openqa.selenium.support.PageFactory;

public class LoginPage {
    WebDriver driver;
    public LoginPage(WebDriver driver){
        this.driver = driver;
        PageFactory.initElements(driver, this);
    }

    @FindBy(id="email")
    WebElement usernameBox;

    @FindBy(id="passwd")
    WebElement passwordBox;

    @FindBy(name="SubmitLogin")
    WebElement SignInBtn;

    public void enterUsername(String uname){
        usernameBox.sendKeys(uname);
    }

    public void enterPassword(String upwd){
        passwordBox.sendKeys(upwd);
    }

    public void submitButton(){
        SignInBtn.click();
    }
}
Base Class:
@BeforeClass: The annotated method will be run before the first test method in the current class is invoked.
@AfterClass: The annotated method will be run after all the test methods in the current class have been run.
package com.example.TestCases;
import org.apache.log4j.Logger;
import org.apache.log4j.PropertyConfigurator;
import org.openqa.selenium.WebDriver;
import org.openqa.selenium.chrome.ChromeDriver;
import org.testng.annotations.AfterClass;
import org.testng.annotations.BeforeClass;
import com.example.Utilities.ReadConfig;
public class BaseClass {
    ReadConfig read = new ReadConfig();
    public String googlebaseurl = read.getGoogleBaseURL();
    public String loginbaseurl = read.getLoginBaseURL();
    public String uname = read.getUsername();
    public String upwd = read.getPassword();
    public String SuccessURL = read.getSuccessURL();
    public WebDriver driver;
    public Logger logger;
    @BeforeClass
    public void SetUp(){
        System.setProperty("webdriver.chrome.driver", "Drivers/chromedriver.exe");
        // WebDriverManager.chromedriver().setup();
        driver = new ChromeDriver();
        driver.manage().window().maximize();

        logger = Logger.getLogger("googledemo");
        PropertyConfigurator.configure("log4j.properties");
    }

    @AfterClass
    public void tearDown(){
        driver.quit();
    }
}
Test Class:
According to the below code, This class will help to run TestNG test cases and will give results. You can add third-party tools for generating reports as well such as extent reports, and Allure reports.
Basically, this folder is used to store browsers that will be required to run test cases on that specific browser. Whether it is Chrome, Edge, or Opera. Further includes driver information, where the Chrome Driver, Firefox, or Edge—whichever you’re comfortable with. Even you can use maven dependency for instantiating Webdriver. The WebDriverManager is a library that allows you to automate the management of WebDriver binaries. There are such as Chrome driver, gecko driver, etc. in your Java project.
3. Configuration:
The Above image implies that properties are used to externalize configurable data. Because if you put that data in your code (test script), you would need to build the code each time you wanted to modify the property’s value. As a result, the fundamental advantage of properties is that they may be modified at any time. And exist independently of your source code. Thus, a pair of strings is used to store each parameter, with one string serving as the key and the other as the value.
You can see the folder structure, where the configuration folder contains a config file that includes all the common information required to run a test.
4. Utilities:
Once we have the config file loaded, we need to read the properties of the config file. The Properties object gives us the .getPropertymethod that takes the key of the property as a parameter and returns it. Basically, the value of the matched key from the .properties file. Therefore, this includes a class that assists in reading all of the data from the config.properties file.
5. Screenshots:
A screenshot in Selenium WebDriver is there we can use for bug analysis. Selenium WebDriver can automatically take screenshots during the execution. But if users need to capture a screenshot on their own, they need to use the Take Screenshot method. So, which notifies the WebDriver to take the screenshot and store it in Selenium. As a result, it includes screenshots that we took at the time of running the test.
6. log4j.properties:
The above image log4j.properties is a configuration file that we can use with the Apache Log4j logging framework. As a result, which is a popular logging library for Java applications. Users utilize this file to configure the logging behavior of the application, including specifying the output destination for log messages. The format of log messages, and the logging levels for different categories of log messages. The log4j.properties file contains key-value pairs that define the various logging settings for the application.
Step 10:
Basically, here is how we organize the hybrid framework. We need to add a few folders to make it easier for testers to run code without encountering them.
Initially, you will not find any errors until you save your code in Visual Studio Code through ctrl+s. You can hover over that error and you will find a solution for that. If you need to install any package, Thus it will also be visible to you.
Run Test:
Navigate to the Project Directory:- Open a command prompt or terminal window. And navigate to the directory where your Maven project is located. This should be the directory that contains the “pom.xml” file, which is the Maven project configuration file.
Run Maven Test Command:- Once you are in the project directory, you can run the following command to execute the Maven tests: “mvn test”
This command will instruct Maven to run the tests defined in your Maven project. Maven will automatically compile the necessary source code and download dependencies. And execute the tests using a testing framework such as JUnit, TestNG, or any other testing framework that you have configured in your project’s dependencies.
View Test Results:- After the tests have been executed. The Maven will display the test results in the command prompt or terminal window. You can view the test results to see which tests have passed, failed, or skipped.
Video:
Accordingly, the below tutorial will guide you
Conclusion:
Since Visual Studio Code for Java Selenium m Automation is a well-known IDE among software professionals. Here, I can think of no better method to run Java-Selenium automation through VSCode.
However, It offers the best Java extension for using Visual Studio Code for Java Selenium Automation. Basically, we make run test cases more appropriate and adaptable.
Harish is an SDET with expertise in API, web, and mobile testing. He has worked on multiple Web and mobile automation tools including Cypress with JavaScript, Appium, and Selenium with Python and Java. He is very keen to learn new Technologies and Tools for test automation. His latest stint was in TestProject.io. He loves to read books when he has spare time.
Most of us use PyCharm to automate the BDD tests using Behave using Python, however, it adds to the cost of test automation. The community version is also available for free, but we can’t run behave files through it. Visual Studio Code also supports Python. However, this blog explains how to use Visual Studio Code for Python + Behave BDD tests for FREE. PyCharm and VS Code are both excellent tools for writing Python code.
PyCharm Community edition and Visual Studio Code (VSCode) are both capable integrated development environments for Python coding. To conduct this evaluation, I chose the most frequently used IDE feature and compared the experience of PyCharm and VSCode.
Let’s see how can we use VSCode for “Python behave” Automation:
First, you should make sure that you have installed the Python extension. I recommend installing it because it will allow you to install libraries and run code. To run Python and Python behave in Visual Studio Code (VSCode), visit the Visual Studio Code Marketplace to get all the extensions you’ll need.
The following three extensions must be installed before proceeding to Python:-
Gherkin- for creating feature files
Pylance: This will install all libraries which are required to run Python
Python extension for VSCode
All of these extensions are available in the VSCode Marketplace, and you can install them manually.
Firstly, we have to create a launch.json file. From the “Run and Debug” option & this file can be generated.·
Go to the “Run and Debug” option, where you will see “Create a launch.json file,” and put the below code into that file.
{
  "version": "0.2.0",
  "configurations": [
{"name":"Python:Current File",  // You can change this name as per your convenient
"type":"python",
"request":"launch",
"program":"${file}",
"console":"integratedTerminal",
"justMyCode":true
},
With this code, you will be able to create a “launch.json” file that will aid in running Python behavior in Visual Studio Code. As soon as you are done with the “launch.json” file, you need to add some libraries to the “settings.json” file, which will help you run the code through the command line. Open a settings JSON file by pressing (ctrl + shift + p) and selecting “Open Settings.” JSON is an option.
Add the below code to the “Settings.json” file. The code below will assist users in integrating with GitHub and running files via the command line.
The final line of code, “python.pythonpath,” will show the virtual environment path. For instructions on how to set up a virtual environment for this, see https://code.visualstudio.com/docs/python/environments Now, the user can go to the “feature file” that he/she wanted to run by selecting “Run” from the “Run and Debug” option.
Cloud Environment:
To automate an application in a cloud environment like (BrowserStack/SauceLabs), add the following code to the “Settings.json” file. Users will be able to run code in a cloud environment. Execution mode determines which cloud environment the user wishes to automate the application in, whether it is BrowserStack or SauceLabs. You can run your tests on the cloud environment of your choice by using the username and access key provided.
We’d all like to be able to navigate directly to that specific function or method from the feature file step, as we can in PyCharm (ctrl+click). This can be achieved by including the following code in Settings.json in VSCode: Your work in VS code will be faster and more flexible.
Pycharm is used to run a Python behave file, but many of us are aware that it’s not free, so we’ve found a solution with Visual Studio Code that will help people save money and run Python behave freely on the VSCode IDE.
Harish is an SDET with expertise in API, web, and mobile testing. He has worked on multiple Web and mobile automation tools including Cypress with JavaScript, Appium, and Selenium with Python and Java. He is very keen to learn new Technologies and Tools for test automation. His latest stint was in TestProject.io. He loves to read books when he has spare time.