Over the years, the landscape of software testing has gradually developed from a predominantly manual testing phase to an increasing accentuation on automated/automation testing. In your career path as a test engineer, you will inevitably bump into automation testing. In the current landscape of the software industry, clients seek frequent and repetitive deployments. If you are in a role of Quality Assurance, you are likely to encounter and test systems needing frequent requirement changes or the rapid introduction of new and progressive requirements. Such a dynamic landscape calls for a constant adaptation to frequent code changes within stiff deadlines. A challenge that we can effectively address by adopting automation testing methodologies.
Why to Automate Chrome Extension:
We often use Chrome extensions in our daily activities, which is crucial for enhancing productivity. The repetitive nature of certain tasks associated with these extensions can become monotonous over time. This blog aims to guide you through the process of automating Chrome extensions and executing click actions using Selenium, a widely acclaimed open-source test automation framework introduced in 2004. If you find yourself needing to use a particular extension regularly, the conventional method involves manually adding the extension to Chrome and performing the same task repeatedly. This manual repetition not only increases effort but also consumes valuable time. Therefore, to streamline this process and save both manual effort and time, we present a precise method to automate Chrome extensions and configure them seamlessly for efficient use.
How to Automate Chrome Extension:
In this article, we will learn the process of Automate Chrome extensions and performing click actions using the Selenium WebDriver and about the Robot Class in Selenium. We will examine them in the Chrome browser using Java. Here we go !!
Before moving on to the main topic of our discussion, let’s quickly review the techniques we will use to Automate Chrome extension and conduct action.
Implementation Steps to Automate Chrome Extension:
Add Calculator extension to the local Chrome browser.
Pack the extension and create a .crx file in File Explorer.
Create a Maven project using IntelliJ IDE.
Add dependencies in POM.xml file and Add .crx file in resources package.
Create Packages and files in the project.
5.1. Creating Features File.
5.2. Creating Steps file.
5.3. Creating Page Object Design Pattern.
5.4. Creating TestContext File.
5.5. Creating BaseStep File.
Conclusion
I intend to use simplified language while articulating the concepts. So, let’s dive into the core of our topic, which is how to Automate Chrome extensions and perform click actions using Selenium.
To do this, we will follow a few rules, which I have depicted below as steps.
Step 1: Add Calculator extension to the local Chrome browser.
In this article, we are going to use the Calculator extension to Automate Chrome extension and perform an action on an extension out of the DOM element.
To add calculator extension to local Chrome browser –
On the Extension page find the search box and search for the calculator extension.
Select calculator first and then download and click on add extension
After adding an extension, visit chrome://extensions/ URL from the address bar and then enable the Developer mode.
Also on this site, we can see our calculator extension which we just added.
On an extension, there could be an Extension ID. We have to note down this extension ID. In the next step, we will learn about generating a folder named extension ID in File Explorer.
In this article Extension ID is hcpbdjanfepobbkbnhmalalmfdmikmbe
Congratulations, we have completed our first step of Adding the Calculator extension to the local automate Chrome browser.
Now let’s begin with the next step.
Step 2: Pack the extension and create a .crx file in File Explorer
Before continuing with the second step we will learn what a .crx file extension is.
What is a .crx file extension?
A Chrome extension file has a .crx extension. It increases the functionality of the Google Chrome web browser by allowing third-party applications to supplement its basic functionality.
Now, we will learn how to pack the calculator extension and generate a .crx file extension.
After adding the calculator extension to the local Chrome browser, the file explorer will generate a folder with the name extension ID (hcpbdjanfepobbkbnhmalalmfdmikmbe).
Follow the provided path to locate the extension folder –
(to locate AppData we have to enable show hidden folders) C:➜Users➜{UserName}➜AppData➜Local➜Google➜Chrome➜User➜Data➜Default➜Extensions➜hcpbdjanfepobbkbnhmalalmfdmikmbe➜1.8.2_0
In the extension folder, we will find the folder named Extension ID, which we have noted down here hcpbdjanfepobbkbnhmalalmfdmikmbe is the Extension ID for calculator extension. Open that folder.
In the folder, we can see a version folder of the extension. Open that folder ➜1.8.2_0
Now we have to copy the path as mentioned in below image –
We will use this path to pack the extension in next steps.
Now, launch the Chrome browser and Visit chrome://extensions/ in the address bar
Here we can see the pack extension option.
➜ Click on Pack Extensionto automate chrome extension
After visiting the page we will be able to see the Pack Extension option as shown in the below image.
Here we have to type or paste the path that we had copied.
➜Add copied path to the Extension root directory
In this step, we have to paste a copied path to the Extension root directory to pack our Extension and then we have to click on the Pack Extension Button.
➜Copy the path of the .crx file
After clicking on the Pack Extension button a pop-up frame will appear. Here, we can see the path of the .crx file where it has been generated in File Explorer. Remember the path of the .crx file and click on the OK button.
➜ Navigate to the .crx file in file explorer
Now let’s navigate to the path of the .crx file as mentioned in the step above . Once we navigate to the path of the .crx file we can see the file has been generated. We have to use this .crx file in our maven project to display it in the selenium web driver and perform actions on it.
Congratulations!! We have successfully generated a .crx file.
Step 3: Create a Maven project using Intellij IDE.
Before creating a Maven project. Let’s understand what Maven is.
What is Maven?
Maven is a Java project management tool that the Apache Software Foundation developed. It is written in Java Language to build projects written in C#, Ruby, Scala, and other languages. It allows developers to create projects, dependencies and documentation using Project Object Model and plugins.
Why do we use Maven?
Maven is the latest build testing tool and a project management tool.
It makes the build process very easy (No need to write long scripts).
It has a standard directory structure which is followed.
It follows Convention over Configuration.
It has a remote maven repository with all the dependencies in one place that can be easily downloaded.
Can be used with other programming languages too, just not Java.
Hope, this now gives a clear view of Maven. Now let’s create a new Maven project using Intellij Idea IDE.
Open your IntelliJ IDE and go to the File ➜ New ➜ Project as shown in the below image.
A new project pop-up will be displayed on the screen, and we must enter the project’s details here.
Details required to create the Maven project are:
Name: Provide a suitable name as per your requirement.
Location: Choose the location where you want to store your project.
Language: Choose the programming language as per your requirement.
Build System: Here you have to choose Maven.
JDK: Choose the JDK you want to use. (Note: Maven uses a set of identifiers, also called coordinates, to uniquely identify a project and specify how the project artifact should be packaged.)
GroupId: a unique base name of the company or group that created the project
ArtifactId: a unique name for the project.
Simply, click on the Create button and the Maven project will be created.
After successfully creating the project we can see the structure of the Maven project. Some default files have been created as given in the image below.
Yes !! We have successfully created our Maven project. Let’s move ahead.
Step 4: Add dependencies in POM.xml file and Add .crx file in the resources package.
We shall include Maven dependencies in your project using IntelliJ IDEA. These dependencies need to be mentioned in our pom.xml file for our project build-up.
Below are the dependencies that we need to add to the pom.xml file.
selenium-java: Selenium WebDriver library for Java language binding
cucumber-java: Cucumber JVM library for Java language binding.
webdrivermanager: library to automatically manage and set up all the drivers of all browsers which are in test scope.
After adding dependencies in the pom.xml file we have to add the .crx file to the resources directory, .crx file is the file that we have generated in step 2.
To add the .crx file to the resources directory, copy the file from the file explorer and paste it into the resources directory. We can also rename the .crx file as we want.
For renaming the file, right-click on the file ➜ select the refactor option ➜ then click on the rename option.
As shown in the above image, the rename pop-up will flash on the screen. Here we can give the file name as desired.
Here in this project, I am renaming the .crx file with the CalculatorExtension.crx file.
Step 5: Create Packages and files in the project to automate chrome extension.
After adding dependencies to the pom.xml file. We have to create a BDD framework that includes packages and files. Before moving ahead, let’s first get an overview of the Cucumber BDD framework.
What is the Cucumber Behavior Driven Development (BDD)Framework?
Cucumber is a Behavior Driven Development (BDD) framework tool for writing test cases. It is a testing tool that supports Behavior Driven Development (BDD). It offers a way to write tests that anybody can understand, regardless of their technical knowledge. In BDD, users (business analysts and product owners) first write scenarios or acceptance tests that describe the behavior of the system from the customer’s perspective. These scenarios and acceptance tests are then reviewed and approved by the product owners. The Cucumber framework uses Ruby as programming language.
To manage our code files for the project we need to create packages that are as follows:
Features Package – All feature files are contained in this package.
Steps Package – All step definition files are included in this package.
Pages Package – All page files are included in this package.
Utilities Package – All configuration files are included in this package.
Now, we have to create a feature file,
5.1: Creating Features File:
Features file contains a high-level description of the Test Scenario in simple language. It is known as Gherkin. Gherkin is a plain English text language
Cucumber Feature File consists of following components –
Feature: We use “Feature” to describe the current test script that needs execution.
Scenario: We use Scenario to describe the steps and expected outcome for a particular test case.
Given: We use “Given” to specify the context of the text to be executed. We can parameterize steps by using data tables “Given”
When: “When” indicates the test action that we have to perform.
Then: We represent the expected outcome of the test with “Then”
We need to add the below code in the feature file for our project.
Feature: Calculator Extension
 Scenario: User want to add 2 number by using calculator extension
   Given User clicks on the extension icon
   And User clicks on the calculator extension
   When User clicks on number 9
   And User clicks on "+" operator
   And User clicks on number 2
   And User clicks on "=" operator
   Then User sees the result 11
According to the above feature file, we are adding two numbers. To open the Chrome WebDriver and add a calculator extension, we use a GIVEN file. With the use of ‘WHEN’ and ‘AND’ annotations, we are executing click actions on the calculator extension, with which we are adding two numbers from the calculator. In the final step, we are using the ‘THEN’ annotation to verify the result (the addition of two numbers).
5.2: Creating Steps file.
Steps Definition to automate chrome extension-
Step definition maps the Test Case Steps in the feature files (introduced by Given/When/Then) to code. It executes the steps on Application Under Test and checks the outcomes against expected results. For a step definition to execute, it requires matching the “Given” component in a Feature.
Here in the step file, we are mapping the steps from the feature file. In simple words, we are making a connection between the steps of the feature file and with step file. While mapping the steps we have to take care about the format of mapping the steps in step definition. We need to use the below format to map the steps for the feature we had created in the features file.
package Steps;
import Pages.CalculatorPage;
import Utilities.TestContext;
import io.cucumber.java.en.And;
import io.cucumber.java.en.Given;
import io.cucumber.java.en.Then;
import io.cucumber.java.en.When;

import java.awt.*;

public class CalculatorStep extends TestContext {

   CalculatorPage calculatorPage;

   public CalculatorStep() throws AWTException { calculatorPage = new CalculatorPage(driver); }

   @Given("User clicks on the extension icon")
   public void User_clicks_on_the_extension_icon() throws InterruptedException {
       calculatorPage.User_clicks_on_the_extension_icon();
   }
   @And("User clicks on the calculator extension")
   public void userClicksOnTheCalculatorExtension() throws InterruptedException {
       calculatorPage.userClicksOnTheCalculatorExtension();
   }
   @When("User clicks on number {int}")
   public void User_clicks_on_number(int number) throws InterruptedException {
       calculatorPage.User_clicks_on_number(number);
   }

   @And("User clicks on {string} operator")
   public void userClicksOnOperator(String operator) throws InterruptedException {
       calculatorPage.userClicksOnOperator(operator);
   }

   @Then("User sees the result {int}")
   public void userSeesTheResult(int result) throws InterruptedException {
       calculatorPage.userSeesTheResult(result);
   }
}
5.3: Creating Page Object Design Pattern
Till now we have successfully created a feature file and a step file. Now in this step, we will be creating a page file. Page file contains all the logic of the test cases. Generally, in Web automation, we have page files that contain the locators and the actions to perform on the web elements but in this framework, we are not using the locators because as we know extension is not in the DOM(Document Object Model) element as it is outside the DOM element. So we will only create the methods and for those methods, we will be using Robot class and X and Y coordinates.
Here in this code, we are performing the activities that are hovering by the mouse actions(move, press, release), clicking on the calculator extension, clicking on the two numbers from the calculator, clicking on the calculator’s “+” addition operator, and obtaining the result of the addition of those two numbers.
What is the Robot Class in Selenium?
Robot Class in Selenium is used to enable automated testing for implementations of the Java platform. It generates input events in native systems for test automation, self-running demos, and other applications where users need control over the mouse and keyboard. Selenium Webdriver was unable to handle these pop-ups or applications and extensions. So a robot class was introduced in Java versions 1.3 and above, that can handle OS pop-ups or applications and extensions.
Robots help in managing all the activities like performing the task within the specified time, handling the mouse functions and the keyboard functions, and many more
While we are using the robot class, it requires the x and y coordinates of the element of the screen on which we will be performing the actions i.e hovering the cursor and then performing click actions.To find the coordinates we are using the Mofiki’s Coordinate finder.
What is Mofiki’s Coordinate Finder?
Mofiki’s Coordinate Finder finds out the present x and y coordinates of our cursor by hovering the mouse anywhere on the screen with the help of the application Mofiki’s Coordinate Finder, which is available for free download.
Steps to download and use Mofiki’s Coordinate Finder:-
Download the zip file of Mofiki’s Coordinate Finder application
Extract the Mofiki’s Coordinate Finder zip file and install the application setup.
Now open the Mofiki’s Coordinate Finder application. Use the image below as an illustration.
Now to find the x and y coordinates move the cursor to the point and just press the space bar we can get the x and y coordinates
package Pages;
import Utilities.TestContext;
import org.openqa.selenium.WebDriver;
import java.awt.*;
import java.awt.event.InputEvent;
import java.util.Objects;
public class CalculatorPage extends TestContext {
   public CalculatorPage(WebDriver driver) throws AWTException {
       TestContext.driver = driver;
   }
   public Robot robot = new Robot();

   public void User_clicks_on_the_extension_icon() throws InterruptedException {
       Thread.sleep(5000);
       robot.mouseMove(1250, 48);
       Thread.sleep(2000);
       robot.mousePress(InputEvent.BUTTON1_DOWN_MASK);
       robot.mouseRelease(InputEvent.BUTTON1_DOWN_MASK);
   }

   public void userClicksOnTheCalculatorExtension() throws InterruptedException {
       Thread.sleep(3000);
       robot.mouseMove(1000, 190);
       Thread.sleep(2000);
       robot.mousePress(InputEvent.BUTTON1_DOWN_MASK);
       robot.mouseRelease(InputEvent.BUTTON1_DOWN_MASK);
       Thread.sleep(10000);
   }

   public void User_clicks_on_number(int number) throws InterruptedException {
       Thread.sleep(3000);
       if(number == 0){robot.mouseMove(964, 450);}
       else if (number == 1) {robot.mouseMove(969, 390);}
       else if (number == 2) {robot.mouseMove(1020, 391);}
       else if (number == 3) {robot.mouseMove(1087, 395);}
       else if (number == 4) {robot.mouseMove(964, 334);}
       else if (number == 5) {robot.mouseMove(1023, 336);}
       else if (number == 6) {robot.mouseMove(1080, 334);}
       else if (number == 7) {robot.mouseMove(965, 282);}
       else if (number == 8) {robot.mouseMove(1023, 278);}
       else if (number == 9) {robot.mouseMove(1089, 278);}
       else { System.out.println("Number Invalid"); }
       Thread.sleep(2000);
       robot.mousePress(InputEvent.BUTTON1_DOWN_MASK);
       robot.mouseRelease(InputEvent.BUTTON1_DOWN_MASK);
       Thread.sleep(10000);
   }

   public void userClicksOnOperator(String operator) throws InterruptedException {
       Thread.sleep(3000);
       if(Objects.equals(operator, "+")){robot.mouseMove(1139, 446);}
       else if (Objects.equals(operator, "-")) {robot.mouseMove(1137, 386);}
       else if (Objects.equals(operator, "*")) {robot.mouseMove(1137, 331);}
       else if (Objects.equals(operator, "/")) {robot.mouseMove(1138, 272);}
       else if (Objects.equals(operator, "=")) {robot.mouseMove(1199, 446);}
       else {System.out.println("Invalid Operator");}
       Thread.sleep(2000);
       robot.mousePress(InputEvent.BUTTON1_DOWN_MASK);
       robot.mouseRelease(InputEvent.BUTTON1_DOWN_MASK);
       Thread.sleep(10000);
   }

   public void userSeesTheResult(int result) {
       System.out.println("Result should be "+ result);
   }
}
5.4: Creating TestContext File.
Now, In the Utilities package we have to create a TestContext file in which we can declare a webdriver. Declaring the webdriver as public allows initialization in every class file after inheriting the TestContext class. The step file and page file inherit the testContext class file. Also, we have declared Robot class here.
package Utilities;

import org.openqa.selenium.WebDriver;

import java.awt.*;

public class TestContext {
   public static WebDriver driver;

   public static Robot robot;
}
5.5: Creating BaseStep File:
This step is very important because we will be creating an environment file (i.e. Hooks file) and also we are using Chrome Options to add Calculator extensions.
Before moving ahead let’s understand about Before and After Hook and Chrome Options
What is Before and After Hooks?
Hooks allow us to better manage the code workflow and help us reduce code redundancy. We can say that it is an unseen step, which allows us to perform our scenarios or tests.
@Before – Before hooks run before the first step of each scenario.
@After – Conversely After Hooks run after the last step of each scenario even when steps fail, are undefined, pending, or skipped.
What are Chrome Options?
For managing different Chrome driver properties, Selenium WebDriver has a concept called the Chromeoptions Class. For modifying Chrome driver sessions, the Chrome options class is typically combined with Desired Capabilities. Eventually it enables you to carry out numerous tasks, such as launching Chrome in maximized mode, turning off installed extensions, turning off pop-ups, etc.
At this instant we have to create Before and After Hooks. At the same time each hook should contain a void method as shown in the below code.
In the Before Hook, we have to initialize the webdriver. Also, we have to add simple lines of code to add extensions to the webdriver. To add the extensions we are using Chrome Options to Automate Chrome Extension. Then in the After Hook, we are closing the webdriver.
Now, we have to create a Base Step which should have driver configuration and hooks
package Utilities;
import io.cucumber.java.After;
import io.cucumber.java.Before;
import io.github.bonigarcia.wdm.WebDriverManager;
import org.openqa.selenium.chrome.ChromeOptions;

import java.io.File;

public class BaseStep extends TestContext{
   @Before
   public void initCucWeb()
   {
       ChromeOptions options = new ChromeOptions();
       options.addExtensions(new File("src/test/Resources/CalculatorExtension.crx"));
       options.addArguments("--remote-allow-origins=*");
       options.setCapability(ChromeOptions.CAPABILITY,options);
       driver = WebDriverManager.chromedriver().capabilities(options).create();
       driver.manage().window().maximize();
   }
   @After
   public void closeWeb()
   {
       driver.quit();
   }
}
Please find attached the GitHub repository link. I have uploaded the same project to this repository. I have also attached a Readme.md file that explains the framework and the different commands we have used so far in this project.
It is a very difficult task to add an extension to a web driver and perform an action on extension icons. So basically, in this article, we have found a solution to add an Automate Chrome Extension to Webdriver and to perform a Click action on the extension icon apart from learning to Automate Chrome extension using the Selenium Webdriver.
The software testing landscape has evolved towards automation to meet the demands for quick and frequent deployments, adapting efficiently to constant updates and tight deadlines in a dynamic development environment.
I am an SDET Engineer proficient in manual, automation, API, Performance, and Security Testing. My expertise extends to technologies such as Selenium, Cypress, Cucumber, JMeter, OWASP ZAP, Postman, Maven, SQL, GitHub, Java, JavaScript, HTML, and CSS. Additionally, I possess hands-on experience in CI/CD, utilizing GitHub for continuous integration and delivery. My passion for technology drives me to constantly explore and adapt to new advancements in the field.
The purpose of this blog is to provide a step-by-step guide on how to use Visual Studio Code for Java Selenium Automation as the Integrated Development Environment (IDE) for designing and running Selenium tests with Java. Visual Studio Code is a defacto IDE for JavaScript, however, it is rarely used for Java and Selenium automation as traditionally test automation engineers use either Eclipse or IntelliJ IDEA. Being one of the most widely used IDEs, software professionals prefer Visual Sstudio Code for its functionality.
Cross-platform support: Visual Studio Code can run on Windows, macOS, and Linux
IntelliSense: Visual Studio Code provides intelligent code completion and error detection, making it easier to write and debug code
Built-in Git integration: Visual Studio Code provides built-in support for Git, allowing you to easily version control your projects
Extensible with plugins: Visual Studio Code has a large community of developers who have created a variety of plugins to enhance the functionality of the IDE.
Fast and lightweight: The design of Visual Studio Code focuses on being fast and lightweight, making it easy to use on lower-end hardware.
Free and open-source: Visual Studio Code is free and open-source, making it accessible to everyone.
Debugging and testing: Visual Studio Code has built-in support for debugging and testing, making it easier to identify and fix bugs in your code.
Customization: You can customize Visual Studio Code with themes, keybindings, and settings, allowing you to tailor the IDE to your needs.
Here’s what you’ll need to get started with using Visual Studio Code for Java Selenium Automation:
Once you’ve installed these components, you can create a new Java project in Visual Studio Code and add the Maven libraries to it.
Following the installation of these parts, you can use Visual Studio Code to build a new Java project and add the Maven libraries to your project.
Steps to setup in Visual Studio Code for Java Selenium Automation:
Assuming Visual Studio Code is installed, let’s start the recipe step by step to create a flow for execution.
Step 1:
You need to open Visual Studio Code and locate the Marketplace.
Step 2:
Go to the search bar search for Java then Install the Extension pack for Java from the Marketplace.
Step 3:
Now, Navigate to the settings option in the lower left corner.
Step 4:
Select the command palette and look for the command create Java project.
Step 5:
Probably, here we start how to add a maven repository into the project to run the Java-Selenium test using Visual Studio Code. After selecting Create Java Project, select the “Maven” option to help you create the project.
Step 6:
After that, it will navigate to the browse folder and choose a specific folder to create your Java project. Please select a folder and open it in Visual Studio Code.
Step 7:
The screen below will appear; enter your project name and press “Enter” to open that project in Visual Sstudio Code.
Step 8:
Once you open the project, you will see the default folder structure displayed. To ensure code reusability, we create the following framework in Visual Studio Code.
Default Structure
Hybrid Framework folder structure
Hybrid Driven Framework is a combination of both the Data-Driven and Keyword-Driven frameworks. Here, we externalize the keywords, as well as the test data. Furthermore, Keywords are maintained in a separate Java class file and test data can be maintained either in a properties file/excel file/can use the data provider of a TestNG framework.
Step 9:
So, for adding Maven dependencies and how to download them
Maven is a tool for managing or building projects. When various test engineers incorporate their files into the same framework, they use it to check for compilation problems amongst framework components. Consequently, every time we make a change to the framework, we update the build status and continuously maintain the monitor, framework components, or build. As a result, there are no compilation errors in the framework, it will output a “build success” message; otherwise, it will output a “build failure” message.
Once you select Maven Project, it will create a Maven project with a pom.xml file. In the pom.xml file, you need to add the selenium dependency from the website https://mvnrepository.com/ and add it into dependency.
This dependency has been added to provide the libraries required to run the Selenium project. In a normal Selenium project, we need to download standalone libraries and then add them to external libraries, whereas here, once you add this Maven dependency, it will automatically download all libraries required for the Selenium project.
In a Maven project, you can use the Apache POI library by adding its dependency to your project’s pom.xml file. This will automatically download and include the library in your project’s classpath. Once you have added the dependency, you can start using the Apache POI APIs in your Java code to read, write, and manipulate Microsoft Office documents.
In a Maven project, you can add the Extent Reports dependency to your project’s pom.xml file to use its reporting functionality. Once you have added the dependency, you can start using the Extent Reports APIs in your Java code to create and generate detailed reports for your automation test results.
In a Maven project, you can add the TestNG dependency to your project’s pom.xml file to use its testing functionality. Once you have added the dependency, you can start using the TestNG annotations in your Java code to define your tests, test suites, and test configurations.
In a Maven project, you can add the Log4j dependency to your project’s pom.xml file to use its logging functionality. Once you have added the dependency, you can start using the Log4j APIs in your Java code to log messages to various output targets. You can configure Log4j using a configuration file such as log4j2.xml or log4j2.properties, which specifies the logging level, output target, and other logging settings.
Here, you need to run Java-selenium tests by using the pom.xml file, according to your demand and test requirements, Therefore, you can add more maven repositories.
1. Test/Java/example:
This folder contains the test source code packages and classes. Here, this contains all the data related to test cases, including page objects, base classes, and the test case class, which helps run the whole TestNG framework. However, this contains all the data related to test cases, including page objects, base classes, and the test cases class, which help run the whole TestNG framework.
Code Explanation in Demo example:
Login Page:
The base class in the main class will take care of browser setup, loading configuration files, and other reusable methods like screenshots, handling sync issues, and many more.
Using Base, we can avoid code duplication.
Reuse code as much as we can.
package com.example.Pages;
import org.openqa.selenium.WebDriver;
import org.openqa.selenium.WebElement;
import org.openqa.selenium.support.FindBy;
import org.openqa.selenium.support.PageFactory;

public class LoginPage {
    WebDriver driver;
    public LoginPage(WebDriver driver){
        this.driver = driver;
        PageFactory.initElements(driver, this);
    }

    @FindBy(id="email")
    WebElement usernameBox;

    @FindBy(id="passwd")
    WebElement passwordBox;

    @FindBy(name="SubmitLogin")
    WebElement SignInBtn;

    public void enterUsername(String uname){
        usernameBox.sendKeys(uname);
    }

    public void enterPassword(String upwd){
        passwordBox.sendKeys(upwd);
    }

    public void submitButton(){
        SignInBtn.click();
    }
}
Base Class:
@BeforeClass: The annotated method will be run before the first test method in the current class is invoked.
@AfterClass: The annotated method will be run after all the test methods in the current class have been run.
package com.example.TestCases;
import org.apache.log4j.Logger;
import org.apache.log4j.PropertyConfigurator;
import org.openqa.selenium.WebDriver;
import org.openqa.selenium.chrome.ChromeDriver;
import org.testng.annotations.AfterClass;
import org.testng.annotations.BeforeClass;
import com.example.Utilities.ReadConfig;
public class BaseClass {
    ReadConfig read = new ReadConfig();
    public String googlebaseurl = read.getGoogleBaseURL();
    public String loginbaseurl = read.getLoginBaseURL();
    public String uname = read.getUsername();
    public String upwd = read.getPassword();
    public String SuccessURL = read.getSuccessURL();
    public WebDriver driver;
    public Logger logger;
    @BeforeClass
    public void SetUp(){
        System.setProperty("webdriver.chrome.driver", "Drivers/chromedriver.exe");
        // WebDriverManager.chromedriver().setup();
        driver = new ChromeDriver();
        driver.manage().window().maximize();

        logger = Logger.getLogger("googledemo");
        PropertyConfigurator.configure("log4j.properties");
    }

    @AfterClass
    public void tearDown(){
        driver.quit();
    }
}
Test Class:
According to the below code, This class will help to run TestNG test cases and will give results. You can add third-party tools for generating reports as well such as extent reports, and Allure reports.
Basically, this folder is used to store browsers that will be required to run test cases on that specific browser. Whether it is Chrome, Edge, or Opera. Further includes driver information, where the Chrome Driver, Firefox, or Edge—whichever you’re comfortable with. Even you can use maven dependency for instantiating Webdriver. The WebDriverManager is a library that allows you to automate the management of WebDriver binaries. There are such as Chrome driver, gecko driver, etc. in your Java project.
3. Configuration:
The Above image implies that properties are used to externalize configurable data. Because if you put that data in your code (test script), you would need to build the code each time you wanted to modify the property’s value. As a result, the fundamental advantage of properties is that they may be modified at any time. And exist independently of your source code. Thus, a pair of strings is used to store each parameter, with one string serving as the key and the other as the value.
You can see the folder structure, where the configuration folder contains a config file that includes all the common information required to run a test.
4. Utilities:
Once we have the config file loaded, we need to read the properties of the config file. The Properties object gives us the .getPropertymethod that takes the key of the property as a parameter and returns it. Basically, the value of the matched key from the .properties file. Therefore, this includes a class that assists in reading all of the data from the config.properties file.
5. Screenshots:
A screenshot in Selenium WebDriver is there we can use for bug analysis. Selenium WebDriver can automatically take screenshots during the execution. But if users need to capture a screenshot on their own, they need to use the Take Screenshot method. So, which notifies the WebDriver to take the screenshot and store it in Selenium. As a result, it includes screenshots that we took at the time of running the test.
6. log4j.properties:
The above image log4j.properties is a configuration file that we can use with the Apache Log4j logging framework. As a result, which is a popular logging library for Java applications. Users utilize this file to configure the logging behavior of the application, including specifying the output destination for log messages. The format of log messages, and the logging levels for different categories of log messages. The log4j.properties file contains key-value pairs that define the various logging settings for the application.
Step 10:
Basically, here is how we organize the hybrid framework. We need to add a few folders to make it easier for testers to run code without encountering them.
Initially, you will not find any errors until you save your code in Visual Studio Code through ctrl+s. You can hover over that error and you will find a solution for that. If you need to install any package, Thus it will also be visible to you.
Run Test:
Navigate to the Project Directory:- Open a command prompt or terminal window. And navigate to the directory where your Maven project is located. This should be the directory that contains the “pom.xml” file, which is the Maven project configuration file.
Run Maven Test Command:- Once you are in the project directory, you can run the following command to execute the Maven tests: “mvn test”
This command will instruct Maven to run the tests defined in your Maven project. Maven will automatically compile the necessary source code and download dependencies. And execute the tests using a testing framework such as JUnit, TestNG, or any other testing framework that you have configured in your project’s dependencies.
View Test Results:- After the tests have been executed. The Maven will display the test results in the command prompt or terminal window. You can view the test results to see which tests have passed, failed, or skipped.
Video:
Accordingly, the below tutorial will guide you
Conclusion:
Since Visual Studio Code for Java Selenium m Automation is a well-known IDE among software professionals. Here, I can think of no better method to run Java-Selenium automation through VSCode.
However, It offers the best Java extension for using Visual Studio Code for Java Selenium Automation. Basically, we make run test cases more appropriate and adaptable.
Harish is an SDET with expertise in API, web, and mobile testing. He has worked on multiple Web and mobile automation tools including Cypress with JavaScript, Appium, and Selenium with Python and Java. He is very keen to learn new Technologies and Tools for test automation. His latest stint was in TestProject.io. He loves to read books when he has spare time.
Selenium is an open-source Web UI automation testing suite/tool. It supports automation across different browsers, platforms, and programming languages which includes Java, Python, C#, .net, Ruby, PHP, and Perl, etc. for developing automated tests. Selenium can be easily deployed on Windows, Linux, Solaris, and Macintosh Operating Systems. It also provides support for mobile applications like iOS, windows mobile, and Android for different Operating Systems.
Selenium consists of drivers specific to each language. Additionally, the Selenium Web driver is mostly used with Java and C#.
Test scripts can be coded in selenium in any of the supported programming languages and can be run directly in most modern web browsers which include Internet Explorer, Microsoft Edge, Mozilla Firefox, Google Chrome, Safari, etc.
Furthermore, C# is an object-oriented programming language derived from C++ and Java. It supports the development of console, windows, and web-based applications using Visual Studio IDE on the .Net platform.
With Selenium C#, there is a wide variety of automation frameworks that can be used for automated browser testing. Each framework has its own advantages and disadvantages, they are chosen on the basis of their requirement, compatibility, and the kind of solution they’d prefer. These are the most popular Selenium C# frameworks used for test automation.
NUnit:
It is a unit testing tool ported initially from JUnit for .Net Framework and is an Open Source Project. NUnit was released in the early 2000s, though the initial Nunit was ported from Junit, the recent .Net version 3 is completely rewritten from scratch.
To run the Nunit test we need to add attributes to our methods. An example, attribute [Test], Indicates the Test method. Below are the NuGet Packages required by NUnit
NUnit NUnit3TestAdapter Microsoft.NET.Test.Sdk
XUnit:
XUnit is a unit testing tool for .Net Framework which was released in 2007 as an alternative to Nunit. xUnit has attributes for the execution of tests but is not similar to NUnit. [Fact] and [Theory] attributes are similar to [Test]
MSTest is a unit testing framework developed by Microsoft and ships with Visual Studio. However, Microsoft made version 2 open-source which can easily be downloaded. Additionally, MSTest has an attributes range similar to NUnit and provides a wide range of attributes along with parallel run support at the Class and Method level.
Prerequisite:
To get started with Selenium C# and the Page Object Model framework, first, we need to have the following things installed.
1) IDE: Download and install any IDE of your choice.
After downloading the Visual Studio Installer, select the .NET desktop development option and then click on Install.
Now let the Visual Studio Installer download the packages and perform the installation.
Install the latest version of the .NET Framework on your machine.
2) Create New Project: After the installation is over, begin using Visual Studio.
select the Create a new project option, then select the xUnit Test Project option for C#.
3) Selenium Webdriver for Chrome Browser: You must also install Selenium’s web driver for Chrome browser.
In Visual Studio navigate to Tools -> NuGet Package Manager -> Manage NuGet Packages for Solution.
In the Search Bar, enter the name of the packages you want to install (e.g. Selenium .WebDriver).
Check the Project checkbox, and click on Install.
In the dialogue box asking to accept the licences click on Accept button.
This will start the installation process and install the Selenium WebDriver.
Selenium.WebDriver
This package contains the .NET bindings for concise and object-based
Selenium WebDriver API, which uses native OS-level events to manipulate the browser, Selenium.Chrome.WebDriver (chrome driver exe) This NuGet package installs Chrome Driver (Win32) for Selenium WebDriver in your xUnit Test Project.
Once Visual Studio is finished with the successful installation of the Selenium WebDriver, it will show a message in the output window. Once the Visual Studio is set up with all dependencies, it’s ready for work.
Note:We will be using the demo testing website (https://www.calculator.net/) and trying to achieve the addition and subtraction operations for our automation test.
Writing the First Selenium C# Test:
Download the WebDriverManager from Tools -> NuGet Package Manager -> Manage NuGet Packages for Solution.
WebDriverManager is an open-source Java Library that automates the management of driver executables required by Selenium WebDriverby performing the four steps (find, download, setup, and maintenance) for the drivers required for Selenium tests. Here are some benefits of WebDriverManager in Selenium:
WebDriverManager automates the management of WebDriver binaries, thereby avoiding installing any device binaries manually.
WebDriverManager checks the version of the browser installed on your machine and downloads the proper driver binaries into the local cache (~/.cache/selenium by default) if not already present.
WebDriverManager matches the version of the drivers. If unknown, it uses the latest version of the driver.
WebDriverManager offers cross-browser testing without the hassle of installing and maintaining different browser driver binaries.
In the UnitTest1 file, the final code looks like this:
public class UnitTest1
    {
        IWebDriver driver;
        CalculatorPage calc_page;
        public void Initialize_driver()
        {
         new WebDriverManager.DriverManager().SetUpDriver(new ChromeConfig());
            driver = new ChromeDriver();
          calc_page = new CalculatorPage();
        }
        public void Close_driver()
        {
        driver.Close();
        }
       [Fact]
        public void Add()
        {
            initialize_driver();
            calc_page.Initialize(driver);
            string actualresult = calc_page.calculate("14", "+", "5");
            Assert.Equal("19", actualresult);
            Close_driver();
        }
        [Fact]
        public void Subtract()
        {
            initialize_driver();
            calc_page.Initialize(driver);
            string actualresult = calc_page.calculate("24", "-", "5");
            Assert.Equal("19", actualresult);
           Close_driver()
        }
    }
Now just build your code by right-clicking the project xUnitTestProject1 or by pressing Ctrl + Shift + B and you will be able to see your test in “Test Explorer”.
After following the above procedure, run the test case. But this code will not execute unless the Chrome driver for the Selenium is not downloaded and unzipped on the system.
When developing a scalable and robust automation framework, it is important to consider the following challenges:
Keeping up with UI changes: The primary goal of automated UI web tests is to validate the functionality of web page elements. However, the UI is subject to constant evolution, leading to changes in web locators. These frequent changes in web locators pose a challenge to code maintenance.
Code maintenance: With the ever-changing UI, it is crucial to maintain the automation codebase effectively. Failing to update Selenium test automation scripts to reflect changes in web locators can result in test failures. Proper maintenance is essential to ensure the longevity and reliability of the test scripts.
Test failure due to lack of maintenance: Inadequate maintenance of automation scripts can lead to scenarios where tests fail. One common cause is a change in web locators. If the Selenium test automation scripts are not updated accordingly, it can cause a significant number of tests to fail, impacting the overall test suite’s reliability.
So to address this, restructure the Selenium test automation scripts for increased modularity and reduced code duplication.
Utilizing the Page Object Model (POM) design pattern achieves code restructuring and minimizes the effort required for test code maintenance.
Now, let’s delve into a comprehensive overview of the Page Object Model, including the implementation and effective maintenance of your Selenium test automation scripts.
Why do we need Page Object Model in Selenium C#?
Selenium test automation scripts become more complex as the web applications add more features and web pages. With every new page added, new test scenarios are included in the Selenium test automation scripts. With this increase in lines of code, its maintenance can become very tedious and time-consuming. Also, the Repetitive use of web locators and their respective test methods can make the test code difficult to read.
Instead of spending time updating the same set of locators in multiple Selenium test automation scripts, a design pattern such as the Page Object Model can be used to develop and maintain code.
What is Page Object Model In Selenium C#?
Page Object Model is the most widely used design pattern by the Selenium communityfor automation testsin which each web page (or significant ones) is considered as a separate class and a central object repository is created for controls on a web page.
Each Page Object (or page classes) contain the elements of the corresponding web page along with the necessary methods to access the elements on the page.
Thus it is a layer between the test scripts and UI and encapsulates the features of the page.
The Selenium test automation scripts do not interact directly with web elements on the page, instead, a new layer (i.e. page class/page object) resides between the test code and UI on the web page.
Hence, Selenium test automation implementation that uses the Page Object Model in Selenium C# will constitute different classes for each web page thereby making code maintenance easier.
In complex test automation scenarios, automation scripts based on Page Object Model can have several page classes (or page objects). It is recommended that you follow a common nomenclature while coming up with file names (representing page objects) as well as the methods used in the corresponding classes. For example, if automation for a login page & dashboard page is to be performed, our implementation will have a class each for login & dashboard. The controls for the login page are in the ‘login page’ class and the controls for the dashboard page are in the ‘dashboard page’ class.
How to Use Page Object Model:
We will now implement the Page Object Model for the use case we considered above i.e. trying to achieve the addition and subtraction operations for our automation test on the Calculator page. Create a class file – CalculatorPage.csfor Calculator page operation. This page class contains the locator information of the elements on that page. Also, we need to define the methods for that page in the CalculatorPage.cs class and call the methods from UnitTest1.cs.
We are initializing the Chromedriver object and launching the web page from the initialiseDriver() method from UnitTest1.cs. Also, we are creating the instance of CalculatePage from the same method. The CalculatePage.cs contain an instance of IWebDriver and the following methods –
Initialize(): this method takes one IWebDriver object as an input parameter and it is assigned to a locally defined IWebDriver object. Also, the required web page is launched using this driver.
Calculate(): this method is actually used to do the calculation operation of two numbers..either addition or subtraction using 3 input parameters as user input number value1, number value 2, and operator like -’+’ or ‘-’. The required elements from the page are located and as per the operator, the required operation is performed on those. The final code of CalculatePage.cs would look like the below:
public class CalculatePage
    {
        IWebDriver driver;

        public void Initialize(IWebDriver driver)
        {
            this.driver = driver;
            driver.Navigate().GoToUrl("https://www.calculator.net/");
        }

    public string Calculate(string no1, string op, string no2)
        {
            IWebElement number1;
            char[] ch = no1.ToCharArray();

            for (int i = 0; i < no1.Length; i++)
            {
                number1 = driver.FindElement(By.XPath("//span[@onclick='r(" + ch[i] + ")']"));
                number1.Click();
             }

            IWebElement op_element = driver.FindElement(By.XPath("//span[@onclick=\"r('" +op + "')\"]"));
            op_element.Click();
            ch = no2.ToCharArray();

            for (int i = 0; i < no2.Length; i++)
            {
                number1 = driver.FindElement(By.XPath("//span[@onclick='r(" + ch[i] + ")']"));
                number1.Click();
            }
            IWebElement result = driver.FindElement(By.Id("sciOutPut"));
            string actual_result = result.Text.Trim();
            return actual_result;
      }
   }
Advantages of Page Object Model in Selenium C#:
Page Object Model is a widely used design pattern nowadays. It reduces code duplication, enhances code readability, and improves maintainability by emphasizing reusability and extensibility. Furthermore, below are some of the major advantages of using the Page Object Model in Selenium C#.
Better Maintenance – With separate page objects (or page classes) for different web pages, functionality or web locator changes will have less impact on the change in test scripts. This makes the code cleaner and more maintainable as Selenium test automation implementation is spread across separate page classes.
Minimal Changes Due To UI Updates – The effect of changes in the web locators will only be limited to the page classes, created for automated browser testing of those web pages. This reduces the overall effort spent in changing test scripts due to frequent UI updates.
Reusability – The page object methods defined in different page classes can be reused across Selenium test automation scripts. This, in turn, results in a reduction of code size as there is increased usage of reusability with the Page Object Model in Selenium C#.
Simplification –One more important point of using this design pattern is that it simplifies the visualization of the functionality and model of the web page as both these entities are located in separate page classes.
Execution:
Navigate to Test -> Run All Tests. This will launch the test explorer in Visual Studio and will run our test.
You can run the test from the command prompt or visual studio’s terminal (Developer Command Prompt) with the following command-
dotnet test
This dotnet test command is used to run the tests in the project in the current directory. The dotnet test command builds the solution and runs a test host application for each test project in the solution. While running the tests from the project, you can put different filters while running the test, like running the tests with particular tags, from specific projects, with particular names, etc.
You can find this framework in the following Git Repository.
Implementing the Page Object Model in Selenium with C# provides a structured approach to automation testing, making the code more maintainable and reusable. It simplifies the handling of UI changes and enhances the overall efficiency of the testing process for large-scale applications.
Trupti is a Sr. SDET at SpurQLabs with overall experience of 9 years, mainly in .NET- Web Application Development and UI Test Automation, Manual testing. Having hands-on experience in testing Web applications in Selenium, Specflow and Playwright BDD with C#.
To deliver a good quality of work creating a robust software testing framework is a very important task. Every tester has his/her own approach or method to create a testing framework but the most common and important thing is creating a framework in such a manner that the other testers with minimal knowledge of automation testing can easily utilize the framework. While creating a framework there are some key points that we should consider you will find these points mentioned below.
A good tester is one who has the ability to create a good testing framework. In this blog, I have explained how to create an automation testing framework. Even a beginner with minimal knowledge of automation testing can use this approach to create his own testing framework. There are many more things that you can implement in this explained framework so feel free to comment on it.
When I started my journey as an SDET creating a framework was my first task assigned in my training so I can understand how important it is to create your own framework. Together in this blog, we will see the guidelines I have described which will help us to create a testing framework.
Before we jump into the main topic of our discussion let’s just quickly see the steps we will be following while creating our own framework.
Key Considerations When Creating an Automation Testing Framework:
Understanding the Requirements
Selecting a Testing Framework
Designing Test Cases
Implementing Test Cases
Executing Tests
Maintaining and Improving the Framework
Among the various frameworks present one of the most popular frameworks used for automation testing i.e. the combination of python’s behave library and selenium. In this blog, we are going to explore how to build and use this framework for our automation testing.
As everyone is familiar with Selenium which is an open source and one of the widely used tools for web automation testing along with Playwright and Cypress. Behave is a python library that is used for the BDD (Behavior Driven Development). Let’s just quickly explore what are the different frameworks present out there for automation testing.
A software automation testing framework is designed to make the process of testing software more efficient and easy to use. Every framework has its own advantages and disadvantages as per the given requirement it is most important for us to choose the right framework for automation. Below you will find some of the most commonly used and popular automation frameworks.
Types of Test Automation Frameworks:
Linear Scription Framework.
Modular Testing Framework.
Data-Driven Framework.
Keyword Driven Framework.
Hybrid Framework
Behavior Driven Development Framework.
Test Driven Development Framework.
In this blog, we will be building a BDD framework using Python’s behave library and selenium. In BDD we use the natural language to describe our test scenario divided into steps using the Gherkin language. These test scenarios are present in a feature file and because of the use of natural language, the behavior of the application is easily understandable by all. So, we can say that while creating a BDD framework one of the key components we should consider to use of the feature files and the step files.
As described earlier a feature file is written in natural language with the help of Gherkin language by following a set format. While a step file is an implementation of the steps present in the feature file. Here, a step file is a python file and we can see that it is full of a set of functions where those functions correspond to the steps described in the feature file. Now that we have seen what is feature file and step file let’s see what is the use of python’s behave library here, so basically once the steps and feature file are ready the behave will start automatically matching the steps present in the feature file with its corresponding implementation in the step file and will also check for any assertion errors present.
5. We can also install all the required packages using the requirement.txt file using the below command.
pip install -r requirement.txt
Framework Structure Overview:
Here is the overview of our python selenium behave BDD framework.
As a beginning, we are going to start with creating a simple framework using one scenario outline. In the next blog, we are going to see how to create an API testing framework using python. To understand both of them please read the blog carefully as I am explaining all the points here in natural language, without wasting any time let’s dive into the main topic of our discussion i.e. how to create python selenium behave BDD automation testing framework.
For this, we will follow some guidelines which I have described as steps.
Step 1:
Create a project in Pycharm (here I am using Pycharm professional) and as mentioned in the prerequisites install the packages.
It is not compulsory to use pycharm professional we can use pycharm community as well.
Step 2:
In this step, we will be creating a Features folder in which we will be creating our feature files for different scenarios. A feature file is something that holds your test cases in the form of a scenario and scenario outline. In this framework, we are using a scenario outline. Both scenario and scenario outline contain steps that are easy to understand for non-technical persons. We can also assign tags for the feature files and for the scenarios present in that file. Note that the feature file should end with a .feature extension.
Feature: Create test cases using Selenium with Python to automate below BMI calculator tests


#  We are using Scenario Outline in this feature as we can add multiple input data using examples.

  Scenario Outline: Calculating BMI value by passing multiple inputs
    Given I enter the "<Age>"
    When I Click on "<Gender>"
    And  I Enter a "<Height>"
    And  I Enter the "<Weight>"
    And  I Click on Calculate btn
    And  I Verify Result with "<Expected Result>"
    Examples:

      | Age | Gender  | Height  | Weight  | Expected Result |
      | 20  | Male    |  180    |  60     | BMI = 18.5 kg/m2|
      | 35  | Female  |  160    |  55     | BMI = 21.5 kg/m2|
      | 50  | Male    |  175    |  65     | BMI = 21.2 kg/m2|
      | 45  | Female  |  150    |  52     | BMI = 23.1 kg/m2|
Step 3:
Now, we have our feature file let’s create a step file to implement the steps described in the feature file. In order to recognize the step file we are adding step work after the name so that behavior will come to know the step file for that particular feature file. Both feature files and step files are essential parts of the BDD framework. We have to be careful while describing the steps in the feature file because we have to use the same steps in the step file so that behavior will understand and map the step implementation.
from behave import *

# The step file contains the implementation of the steps that we have described in the feature file.

@given('I enter the "{Age}"')
def step_impl(context, Age):
    context.bmipage.age_input(Age)

@when('I Click on "{Gender}"')
def step_impl(context, Gender):
    context.bmipage.gender_radio(Gender)

@step('I Enter a "{height}"')
def step_impl(context, height):
    context.bmipage.height_input(height)

@step('I Enter the "{weight}"')
def step_impl(context, weight):
    context.bmipage.weight_input(weight)

@step("I Click on Calculate btn")
def step_impl(context):
    context.bmipage.calculatebtn_click()

@step('I Verify Result with "{expresult}"')
def step_impl(context, expresult):
    context.bmipage.result_validation(expresult)
Step 4:
In step 4 we will be creating a page file that contains all the locators and the action methods to perform the particular action on the web element. We are going to add all the locators at the class level only and will be using them in the respective methods. The reason behind doing so is it is a good practice to declare your locators at the class level as when the locators get changed it is effortless to replace them and we don’t have to go through the whole code again.
from selenium.webdriver.common.by import By
import time
from Features.Pages.BasePage import BasePage


# The page contains all the locators and the actions to perform on that web element.
# In this page file we have declared all the locators at the class level and we are using them in the respective methods.

class BmiPage (BasePage):
    def __init__(self, context):
        BasePage.__init__(self, context.driver)
        self.context = context
        self.age_xpath = "//input[@id='cage']"
        self.height_xpath = "//input[@id='cheightmeter']"
        self.weight_xpath = "//input[@id='ckg']"
        self.calculatebtn_xpath = "//input[@value='Calculate']"
        self.actual_result_xpath = "//body[1]/div[3]/div[1]/div[4]/div[1]/b[1]"

    def age_input(self, Age):
        AgeInput = self.driver.find_element(By.XPATH, self.age_xpath)
        AgeInput.clear()
        AgeInput.send_keys(Age)
        time.sleep(2)

    def gender_radio(self, Gender):
       SelectGender = self.driver.find_element(By.XPATH, "//label[normalize-space()='" + Gender+"']")
        SelectGender.click()
        time.sleep(2)


    def height_input(self, height):
        HeightInput = self.driver.find_element(By.XPATH, self.height_xpath)
        HeightInput.clear()
        HeightInput.send_keys(height)
        time.sleep(3)

    def weight_input(self, weight):
        WeightInput = self.driver.find_element(By.XPATH, self.weight_xpath)
        WeightInput.clear()
        WeightInput.send_keys(weight)
        time.sleep(3)

    def calculatebtn_click(self):
        Calculatebtn = self.driver.find_element(By.XPATH, "//input[@value='Calculate']")
        Calculatebtn.click()
        time.sleep(3)

    def result_validation(self, expresult):
        try:
            Result = self.driver.find_element(By.XPATH, "//body[1]/div[3]/div[1]/div[4]/div[1]/b[1]")
            Actualresult = Result.text
            Expectedresult = expresult
            assert Actualresult == Expectedresult, "Expected Result Matched"
            time.sleep(5)
        except:
            self.driver.close()
            assert False, "Expected Result mismatched"
The next one is the base page file. We are creating a base page file to make an object of the driver so that we can easily use that for our page and environment file.
from selenium.webdriver.support.wait import WebDriverWait


# In the base page we are creating an object of driver.
# We are using this driver in the other pages and environment page.


class BasePage(object):
    def __init__(self, driver):
        self.driver = driver
        self.wait = WebDriverWait(self.driver, 30)
        self.implicit_wait = 25
Step 5:
This step is very important because we will be creating an environment file (i.e. Hooks file). This file contains hooks for before and after scenarios to start and close the browser. Also if you want you can add after-step hooks for capturing screenshots for reporting. We have added a method to capture screenshots after every step and will attach them to the allure report.
import json
import time

from allure_commons._allure import attach
from allure_commons.types import AttachmentType
from selenium import webdriver
from webdriver_manager.chrome import ChromeDriverManager
from Pages.BasePage import BasePage
from Pages.BmiPage import BmiPage

data = json.load(open("Resources/config.json"))


# This environment page is used as hooks page. Here we can notice that we have used before, after hooks along side with some step hooks.


def before_scenario(context, scenario):
    context.driver = webdriver.Chrome(ChromeDriverManager().install())
    time.sleep(5)
    basepage = BasePage(context.driver)
    context.bmipage = BmiPage(basepage)
    context.stepid = 1
    context.driver.get(data['BMIWEBURL'])
    context.driver.maximize_window()
    context.driver.implicitly_wait(3)


def after_step(context, step):
    attach(context.driver.get_screenshot_as_png(), name=context.stepid, attachment_type=AttachmentType.PNG)
    context.stepid = context.stepid + 1


def after_scenario(context, scenario):
    context.driver.close()
Step 6:
It is a good practice to store all our common data and files in a resource folder. So, whenever we need to make changes it will be easy to implement them for the whole framework. For now, we are adding a config.json file in the resource folder. This file contains the web URL used before the scenario to launch the web page for the specified tag in the feature file. The file is written in JSON format.
Congratulations, finally we have created our own Python Selenium Behave BDD framework. As I mentioned earlier we will be using Allure for reporting the test result. For this use the below command in the terminal and it will generate the result folder for you.
Creating a testing framework is very important as well as feels like a tedious task but with the right guidelines, everyone can create a testing framework. I hope in this blog I have provided all the answers related to the python selenium behavior automation testing framework. Here, we choose a BDD framework over other existing frameworks because of its better understanding, easy to adapt, and easy to understand for end users. If you still have any issues related to what we have seen earlier feel free to comment them down we will solve them together. There are many more things we can add to this existing framework but to get started I feel this framework is enough and will cover most of the requirements.
An SDET Engineer with hands-on experience in manual, automation, API, Performance, and Security Testing. The technologies I have worked on include Selenium, Playwright, Cypress, SpecFlow, Cucumber, JMeter, K6, OWASP ZAP, Appium, Postman, Maven, Behave, Pytest, BrowserStack, SQL, GitHub, Java, JavaScript, Python, C#, HTML, CSS. Also, I have hands-on experience in CI/CD the technologies I have used for CI/CD include Azure DevOps, AWS, and Github. Apart from this, I like to write blogs and explore new technologies.
For any web automation testing, the one and most important task is to identify and use robust locators to identify web elements so that your automated tests do not fail with “Unable to locate element”. In this article, we are providing you with the techniques that every tester should learn to create those robust locators. As we already know this can be done using different locator strategies. In this blog, we are going to learn about XPath. Before we dive into the topic of our discussion let’s just get more familiar with Xpaths. Let’s start with,
What is XPath?
XPath (XML Path Language) is an expression language that allows the processing of values conforming to the data model defined in the XQuery and XPath Data models. Basically, it is a query language that we use to locate or find an element present on the webpage. It is defined by the World Wide Consortium (W3C). Now, let’s discuss why Xpaths are necessary.
Why is XPaths necessary?
Xpaths are the most widely used locators in automation though there are other locators like id, name, class name, tag name, and so on. Also, it is used when there are no unique attributes available to locate the web element. It allows identification with the help of the visible test present on the screen with the help of Xpath function text().
Before explaining the importance of XPath let’s just go through the different types of locators available for automation testing.
In this blog, we will learn about the different types of Xpaths and how to implement them so that we can locate our web elements quickly using the selenium web driver. Basically, there are two types of Xpaths
1. Absolute XPath:
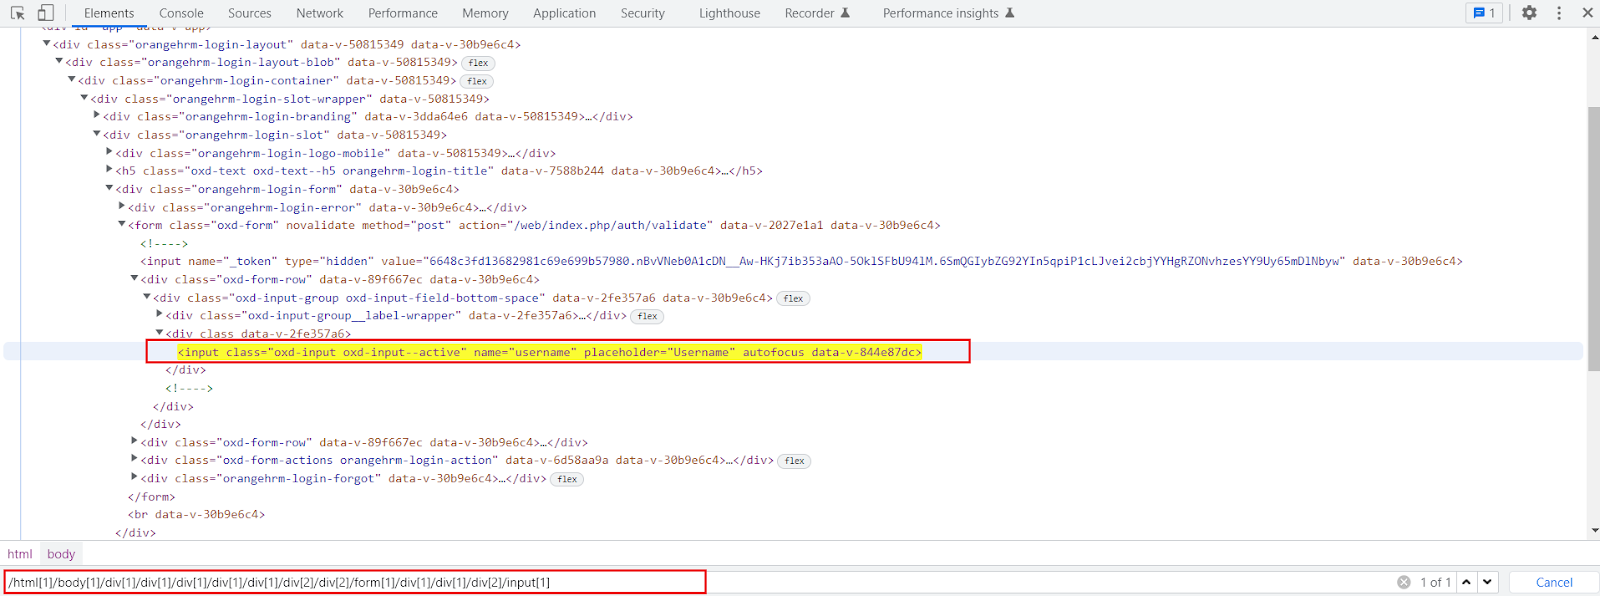
In this type, The XPath starts from the beginning or from the root node of the HTML DOM structure. It is a direct way to locate or find the web element but the disadvantage of absolute XPath is that as we are creating it from the start of the HTML DOM structure if there are any changes introduced in the created path of the web element then it gets failed. In this type of locator, we only use tags or nodes. The main advantage of this is that we can select a web element from the root node as it starts with the single forward slash “ / ”.
Example:
Here is an example of an absolute Xpath for an input field box.
The absolute XPath is: /html[1]/body[1]/div[1]/div[1]/div[1]/div[1]/div[1]/div[2]/div[2]/form[1]/div[1]/div[1]/div[2]/input[1]
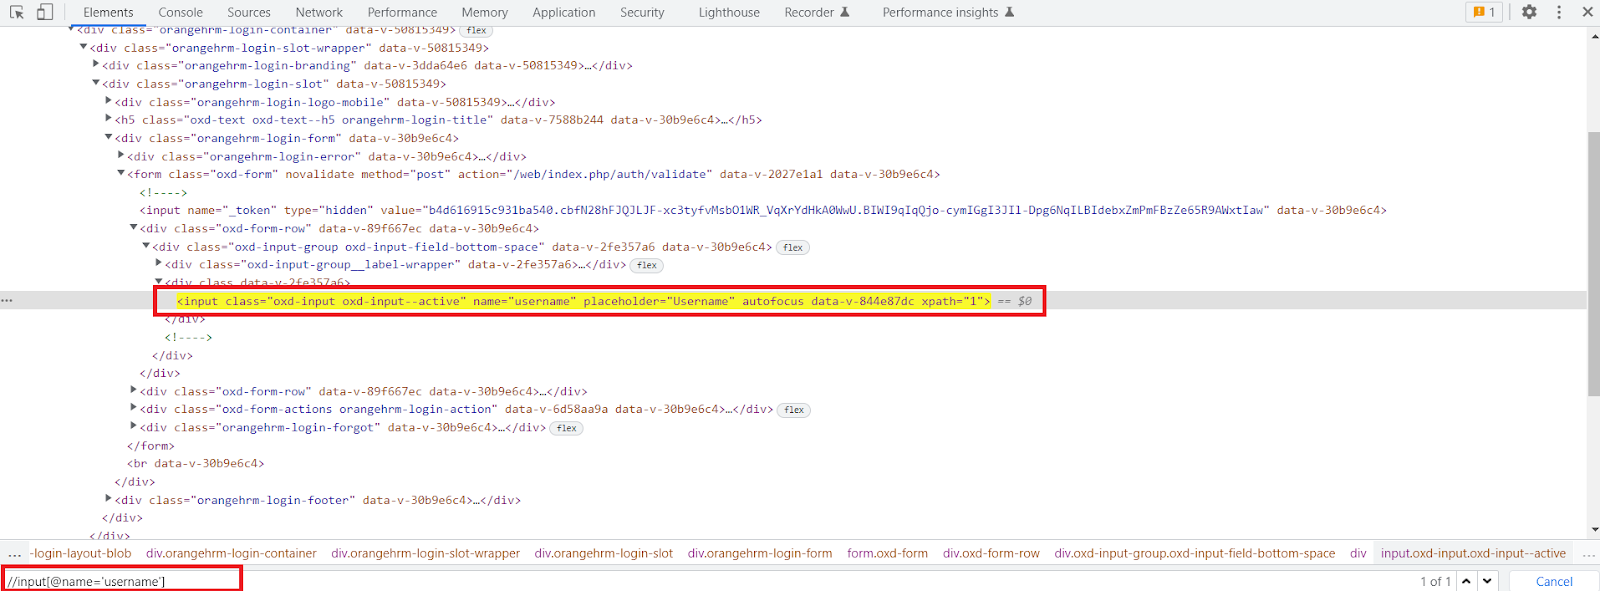
2. Relative Xpath:
Compared to an absolute XPath the relative XPath does not start from the beginning of the HTML DOM structure. It starts from where the element is present e.g. from the middle of the HTML DOM structure if the element is located there. We don’t have to travel from the start of the HTML DOM structure. The relative Xpath starts with a double forward slash “ // “ and it can locate and search the web element anywhere on the webpage. Relative XPath directly jumps to elements on DOM. The other difference between absolute and relative XPath is that in absolute XPath we use tags or nodes but in relative XPath we use attributes.
Example:
We are writing the relative XPath for the same input field for which earlier we created an absolute XPath.
Relative XPath is:
//input[@name=’username’]
XPath Functions:
It is not always possible to locate a web element using relative XPath that is because at some times while locating a particular web element there is the possibility of elements that have similar properties, for example, the same id, name, or same class name. So, here the basic XPath won’t work efficiently for finding that web element. Xpath functions are used to write the efficient XPath by locating a web element with a unique value. Basically, there are three types of XPath functions as follows,
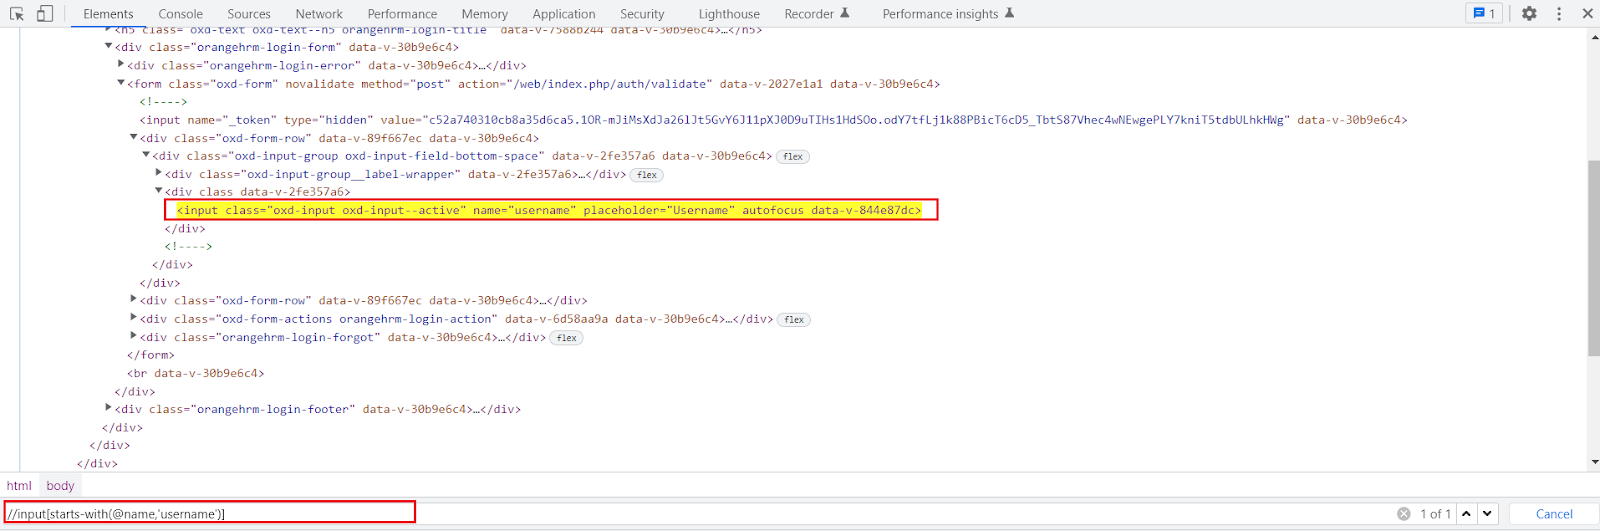
a. starts-with() Function:
starts-with() function is very useful in locating dynamic web elements. It is used to find the element in which the attribute value starts with some particular character or text.
While working on the dynamic web page the starts-with function plays an important role. We can use it to match the starting value of a web element that remains static.
It can also locate the web element whose attribute value is static.
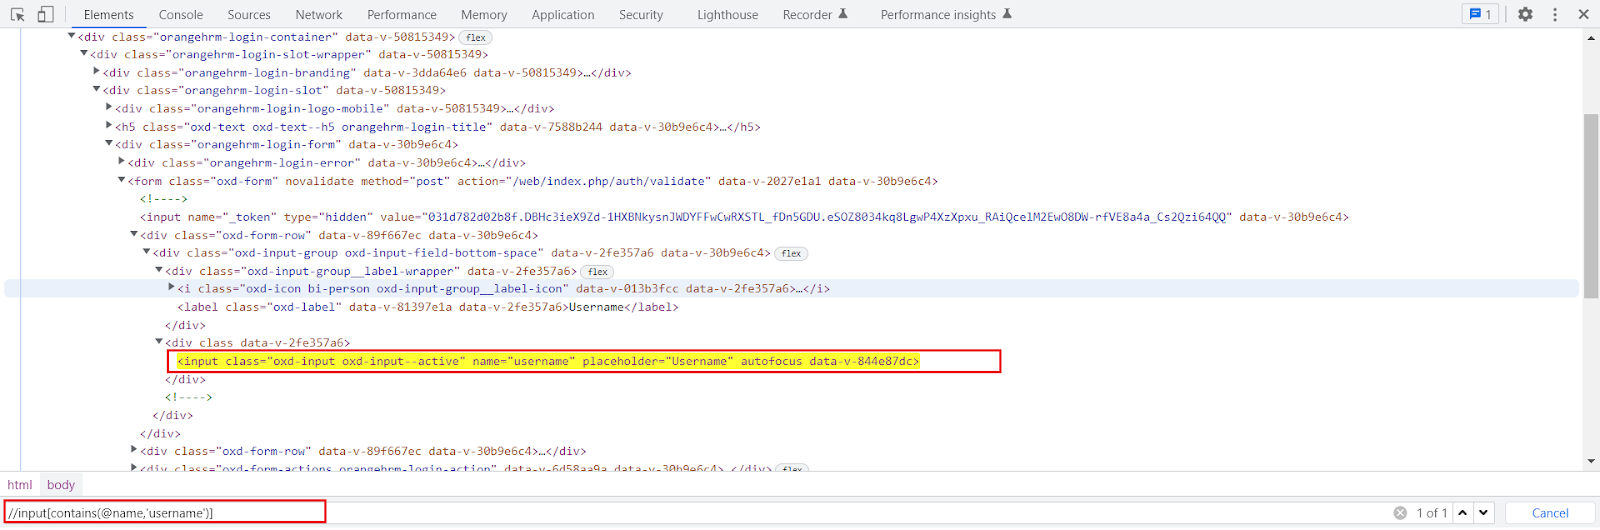
Just like the start-with() function explained above, the contains() function is also used to create a unique expression to locate a web element.
It is used when if a part of the value of an attribute changes dynamically the function can navigate to the web element with the partial text present.
We can provide any partial attribute value to locate the web element.
It accepts two parameters the first one is the attribute of the tag must validate to locate the web element and the second one is the value of an attribute is a partial value that the attribute must contain.
Syntax:
Xpath = //tagname[contains(@attribute,’value’)]
Example:
//input[contains(@name,’username’)]
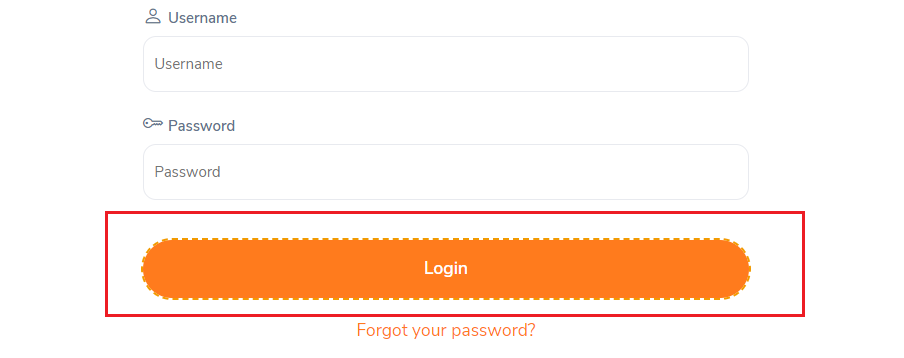
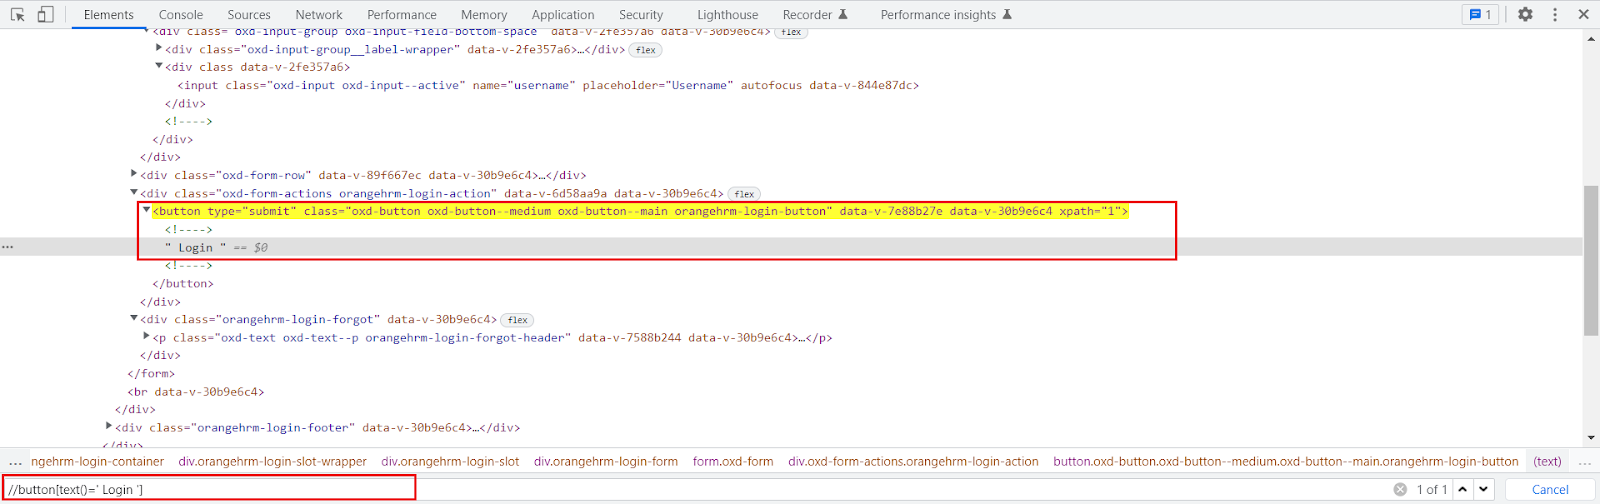
c. text() Function:
text() Function:
The text() function is used to locate web elements with exact text matches.
The function only works if the element contains the text.
This method returns the text of the web element when identified by the tag name and compared it with the value provided on the right side.
Syntax:
Xpath = //tagname[text()=’Actual text present’]
Example:
//button[text()=’ Login ‘]
How to use AND & OR in XPath:
AND & OR expressions can also be used in selenium Xpath expressions. Very useful if you want to use more than two attributes to find elements on a webpage.
The OR expression requires two conditions and it will check whether the first condition in the statement is true if so then it will locate that web element and if not then it will go for the second condition and if that is true then also it will locate that web element. So, here the point we should remember is that when we are using the OR expression at least either of two of the conditions should be true then, and then only it will find and locate that web element.
Syntax:
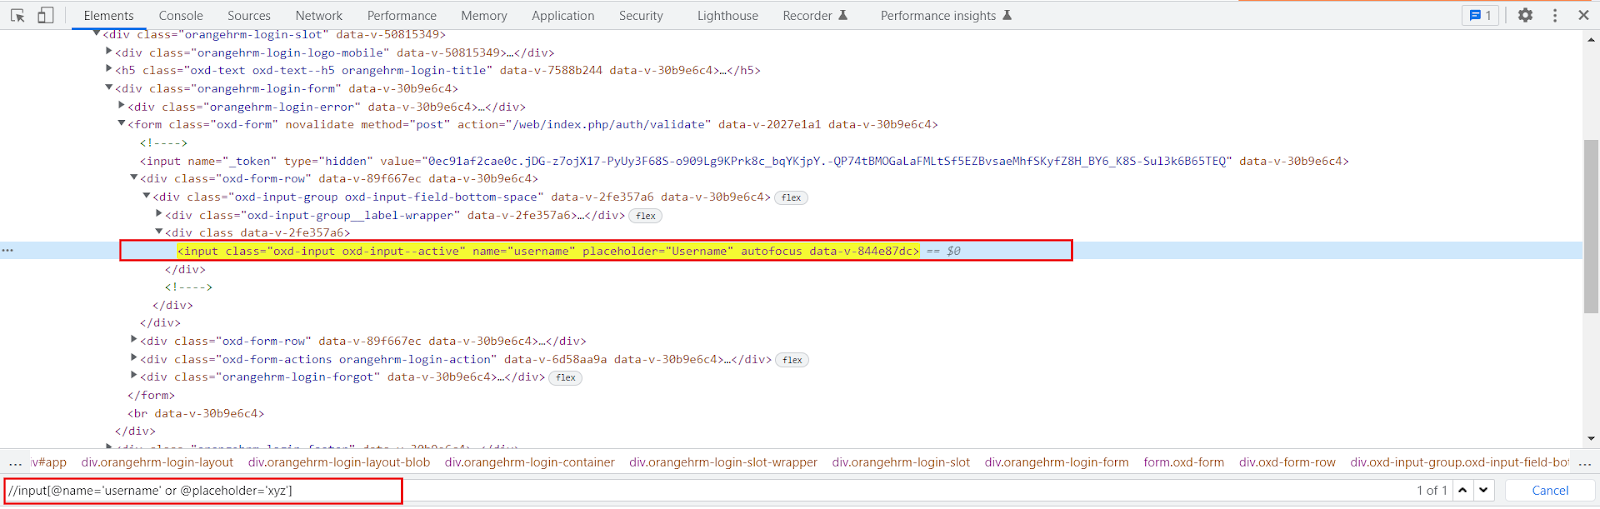
Xpath = //tagname[@attribute=’Value’ or @attribute=’Value’]
Example:
//input[@name=’username’ or @placeholder=’xyz’]
Here the first condition is true and the second one is false still the web element got located.
Just like the OR expression the AND expression also requires two conditions but the catch here is that both the provided condition must be true then and then only the web element will get located. If either of the conditions is false then it will not locate that web element.
Syntax:
Xpath = //tagname[@attribute=’Value’ and @attribute=’Value’]
Example:
//input[@name=’username’ and @placeholder=’Username’]
In this case, both the condition provided for an AND expression is true hence the web element got located.
XPath Axis:
It is a method to identify those dynamic elements that are impossible to find by normal XPath methods. All the elements are in a hierarchical structure and can be either located using absolute or relative Xpaths but it provides specific attributes called XPath axis to locate those elements with unique XPath expressions. The axes show a relationship to the current node and help locate the relative nodes concerning the tree’s current node. The dynamic elements are those elements on the webpage whose attributes dynamically change on refresh or any other operations. The HTML DOM structure contains one or more element nodes and they are known as trees of nodes. If an element contains the content, whether it is other elements or text, it must be declared with a start tag and an end tag. The text defined between the start tag and the end tag is the element content.
Types of XPath Axis:
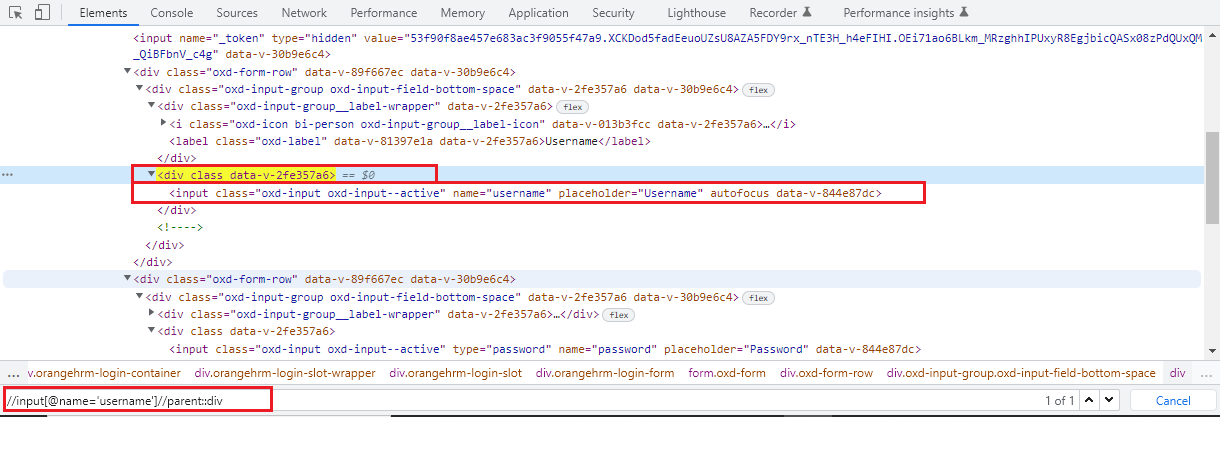
1. Parent Axis XPath:
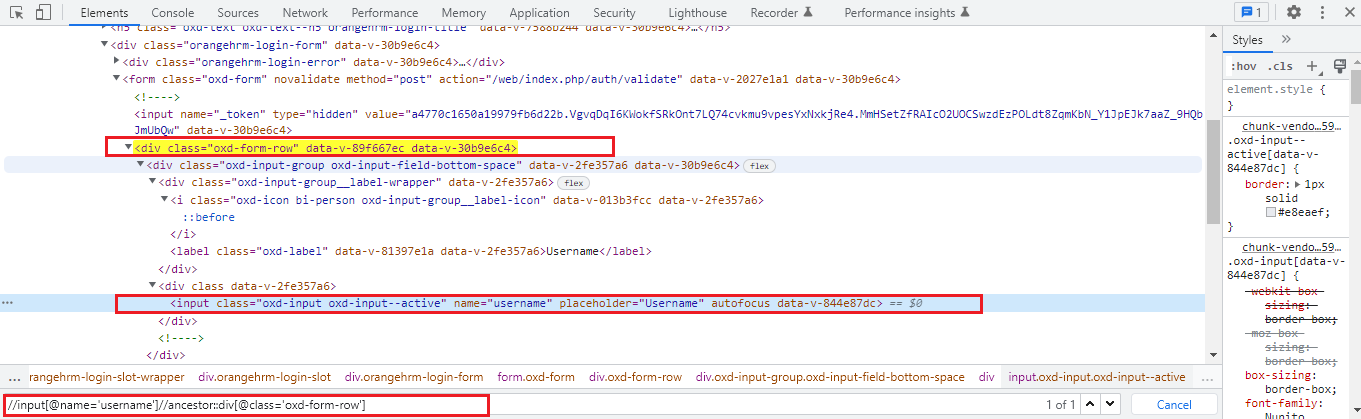
With the help of the parent axis XPath, we can select the parent of the current node. Here, the parent node can be either a root node or an element node. The point to consider here is that for all the other element nodes the maximum node the parent axis contains is one. Also, the root node of the HTML DOM structure has no parent hence the parent axis is empty when the current node is the root node.
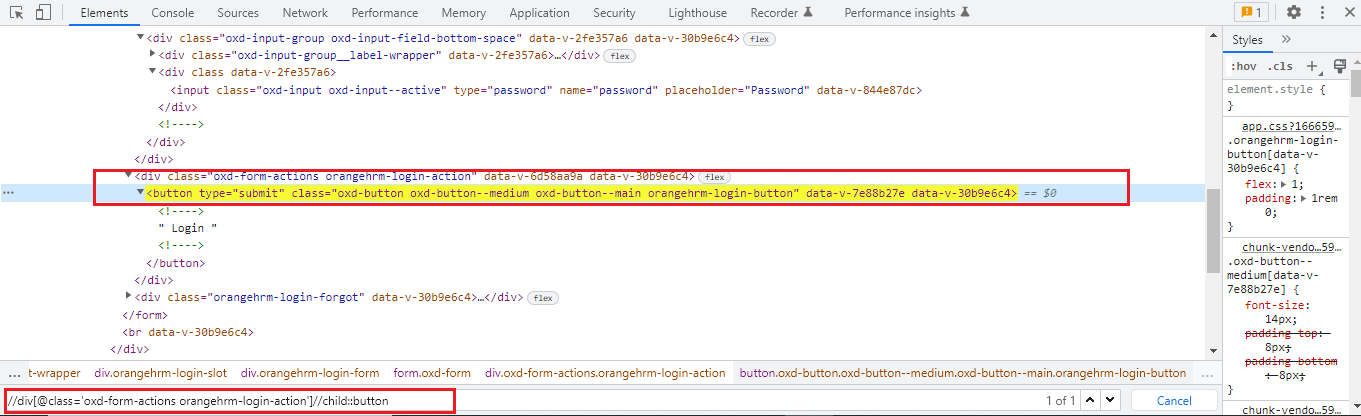
As we have seen using the parent axis XPath actually we are creating an XPath by the following bottom-up approach but here in the child axis case, we are going to follow the top-down approach to create an XPath. The child axis selects all the child elements present under the current node. We can easily locate a web element as a child of the current node.
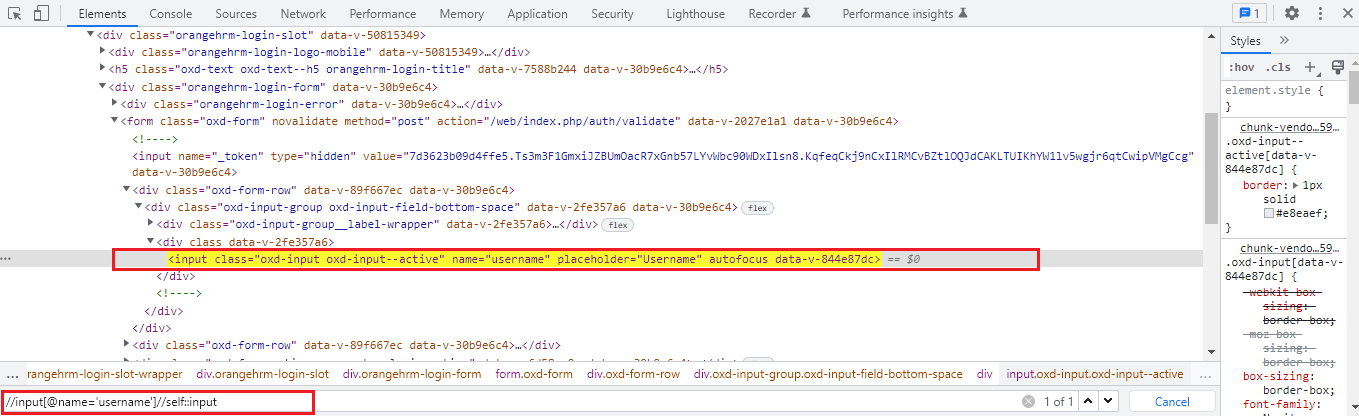
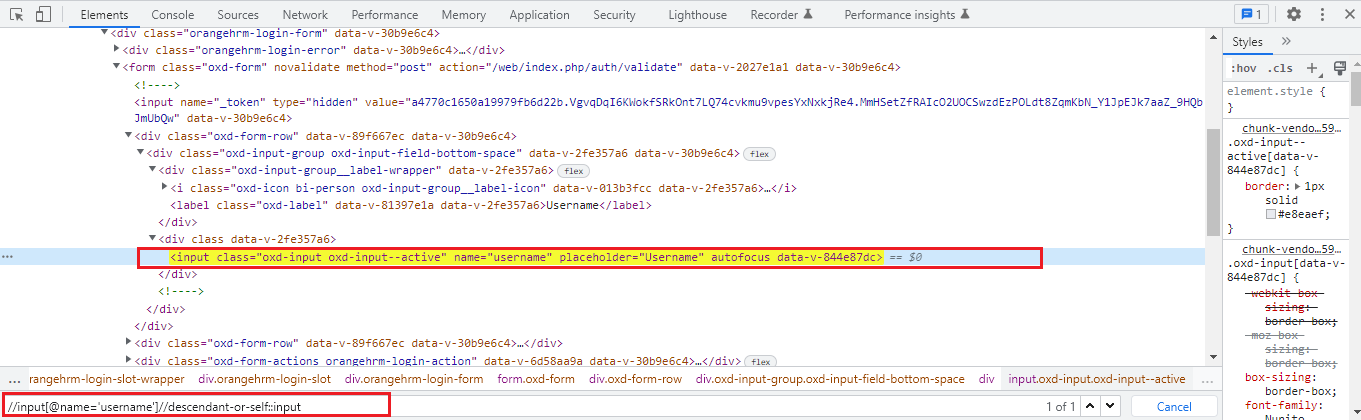
This type of XPath uses its own current node and selects the web element belonging to that current node. You will always observe only one node that represents the self-web element. The tag name we provide at the start and at the end of XPath are the same as they are on the self-axis of the current node. However, this provides the confirmation of the element present when there is more than one element present having the same value and attribute.
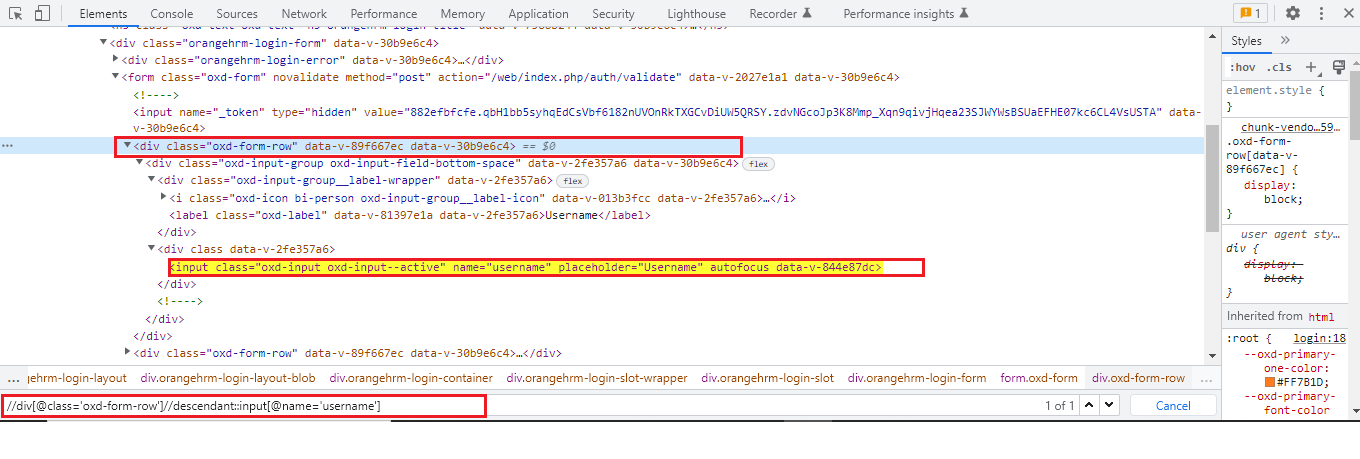
Using this axis we can select the current node and all its descendants i.e. child, grandchild, etc just like a descendant axis. The point to be noticed here is the tag name for descendants and self are the same.
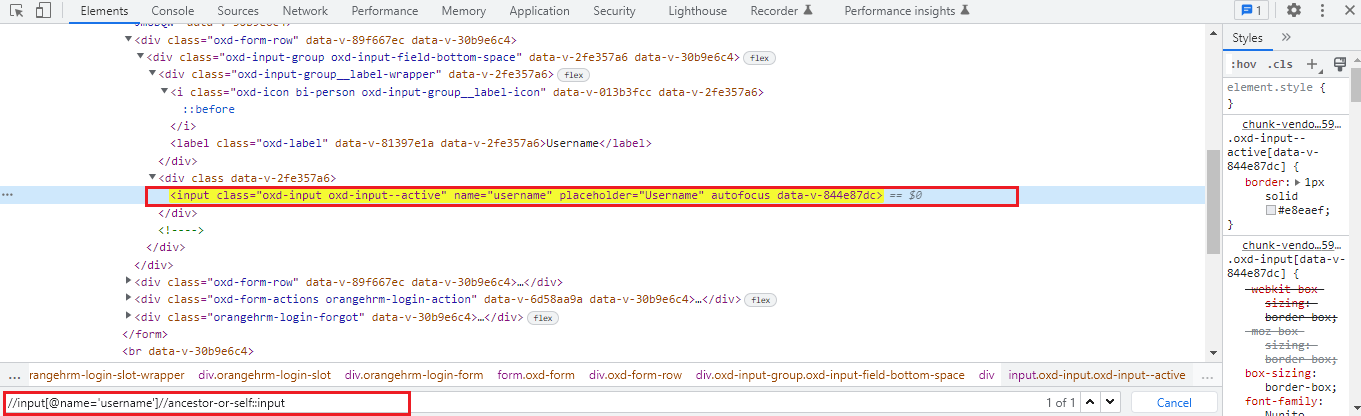
As we understand how the descendant axis works now, the ancestor axis works exactly opposite to that of the descendant axis. It will select or locate all ancestors elements i.e. parent, grandparent, etc of the current node. This axis contains the root node too.
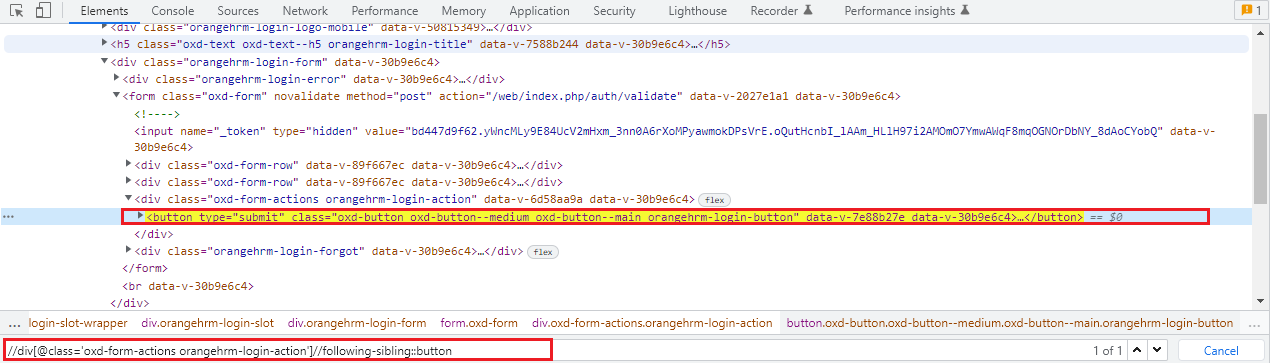
Using the following sibling axis method we can select all the nodes that have the same parent as that of the current node and that appear after the current node.
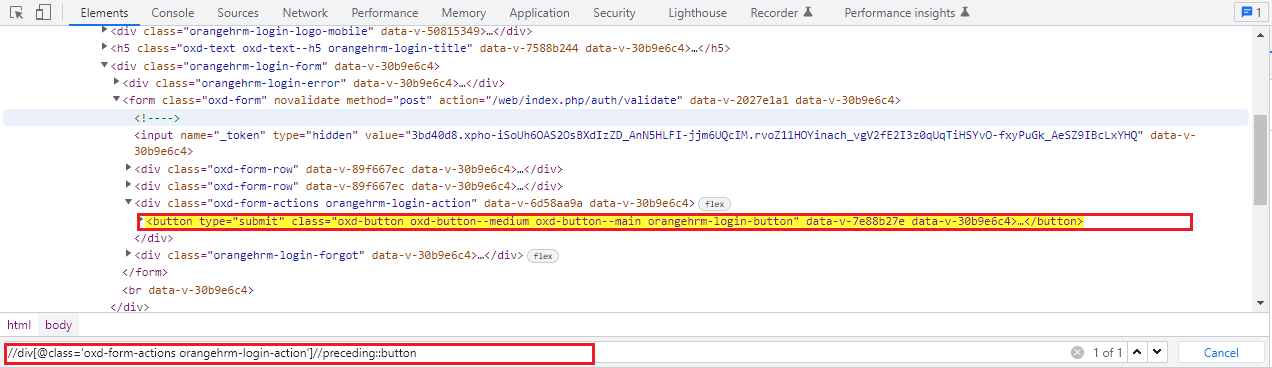
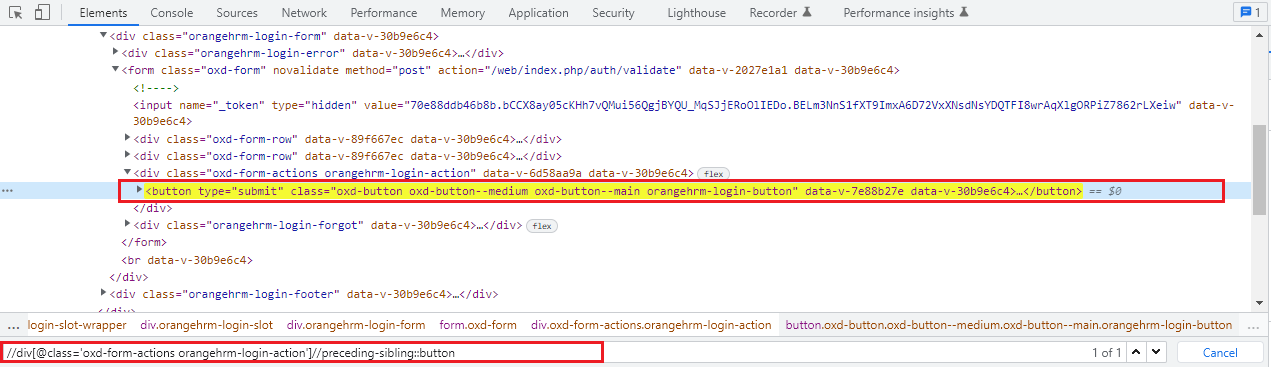
Using the following sibling axis method we can select all the nodes that have the same parent as that of the current node and that appear before the current node. It works opposite to that of the following sibling axis XPath.
You can try all of these examples mentioned above with the Orange HRM Demo website here.
Conclusion:
In conclusion, XPath is an essential tool for web automation testing when using Selenium, Playwright, and Cypress. It allows for more flexibility and specificity in locating elements on a web page. Understanding the different types of XPath expressions and how to use them can greatly improve the efficiency and effectiveness of the automation testing process. It can be particularly useful in situations where elements do not have unique CSS selectors, or when the structure of the HTML changes frequently. With the knowledge of XPath, you can write more robust and stable automation tests.
An SDET Engineer with hands-on experience in manual, automation, API, Performance, and Security Testing. The technologies I have worked on include Selenium, Playwright, Cypress, SpecFlow, Cucumber, JMeter, K6, OWASP ZAP, Appium, Postman, Maven, Behave, Pytest, BrowserStack, SQL, GitHub, Java, JavaScript, Python, C#, HTML, CSS. Also, I have hands-on experience in CI/CD the technologies I have used for CI/CD include Azure DevOps, AWS, and Github. Apart from this, I like to write blogs and explore new technologies.