After spending years in the software testing field, many SDETs/Test Engineers showcase strong technical abilities and hard work. However, despite their skill and effort, some may find themselves feeling undervalued, lacking the recognition and success they had hoped for, highlighting the importance of software testing skills.
Conversely, there are also SDETs/Test Engineers who possess solid technical knowledge and have rapidly gained recognition for their contributions, resulting in significant career advancement. What do you believe sets them apart? Could it be luck, connections, a positive reputation with seniors, or another factor?
Indeed, a crucial distinction lies between the two categories. Individuals in the first group solely emphasize technical skills and hard work, while those in the second group strike a balance between technical expertise and soft skills, allowing them to work smartly.
But what exactly are these soft skills, and why are they pivotal for career growth?
Absolutely, Technical skills are undoubtedly paramount as they form the solid foundation upon which one’s expertise is built. Without acquiring strong technical skills, initiating or sustaining a career in the long run can prove to be quite challenging.
However, it’s essential to recognize that these technical skills must be complemented by Soft skills to maximize outcomes and achieve goals within optimized timelines. Just like hand in hand, the synergy between Technical and Soft skills fosters excellence in work and facilitates goal attainment.
By now, it’s evident that Soft Skills hold immense significance not only in the software testing field but also across various other domains. Despite their importance, these skills are often overlooked amidst work pressure, tight deadlines, and a focus on problem-solving or achieving test results.
Let’s delve into some of the most common Soft skills, well-known to everyone, yet frequently neglected in practice.
Essential Skills in the Software Testing Field
Here are the most common soft skills for software testing professionals:
Let’s dive deeper into each of these skills to understand their significance and how they contribute to success in the software testing field.
1. Attention to detail :
It is a foundational skill in software testing that contributes to the accuracy, reliability, and overall quality of software products. Testers who possess this skill play a crucial role in ensuring that software meets quality standards, satisfies user requirements, and delivers a positive user experience.
Benefits :
Effective Bug Identification: Testers who pay close attention can find even small issues in the software, helping developers fix them faster.
Ensuring Quality: Attention to detail ensures that all parts of the software meet the required standards by carefully reviewing documents and test cases.
Improving User Experience: Testers focus on making sure the software is easy to use and error-free, which makes users happier and more likely to keep using the product.
Identifying Risks Early: By carefully examining requirements and designs, testers can catch potential problems before they become serious issues, saving time and money.
Building Trust: Thorough testing builds trust in the software among clients and users, showing that it’s reliable and high-quality.
Encouraging Improvement: Testers who pay attention to detail help their teams get better over time by learning from mistakes and finding ways to improve their processes.
2. Proactive communication:
In software testing proactive communication involves initiating and maintaining effective communication within the team and with Developers, Clients, and Stakeholders, throughout the testing process.
Benefits :
Improved Team Collaboration: Proactive communication fosters better collaboration among team members, ensuring everyone is on the same page regarding project goals, tasks, and timelines.
Early Issue Identification: By sharing updates and insights regularly, team members can quickly identify potential issues or roadblocks in the testing process, allowing for timely resolution.
Enhanced Problem-Solving: Proactive communication encourages team members to openly discuss challenges and brainstorm solutions, leading to more effective problem-solving and faster resolution of issues.
Increased Efficiency: Clear and proactive communication helps streamline workflows and eliminate misunderstandings, reducing the likelihood of rework or delays in the testing process.
Effective Task Coordination: By communicating task assignments, dependencies, and priorities proactively, team members can coordinate their efforts more efficiently, ensuring that testing activities progress smoothly.
Boosted Morale: Open and transparent communication creates a positive work environment where team members feel valued and supported, leading to higher morale and job satisfaction.
Continuous Improvement: Proactive communication encourages feedback and discussion about testing processes and practices, enabling the team to identify areas for improvement and implement changes to enhance overall efficiency and effectiveness.
3. Good data organizing and presentation skills :
It involves the ability to effectively structure, format, and present data in a clear, concise, and meaningful manner.
Benefits :
Clarity in Reporting: Testers often need to compile and present data regarding test results, defects, and overall testing progress. Strong data organizing skills ensure that information is presented clearly and concisely, making it easier for clients/stakeholders to understand and interpret.
Effective Communication: Well-organized data facilitates effective communication with developers, project managers, and other stakeholders. Testers can convey testing findings and insights more effectively, leading to quicker decision-making and problem-resolution.
Identifying Patterns and Trends: By organizing data systematically, testers can identify patterns, trends, and correlations in software behavior or defect occurrences. This enables them to make more informed decisions about where to focus testing efforts and how to prioritize issues for resolution.
Facilitating Root Cause Analysis: When defects or issues arise, well-organized data allows testers to conduct thorough root cause analysis. They can trace the origins of problems more efficiently, leading to more accurate diagnoses and more effective solutions.
Enhancing Documentation: Good data organizing skills contribute to the creation of comprehensive and well-structured test documentation. Test plans, test cases, and test reports are more informative and useful when data is organized logically and presented in a clear format.
Demonstrating Value: Effective data presentation showcases the value of testing efforts to stakeholders. By presenting data in a compelling and visually appealing manner, testers can demonstrate the impact of their work on software quality, project success, and overall business objectives.
4. Time management :
In the software testing profession time management involves efficiently allocating and prioritizing time to complete testing tasks, meet deadlines, and ensure the timely delivery of high-quality software. Here are the benefits of effective time management in software testing
Benefits :
Meeting Deadlines: Proper time management allows testers to schedule and prioritize tasks effectively, ensuring that testing activities are completed on time and within project deadlines.
Optimizing Resource Allocation: By managing time efficiently, testers can allocate resources, such as human resources and testing tools, in a way that maximizes productivity and minimizes waste.
Enhancing Testing Coverage: With good time management, testers can allocate sufficient time to different testing activities, including test planning, execution, and defect resolution, ensuring comprehensive testing coverage and thorough validation of the software.
Improving Test Quality: Properly managing time allows testers to dedicate adequate time to each testing activity, reducing the likelihood of rushing through tests or skipping important steps. This results in higher-quality testing outcomes and more reliable software.
Identifying Risks Early: Time management enables testers to allocate time for risk assessment and mitigation activities, such as identifying potential risks, creating contingency plans, and conducting risk-based testing. Early identification of risks helps prevent issues from escalating and ensures smoother project execution.
5. Critical Thinking while Planning Tasks:
It plays a crucial role in planning tasks in the software testing profession.
Benefits :
Identification of Test Objectives: Critical thinking helps testers analyze project requirements and objectives thoroughly, ensuring that testing activities are aligned with the goals of the project. This ensures that testing efforts are focused on verifying the functionality, performance, and quality attributes that are most critical to the project’s success.
Effective Test Strategy Development: Critical thinking enables testers to evaluate different testing approaches and methodologies critically, selecting the most appropriate strategy for the given project context. This ensures that testing efforts are efficient, cost-effective, and capable of uncovering potential defects and issues effectively.
Optimized Test Coverage: Critical thinking allows testers to analyze the software under test critically, identifying key areas and functionalities that require testing priority. By prioritizing testing efforts based on criticality and risk, testers can optimize test coverage and ensure that testing resources are allocated effectively.
Risk Assessment and Mitigation: Critical thinking helps testers assess potential risks and vulnerabilities in the software accurately. By critically analyzing project requirements, dependencies, and constraints, testers can identify and prioritize risks, allowing them to develop targeted risk mitigation strategies and allocate testing resources accordingly.
Identification of Test Scenarios: Critical thinking enables testers to identify and define test scenarios comprehensively. They consider various factors such as user workflows, boundary conditions, error handling, and performance requirements. This ensures that testing coverage is thorough. Critical scenarios are adequately tested as a result.
Adaptability to Changes: Critical thinking equips testers with the ability to adapt and adjust testing plans dynamically. They respond to changing project requirements, priorities, or constraints. Testers critically evaluate the impact of changes on testing objectives and strategies. They make informed decisions and adjust testing plans accordingly. This ensures continued alignment with project goals.
6. Adaptability :
In the software testing profession, adaptability in software testing skills is crucial. Testers need to respond effectively to changes. These changes can include project requirements, priorities, technologies, or constraints.
Benefits :
Flexibility in Test Planning: Testers can adapt their testing strategies and plans to accommodate changes in project scope, timelines, or priorities. This ensures that testing efforts remain aligned with evolving project needs and objectives.
Quick Response to Changes: Adaptability allows testers to respond quickly to changes in software requirements, design, or functionality. They can adjust test cases, test scripts, and test data as needed. This ensures comprehensive coverage of new features or modifications.
Efficient Resource Allocation: Testers can adaptively allocate testing resources, such as persons, tools etc based on changing project demands. This ensures that resources are utilized efficiently and effectively to support testing activities.
Effective Risk Management: Adaptability enables testers to identify and respond proactively to emerging risks or challenges in the testing process. They can adjust testing priorities, focus areas, or methodologies to mitigate risks and ensure they adequately address critical areas.
Enhanced Problem-Solving: Adaptability fosters a problem-solving mindset among testers, enabling them to overcome obstacles or challenges encountered during testing. They can explore alternative approaches, techniques, or tools to address complex testing scenarios effectively.
Continuous Improvement: Adaptability promotes a culture of continuous improvement within testing teams. Testers actively seek feedback, reflect on past experiences, and implement changes to enhance testing processes and practices over time.
Customer Satisfaction: Adaptable testers respond to feedback from end-users or clients. They incorporate preferences or requirements into the testing process. This leads to higher levels of customer satisfaction. It ensures that the software meets user needs effectively.
7. Empathy and customer-centric approach :
In the software testing profession, an empathy and customer-centric approach involves considering the perspective, needs, and experiences of end-users throughout the testing process.
Benefits :
Improved User Satisfaction: Testers can ensure that the software meets users’ needs effectively. This is done by understanding their perspective and requirements. It leads to higher levels of user satisfaction.
Enhanced Usability: Taking an empathetic approach helps testers identify usability issues early in the testing process. This allows for improvements that result in a more user-friendly software interface.
Better Bug Detection: Testers who empathize with users are more likely to anticipate how they will interact with the software. This leads to better identification of potential bugs or defects. These issues could affect user experience.
Enhanced Brand Loyalty: Users develop a sense of loyalty to the brand when they feel that the software understands and addresses their needs. They are more likely to stay committed and engaged. This loyalty often leads to repeat business and positive word-of-mouth referrals.
Alignment with Business Goals: An approach centered around the customer ensures that software testing efforts align with broader business goals. These goals may include increasing revenue, improving market share, or enhancing customer satisfaction.
Conclusion:
In conclusion, software testing skills encompass expertise in various testing methodologies. Technical skills equip you with the knowledge to execute these methodologies effectively. Soft skills complement your efforts by meticulously organizing details in a presentable manner. They also enhance your flexibility and adaptability to navigate dynamic changes in client requirements. This ensures the delivery of a product that meets the end user’s expectations. Therefore, achieving a perfect balance between technical and soft skills is pivotal for recognition and advancement in your career.
Click Here to read more blogs for Software Testing Tips and Practices.
Manisha is a Lead SDET at SpurQLabs with overall experience of 3.5 years in UI Test Automation, Mobile test Automation, Manual testing, database testing, API testing and CI/CD. Proven expertise in creating and maintaining test automation frameworks for Mobile, Web and Rest API in Java, C#, Python and JavaScript.
Understanding 2FA Authenticator Apps and Time-based One-Time Passwords (TOTP)
2FA Login using TOTP: In an era where cybersecurity is paramount, two-factor authentication (2FA) has become a cornerstone of online security. Authenticator apps and Time-based One-Time Passwords (TOTP) offer an additional layer of protection beyond traditional password-based security measures. This guide aims to elucidate the concept of 2FA authenticator apps, delve into the workings of TOTP, and provide insights into their importance in digital security.
What are 2FA Authenticator Apps?
Authenticator apps generate time-based one-time passwords (TOTPs) on mobile devices for authentication. They serve as a secure means of implementing 2FA, requiring users to provide both something they know (their password) and something they have (their mobile device with the authenticator app installed).
How Do 2FA Authenticator Apps Work?
Initialization: When setting up 2FA for an online account, users typically scan a QR code or manually enter a secret key provided by the service into their authenticator app.
Code Generation: Once initialized, the authenticator app generates TOTPs based on a shared secret key and the current time. These TOTPs are typically six-digit codes that change every 30 seconds.
Authentication: During login, users enter the current TOTP from their authenticator app along with their password. The service verifies the entered TOTP against the expected value based on the shared secret key.
Time-based One-Time Passwords (TOTP):
TOTP generates short-lived authentication codes using a shared secret key and the current time. The algorithm combines the secret key with the current time interval to produce a unique, one-time password that is valid only for a brief period, typically 30 seconds. TOTP ensures that even if an attacker intercepts a generated code, it quickly becomes obsolete, enhancing security.
Importance of Authenticator Apps and TOTP:
Enhanced Security: Authenticator apps provide an additional layer of security beyond passwords, significantly reducing the risk of unauthorized access to online accounts.
Protection Against Phishing: Because TOTP codes generate locally on your device and change with time, they resist phishing attacks that aim at stealing static passwords.
Convenience: Authenticator apps offer a convenient and user-friendly method of implementing 2FA, eliminating the need to rely on SMS-based authentication methods that may be vulnerable to SIM swapping attacks.
Authenticator apps and Time-based One-Time Passwords (TOTP) play a crucial role in safeguarding online accounts against unauthorized access and cyber threats. By incorporating 2FA with authenticator apps into their security protocols, individuals and organizations can significantly enhance their digital security posture in an increasingly interconnected world.
The protocol (otpauth) signals that an authenticator app should open this URL (DOMAIN).
the type (totp)
a label (USERNAME) that is a colon-separated combination of issuer and username
a secret (SECRET)
the issuer
The key element for logging in and automating the TOTP process is the supplied secret.
However, what’s the utilization method for this secret?
When you scan the QR code with an authenticator app, it combines the secret with the current time to create a unique password. The app then stores the second-factor secret, shows the issuer and username, and generates a new passcode every 30 seconds (though this time frame can be changed).That’s the gist of it!
You can then employ the passcode as a secondary login factor, providing assurance to services that it is indeed you are accessing your account.
Automating Login with Playwright for 2FA-Secured Websites
Automating the login process for websites secured with two-factor authentication (2FA) can streamline testing and administrative tasks. Playwright, a powerful automation library, provides the tools necessary to automate interactions with web pages, including those requiring 2FA.
Prerequisites:
Install Node.js: Make sure Node.js is installed on your system. You can download it from nodejs.org.
Set Up Playwright: Install Playwright using npm, the Node.js package manager, by running the following command in your terminal:
// Navigate to login page
await page.goto('https://example.com/login');
Enter Username and Password:
// Enter username and password
     await page.fill('#username', 'your_username');
     await page.fill('#password', 'your_password');
Click on the Login Button:
// Click on the login button
     await page.click('#loginButton');
Handle 2FA Authentication:
Playwright supports interacting with elements on the page to handle 2FA. You can wait for the 2FA input field to appear and then fill it with the code.
The new OTPAuth.TOTP() syntax indicates that an instance of the TOTP class from the OTPAuth library is being created.
This instance is configured with various parameters such as issuer, label, algorithm, digits, period, and secret, which are used to generate and validate one-time passwords for authentication purposes.
In essence, new OTPAuth.TOTP() initializes a new TOTP (Time-based One-Time Password) object, allowing the application to generate OTPs for user authentication.
totp.generate() is a method call on the totp object. This method is provided by the OTPAuth library and is used to generate a one-time password (OTP) based on the TOTP algorithm.
The generate() method computes the current OTP value based on the TOTP parameters configured earlier, such as the secret key, time period, and algorithm. This OTP is typically used for user authentication purposes.
Once token holds the generated OTP, it can be used in the subsequent lines of code for filling an authentication code input field and submitting it for authentication.
Here’s the final code.
import * as OTPAuth from 'otpauth';
export class LoginPage {
  readonly page: Page;
  private readonly loginButton: Locator;
  private readonly userNameInput: Locator;
  private readonly passwordInput: Locator;
  private readonly emailDisplay: Locator;
  private userEmail: any;
  private readonly authCode: Locator;
  private readonly submitAuthCode: Locator;

  constructor(page: Page) {
    this.page = page;
    this.loginButton = page.getByTestId(AppUniqueId.login_submitButton);
    this.userNameInput = page.getByTestId(AppUniqueId.login_username);
    this.passwordInput = page.getByTestId(AppUniqueId.login_password);
    this.emailDisplay = page.getByTestId(AppUniqueId.personalDetails_email);
    this.authCode = page.locator('#root > div > div > section > main > div > div > div > input');
    this.submitAuthCode = page.locator('#root > div > div > section > main > div > div > button');
  }
  async waitFor(ms: number) {
    return new Promise(resolve => setTimeout(resolve, ms));
}
  async loginUserUI(childUser: User) {
    let totp = new OTPAuth.TOTP({
      issuer: "ISSUER",
      label: "LABLE",
      algorithm: "SHA1",
      digits: 6,
      period: 30,
      secret: "XXXXXXXXXX”
    });
    await this.userNameInput.fill(await childUser.username);
    await this.passwordInput.fill(await childUser.password);
    await this.loginButton.click();
    try{
      let token = totp.generate()
      await this.authCode.fill(token, { timeout: 5000});
      await this.submitAuthCode.click()
    }catch(err)
    {

    }
  }
  async verifyLoginUserEmail(childUser: User) {
    this.userEmail = childUser.username;
    try{
         await this.page.locator("div[class='col-sm-12 d-flex impersonation-bar'] a").click()
     }catch(err)
      {

      }
  }
}
Conclusion:
Automating login for 2FA-secured websites using Playwright can enhance efficiency and productivity in various scenarios, from testing to administrative tasks. By following the steps outlined above, you can create robust automation scripts tailored to your specific requirements. https://github.com/apurvakolse/playwright-typescript-totp
Feel free to customize and expand upon these steps to suit your needs and the specific requirements of the website you’re working with.
Disclaimer: Ensure that you have the necessary permissions to automate interactions with websites, and use this knowledge responsibly and ethically.
Apurva is a Test Engineer, with 3+ years of experience in Manual and automation testing. Having hands-on experience in testing Web as well as Mobile applications in Selenium and Playwright BDD with Java. And loves to explore and learn new tools and technologies.
Desktop application test automation can be a tedious task as it’s hard to locate the elements and interact with those elements. There are plenty of tools available for automating desktop applications. Winium is one of those tools which is a selenium-based tool. So for those who don’t have an idea about Selenium, Selenium is a web application test automation tool that supports almost all programming languages. (Wish to learn more about selenium? Check out the link here) If you are familiar with the Selenium tool then it’s going to be easy for you to understand the workings of the Winium tool as most of the methods are common and if you are not familiar with Selenium no worries, I have got you covered.
Coming back to our topic, In this blog we will see how we can create a robust test automation framework for automating desktop applications using Winium a desktop application automation tool, Java as a programming language, Maven, as a dependency management tool, Cucumber as a BDD (Behavior Driven Development) tool. We are going to build a test automation framework from scratch. Even if you don’t have any idea on how to create a framework no worries.
Before we start building the framework let’s complete the environment set-up. So for this, we will have to install some tools. Below I am sharing the URLs of the tools we are using just in case if you want to know more about these tools then you can visit these official web pages.
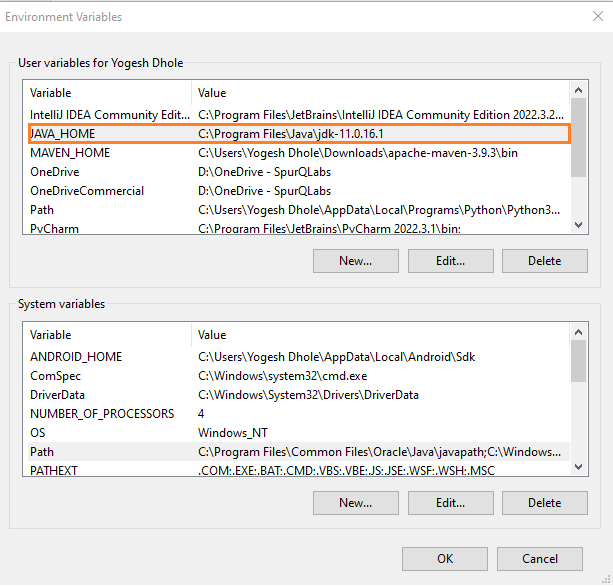
Once the download is completed the next step is setting up the path in the environment variables. Check the below screenshots to set up the path in your system environment variables
Once you are done with the above steps then you should see the below information in the command prompt.
Maven Set-up :
Once you are done with Java Installation and set up the next step is to do the installation and set up the maven.
Not only that there are other desktop application element inspection tools.
Once you are done with the above steps then we can start building the automation framework.
Implementing BDD with Cucumber for Desktop Automation:
The BDD (Behavior-Driven-Development) is a software development approach that focuses on collaboration among stakeholders, including developers, QA engineers, and business analysts. The reason behind this is that in the BDD approach, we use natural language specifications to describe software behaviour from the end user’s perspective. I believe this helps in creating a shared understanding of requirements and promotes effective communication throughout the development lifecycle. Let’s see this in detail,
Feature File Creation :
Feature files are the main component of the BDD cucumber framework we can even say they are the heart of this cucumber framework.
These files are written using gherkin language which describes the high-level functionalities of the application.
Cucumber is a widely used BDD tool as it allows us to write test cases (scenarios) in plain tests using the Gherkin syntax.
This is because Gherkin uses keywords like, Given, When, And, and Then to structure scenarios, making it easy to read and understand by both technical and non-technical stakeholders.
Here is the one scenario that I have created for this framework.
@winiumApp
Feature: To verify the draw functionality of AutoCAD software
 As a User I want to launch the application
 and validate that I can access the different functionalities of the application.


 @smoke
 Scenario: Verify user can launch and open the new document using microsoft word application
   Given User launches the microsoft word application
   When User verifies the landing screen is visible with "Recent" opened document list
   And User clicks on "Blank document" option to add blank document
   Then User verifies that "Page 1 content" a new page for opened blank page is visible
Step Definition File Creation :
Yes, that’s correct. Step definition files contain code that maps the steps in the feature file to automation code.
These files are written using the programming language used in the automation framework, in this case, Java.
The step definitions are responsible for interacting with the elements of the application and performing actions on them such as clicking, entering text, etc.
They also contain assertions to check if the expected behaviour is observed in the application.
package com.SpurCumber.Steps;

import com.SpurCumber.Pages.DemoWiniumAppPage;
import com.SpurCumber.Utils.ScreenshotHelper;
import com.SpurCumber.Utils.TestContext;
import io.cucumber.java.en.And;
import io.cucumber.java.en.Given;
import io.cucumber.java.en.Then;
import io.cucumber.java.en.When;
import org.testng.Assert;


public class DemoWiniumAppSteps extends TestContext {
   private final DemoWiniumAppPage demoWiniumAppPage;

   public DemoWiniumAppSteps() {
       demoWiniumAppPage = new DemoWiniumAppPage(winiumdriver);
   }
   @Given("User launches the microsoft word application")
   public void userLaunchesTheMicrosoftWordApplication() {
       scenario.log("The application is launched successfully!");
       ScreenshotHelper.takeWebScreenshotBase64(winiumdriver);
       ScreenshotHelper.captureScreenshotAllure(winiumdriver, "User launches the microsoft word application");
   }

   @When("User verifies the landing screen is visible with {string} opened document list")
   public void userVerifiesTheLandingScreenIsVisible(String arg0) throws InterruptedException {
       Assert.assertTrue(demoWiniumAppPage.verifyScreen(arg0));
       ScreenshotHelper.takeWebScreenshotBase64(winiumdriver);
       ScreenshotHelper.captureScreenshotAllure(winiumdriver, "User verifies the landing screen is visible with "+arg0+" opened document list");
   }

   @And("User clicks on {string} option to add blank document")
   public void userClicksOnOptionToAddBlankDocument(String arg0) throws InterruptedException {
       demoWiniumAppPage.clickBtnByName(arg0);
       ScreenshotHelper.takeWebScreenshotBase64(winiumdriver);
       ScreenshotHelper.captureScreenshotAllure(winiumdriver, "User clicks on "+arg0+" option to add blank document");
   }

   @Then("User verifies that {string} a new page for opened blank page is visible")
   public void userVerifiesThatANewPageForOpenedBlankPageIsVisible(String arg0) throws InterruptedException {
       Assert.assertTrue(demoWiniumAppPage.verifyScreen(arg0));
       ScreenshotHelper.takeWebScreenshotBase64(winiumdriver);
       ScreenshotHelper.captureScreenshotAllure(winiumdriver, "User verifies that "+arg0+" a new page for opened blank page is visible");
   }
}
Hooks File Creation :
In Cucumber, hooks are methods annotated with @Before and @After that run before and after each scenario.
To ensure consistency between test environments, these hooks are used for setting up and taking down tests.
The application can be initialized before and cleaned up after each scenario using hooks, for example.
Implementing Page Object Model (POM) for Desktop Automation:
The Page Object Model (POM) is a design pattern that assists in building automation frameworks that are scalable and maintainable. In POM, we create individual page classes for each application page or component, which encapsulates the interactions and elements associated with that particular page. This approach improves code readability, reduces code duplication, and enhances test maintenance.
package com.SpurCumber.Pages;

import org.openqa.selenium.WebElement;
import org.openqa.selenium.winium.WiniumDriver;

public class DemoWiniumAppPage {

   private final WiniumDriver winiumdriver;

   public DemoWiniumAppPage(WiniumDriver _winiumdriver) {
       this.winiumdriver = _winiumdriver;
   }

   public Boolean verifyScreen(String locator) throws InterruptedException {
       WebElement Screen = winiumdriver.findElementByName(locator);
       return Screen.isDisplayed();
   }

   public void clickBtnByName(String locator) throws InterruptedException {
       WebElement element = winiumdriver.findElementByName(locator);
       Thread.sleep(3000);
       element.click();
   }
}
Creating Utility Files to Support Framework:
In a test automation framework, utility files provide reusable functionalities, configurations, and helper methods to streamline the development, execution, and maintenance of test scripts. As a result, they enhance the efficiency, scalability, and maintainability of the automation framework. Listed below are a few common utility files, along with their functions:
Winium Util File :
This utility file handles the launch and termination processes of the desktop application, as well as the Winium driver
When we use Winium as a desktop application automation tool we have to start the server. (Winium Driver).
Either we can do this manually before starting the execution of the test case or we can do this through automation as well.
In the below utility file there are methods created for launching the desktop application and Winium driver (server).
This common util file reads or retrieves the values and files present in a particular folder (referenced here as the resource folder).
This file can further serve as a basis for developing additional common methods usable throughout the framework.
package com.SpurCumber.Utils;

import java.io.File;
import java.nio.file.Paths;

public class CommonUtil {

   public static String getResourceDirPath(String parameter) {
       String assemblyLocation = System.getProperty("user.dir");
       String path = Paths.get(assemblyLocation+"/src/test/resources/"+parameter).toString();
       return new File(path).getAbsolutePath();
   }
}
Test Runner File :
The TestRunner class executes Cucumber tests with specified configuration settings, including the location of feature files, step definitions package, inclusion tags, and report generation plugins.
The seamless integration of Cucumber tests into TestNG makes testing and reporting easy.
Once we have defined the test scenarios, we will use Maven commands to execute them. Maven is a robust tool that manages project dependencies and automates the build process. With Maven, we can run automated tests with ease and ensure a smooth and efficient testing process.
Configuring Maven POM File(Pom.xml):
In the project’s Maven Project Object Model (POM) file, we define the necessary configurations for test execution.
This includes specifying the test runner class, defining the location of feature files and step definitions, setting up plugins for generating test reports, and configuring any additional dependencies required for testing.
Once you configure the automated tests in the Maven POM file, you can run them using Maven commands from the terminal or command prompt. Common Maven commands used for test execution include:
mvn test – This command runs all the tests from the project.
mvn clean test – This command first cleans the project (removes the target directory) and then runs the tests.
mvn test “-Dcucumber.filter.tags=@tagName” – This command runs tests with specific Cucumber tags.
Generating Cucumber Reports:
Cucumber provides built-in support for generating comprehensive test reports. By configuring plugins in our automation framework, we can generate detailed reports that showcase the test results, including passed, failed, and pending scenarios. These reports offer valuable insights into the test execution, helping us identify issues, track progress, and make data-driven decisions for test improvements.
Conclusion:
Automating desktop applications with Winium, Java, and Behavior-Driven Development (BDD) using Cucumber is a strategic approach that offers numerous benefits to software development and testing teams. By combining these technologies and methodologies, we create a robust automation framework that enhances software quality, reduces manual efforts, and promotes collaboration across teams.
In conclusion, automating desktop applications with Winium, Java, and BDD using Cucumber empowers teams to deliver high-quality software efficiently. By leveraging the strengths of each technology and following best practices such as the Page Object Model and Maven integration, we create a solid foundation for successful test automation that aligns with business goals and enhances overall product quality.
Source Code:
You can access the complete source code of the created automation framework for desktop applications using Winium, Java, and BDD with Cucumber on GitHub at https://github.com/spurqlabs/Desktop-App-Winium-Java-Cucumber The framework includes feature files, step definitions, page classes following the Page Object Model, Maven dependencies, and configuration files for generating Cucumber reports. Feel free to explore, fork, and contribute to enhance the framework further.
An SDET Engineer with hands-on experience in manual, automation, API, Performance, and Security Testing. The technologies I have worked on include Selenium, Playwright, Cypress, SpecFlow, Cucumber, JMeter, K6, OWASP ZAP, Appium, Postman, Maven, Behave, Pytest, BrowserStack, SQL, GitHub, Java, JavaScript, Python, C#, HTML, CSS. Also, I have hands-on experience in CI/CD the technologies I have used for CI/CD include Azure DevOps, AWS, and Github. Apart from this, I like to write blogs and explore new technologies.
“Cypress Testing – Assertions Techniques Best Practices and Tips” focuses on enhancing the efficiency and effectiveness of test assertions in Cypress, a popular JavaScript end-to-end testing framework.
Cypress testing plays a crucial role in ensuring the reliability and correctness of web application tests. Developers and testers use these to validate expected outcomes, allowing them to assert conditions about the application’s state during test execution. Automation Testing.
We can summarise the key features of Assertions in Cypress Testing as:
Rich Assertions: Comprehensive checks for element properties (existence, visibility, text content, attributes).
Seamless Integration: Assertions smoothly blend into test syntax, improving readability and maintenance.
Automatic Retry: Robust handling of asynchronous tasks, minimizing test flakiness.
Expressive Tests: Empowers developers to create clear, comprehensive, and efficient tests, boosting confidence in the testing process.
<button id="myButton">Visible Button</button>
<button id="hiddenButton">Hidden Button</button>

//To check visibility of element
cy.get(' button#myButton ').should('be.visible')
//To check invisibility of element
cy.get('button#hiddenButton').should('not.be.visible');
Verify that an element is hidden:
Syntax: .should(‘be.hidden)
Example:
<body>
    <div id="hiddenElement">This element is hidden</div>
</body>
cy.get('#hiddenElement').should('be.hidden');
Verify that an element has the expected value that the user has entered in the textbox:
Verify that a string includes the expected substring:
Syntax: .should(‘include’, ‘expectedSubstring’)
Example:
<title>Cypress Example</title>
    <body>
        <div id="myText">This is some text content.</div>
    </body>
// Verify that the text content includes the expected substring
const expectedSubstring = 'some text';
cy.get('#myText').should('include.text', expectedSubstring);
Verify that a string matches a regular expression pattern:
Syntax: .should(‘match’, /regexPattern/)
Example:
<title>Cypress Example</title>
    <body>
        <div id="myText">This is some text content.</div>
    </body>
// Verify that the text content matches a regular expression pattern
const regexPattern = /some.*content/;
cy.get('#myText').invoke('text').should('match', regexPattern);
Verify the length of an array or the number of elements matched:
<title>Cypress Example</title>
    <body>
        <input type="text" id="myInput" />
    </body>
// Focus on the input element
   cy.get('#myInput').focus();
// Verify that the input element is focused
   cy.get('#myInput').should('have.focus');
   cy.get('#myInput').should('be.focused ');
cy.get('h1')
.should('exist')  // Assertion 1: Check if the h1 element exists
.and('be.visible') // Assertion 2: Check if the h1 element is visible
.and('have.text', 'Example Domain'); // Assertion 3: Check if the h1 element has the expected text
Property Assertion in Cypress Testing
Verify that an element has the expected attribute value:
Verify that a given value is NaN, or “not a number”:
Syntax: .should(‘be.a.NaN’)
Example:
// Some operation that results in NaN, for example, dividing by zero
const result = 1 / 0;
// Verify that the result is NaN
1) cy.wrap(result).should('be.a.NaN');
2) cy.wrap(result).then(value => {
     expect(value).to.not.be.NaN;
   });
Verify an element or collection of elements is empty:
<body>
        <div id="emptyElement"></div>
        <div id="nonEmptyElement">Some content</div>
</body>
// Verify that the empty element is empty
cy.get('#emptyElement').should('be.empty');

// Verify that the non-empty element is not empty
cy.get('#nonEmptyElement').should('not.be.empty');
Verify that a numeric value is within a certain range of another value:
Syntax: .should(‘be.closeTo’, expectedValue, delta)) .should(‘be.within’, Start range, End range);
Example:
const actualValue = 15;
const referenceValue = 10;
const range = 5;

// Verify that the actual value is within the specified range of the reference value
cy.wrap(actualValue).should('be.within', referenceValue - range, referenceValue + range);
    });
// Verify that the actual value is close to the expected value within the specified delta
cy.wrap(actualValue).should('be.closeTo', 50, 2); // Verify that actual value is close to (50-2) to (50+2) i.e. 48 to 52.
In the context of Cypress Testing, the .is() block typically utilizes conditions that check various states or attributes of an element. Here are some examples of selectors and conditions you might use inside the .is() block:
Check if an element is visible:
if($element.is(':visible')){
// Code to execute when the element is visible
}
Check if a button or input is enabled:
if ($element.is(':enabled')) {
// Code to execute when the element is enabled
}
Check if an input field is readonly:
if ($element.is('[readonly]')) {
// Code to execute when the element is readonly
}
Check if an element contains specific text:
if ($element.is(':contains("Some Text")')) {
// Code to execute when the element contains the specified text
}
Check if an element has a specific attribute value:
if ($element.is('[data-type="value"]')) {
// Code to execute when the element has the specified attribute value
}
Create custom conditions based on your specific requirements:
if ($element.is('.custom-class')) {
// Code to execute when the element has a specific class
}
Conclusion:
Cypress Testing with its rich set of functionalities and integration benefits, empowers developers to create expressive and comprehensive tests. The combination of these features fosters a more efficient and confident testing process, ultimately contributing to the overall reliability of web applications.
Harish is an SDET with expertise in API, web, and mobile testing. He has worked on multiple Web and mobile automation tools including Cypress with JavaScript, Appium, and Selenium with Python and Java. He is very keen to learn new Technologies and Tools for test automation. His latest stint was in TestProject.io. He loves to read books when he has spare time.
Over the years, the landscape of software testing has gradually developed from a predominantly manual testing phase to an increasing accentuation on automated/automation testing. In your career path as a test engineer, you will inevitably bump into automation testing. In the current landscape of the software industry, clients seek frequent and repetitive deployments. If you are in a role of Quality Assurance, you are likely to encounter and test systems needing frequent requirement changes or the rapid introduction of new and progressive requirements. Such a dynamic landscape calls for a constant adaptation to frequent code changes within stiff deadlines. A challenge that we can effectively address by adopting automation testing methodologies.
Why to Automate Chrome Extension:
We often use Chrome extensions in our daily activities, which is crucial for enhancing productivity. The repetitive nature of certain tasks associated with these extensions can become monotonous over time. This blog aims to guide you through the process of automating Chrome extensions and executing click actions using Selenium, a widely acclaimed open-source test automation framework introduced in 2004. If you find yourself needing to use a particular extension regularly, the conventional method involves manually adding the extension to Chrome and performing the same task repeatedly. This manual repetition not only increases effort but also consumes valuable time. Therefore, to streamline this process and save both manual effort and time, we present a precise method to automate Chrome extensions and configure them seamlessly for efficient use.
How to Automate Chrome Extension:
In this article, we will learn the process of Automate Chrome extensions and performing click actions using the Selenium WebDriver and about the Robot Class in Selenium. We will examine them in the Chrome browser using Java. Here we go !!
Before moving on to the main topic of our discussion, let’s quickly review the techniques we will use to Automate Chrome extension and conduct action.
Implementation Steps to Automate Chrome Extension:
Add Calculator extension to the local Chrome browser.
Pack the extension and create a .crx file in File Explorer.
Create a Maven project using IntelliJ IDE.
Add dependencies in POM.xml file and Add .crx file in resources package.
Create Packages and files in the project.
5.1. Creating Features File.
5.2. Creating Steps file.
5.3. Creating Page Object Design Pattern.
5.4. Creating TestContext File.
5.5. Creating BaseStep File.
Conclusion
I intend to use simplified language while articulating the concepts. So, let’s dive into the core of our topic, which is how to Automate Chrome extensions and perform click actions using Selenium.
To do this, we will follow a few rules, which I have depicted below as steps.
Step 1: Add Calculator extension to the local Chrome browser.
In this article, we are going to use the Calculator extension to Automate Chrome extension and perform an action on an extension out of the DOM element.
To add calculator extension to local Chrome browser –
On the Extension page find the search box and search for the calculator extension.
Select calculator first and then download and click on add extension
After adding an extension, visit chrome://extensions/ URL from the address bar and then enable the Developer mode.
Also on this site, we can see our calculator extension which we just added.
On an extension, there could be an Extension ID. We have to note down this extension ID. In the next step, we will learn about generating a folder named extension ID in File Explorer.
In this article Extension ID is hcpbdjanfepobbkbnhmalalmfdmikmbe
Congratulations, we have completed our first step of Adding the Calculator extension to the local automate Chrome browser.
Now let’s begin with the next step.
Step 2: Pack the extension and create a .crx file in File Explorer
Before continuing with the second step we will learn what a .crx file extension is.
What is a .crx file extension?
A Chrome extension file has a .crx extension. It increases the functionality of the Google Chrome web browser by allowing third-party applications to supplement its basic functionality.
Now, we will learn how to pack the calculator extension and generate a .crx file extension.
After adding the calculator extension to the local Chrome browser, the file explorer will generate a folder with the name extension ID (hcpbdjanfepobbkbnhmalalmfdmikmbe).
Follow the provided path to locate the extension folder –
(to locate AppData we have to enable show hidden folders) C:➜Users➜{UserName}➜AppData➜Local➜Google➜Chrome➜User➜Data➜Default➜Extensions➜hcpbdjanfepobbkbnhmalalmfdmikmbe➜1.8.2_0
In the extension folder, we will find the folder named Extension ID, which we have noted down here hcpbdjanfepobbkbnhmalalmfdmikmbe is the Extension ID for calculator extension. Open that folder.
In the folder, we can see a version folder of the extension. Open that folder ➜1.8.2_0
Now we have to copy the path as mentioned in below image –
We will use this path to pack the extension in next steps.
Now, launch the Chrome browser and Visit chrome://extensions/ in the address bar
Here we can see the pack extension option.
➜ Click on Pack Extensionto automate chrome extension
After visiting the page we will be able to see the Pack Extension option as shown in the below image.
Here we have to type or paste the path that we had copied.
➜Add copied path to the Extension root directory
In this step, we have to paste a copied path to the Extension root directory to pack our Extension and then we have to click on the Pack Extension Button.
➜Copy the path of the .crx file
After clicking on the Pack Extension button a pop-up frame will appear. Here, we can see the path of the .crx file where it has been generated in File Explorer. Remember the path of the .crx file and click on the OK button.
➜ Navigate to the .crx file in file explorer
Now let’s navigate to the path of the .crx file as mentioned in the step above . Once we navigate to the path of the .crx file we can see the file has been generated. We have to use this .crx file in our maven project to display it in the selenium web driver and perform actions on it.
Congratulations!! We have successfully generated a .crx file.
Step 3: Create a Maven project using Intellij IDE.
Before creating a Maven project. Let’s understand what Maven is.
What is Maven?
Maven is a Java project management tool that the Apache Software Foundation developed. It is written in Java Language to build projects written in C#, Ruby, Scala, and other languages. It allows developers to create projects, dependencies and documentation using Project Object Model and plugins.
Why do we use Maven?
Maven is the latest build testing tool and a project management tool.
It makes the build process very easy (No need to write long scripts).
It has a standard directory structure which is followed.
It follows Convention over Configuration.
It has a remote maven repository with all the dependencies in one place that can be easily downloaded.
Can be used with other programming languages too, just not Java.
Hope, this now gives a clear view of Maven. Now let’s create a new Maven project using Intellij Idea IDE.
Open your IntelliJ IDE and go to the File ➜ New ➜ Project as shown in the below image.
A new project pop-up will be displayed on the screen, and we must enter the project’s details here.
Details required to create the Maven project are:
Name: Provide a suitable name as per your requirement.
Location: Choose the location where you want to store your project.
Language: Choose the programming language as per your requirement.
Build System: Here you have to choose Maven.
JDK: Choose the JDK you want to use. (Note: Maven uses a set of identifiers, also called coordinates, to uniquely identify a project and specify how the project artifact should be packaged.)
GroupId: a unique base name of the company or group that created the project
ArtifactId: a unique name for the project.
Simply, click on the Create button and the Maven project will be created.
After successfully creating the project we can see the structure of the Maven project. Some default files have been created as given in the image below.
Yes !! We have successfully created our Maven project. Let’s move ahead.
Step 4: Add dependencies in POM.xml file and Add .crx file in the resources package.
We shall include Maven dependencies in your project using IntelliJ IDEA. These dependencies need to be mentioned in our pom.xml file for our project build-up.
Below are the dependencies that we need to add to the pom.xml file.
selenium-java: Selenium WebDriver library for Java language binding
cucumber-java: Cucumber JVM library for Java language binding.
webdrivermanager: library to automatically manage and set up all the drivers of all browsers which are in test scope.
After adding dependencies in the pom.xml file we have to add the .crx file to the resources directory, .crx file is the file that we have generated in step 2.
To add the .crx file to the resources directory, copy the file from the file explorer and paste it into the resources directory. We can also rename the .crx file as we want.
For renaming the file, right-click on the file ➜ select the refactor option ➜ then click on the rename option.
As shown in the above image, the rename pop-up will flash on the screen. Here we can give the file name as desired.
Here in this project, I am renaming the .crx file with the CalculatorExtension.crx file.
Step 5: Create Packages and files in the project to automate chrome extension.
After adding dependencies to the pom.xml file. We have to create a BDD framework that includes packages and files. Before moving ahead, let’s first get an overview of the Cucumber BDD framework.
What is the Cucumber Behavior Driven Development (BDD)Framework?
Cucumber is a Behavior Driven Development (BDD) framework tool for writing test cases. It is a testing tool that supports Behavior Driven Development (BDD). It offers a way to write tests that anybody can understand, regardless of their technical knowledge. In BDD, users (business analysts and product owners) first write scenarios or acceptance tests that describe the behavior of the system from the customer’s perspective. These scenarios and acceptance tests are then reviewed and approved by the product owners. The Cucumber framework uses Ruby as programming language.
To manage our code files for the project we need to create packages that are as follows:
Features Package – All feature files are contained in this package.
Steps Package – All step definition files are included in this package.
Pages Package – All page files are included in this package.
Utilities Package – All configuration files are included in this package.
Now, we have to create a feature file,
5.1: Creating Features File:
Features file contains a high-level description of the Test Scenario in simple language. It is known as Gherkin. Gherkin is a plain English text language
Cucumber Feature File consists of following components –
Feature: We use “Feature” to describe the current test script that needs execution.
Scenario: We use Scenario to describe the steps and expected outcome for a particular test case.
Given: We use “Given” to specify the context of the text to be executed. We can parameterize steps by using data tables “Given”
When: “When” indicates the test action that we have to perform.
Then: We represent the expected outcome of the test with “Then”
We need to add the below code in the feature file for our project.
Feature: Calculator Extension
 Scenario: User want to add 2 number by using calculator extension
   Given User clicks on the extension icon
   And User clicks on the calculator extension
   When User clicks on number 9
   And User clicks on "+" operator
   And User clicks on number 2
   And User clicks on "=" operator
   Then User sees the result 11
According to the above feature file, we are adding two numbers. To open the Chrome WebDriver and add a calculator extension, we use a GIVEN file. With the use of ‘WHEN’ and ‘AND’ annotations, we are executing click actions on the calculator extension, with which we are adding two numbers from the calculator. In the final step, we are using the ‘THEN’ annotation to verify the result (the addition of two numbers).
5.2: Creating Steps file.
Steps Definition to automate chrome extension-
Step definition maps the Test Case Steps in the feature files (introduced by Given/When/Then) to code. It executes the steps on Application Under Test and checks the outcomes against expected results. For a step definition to execute, it requires matching the “Given” component in a Feature.
Here in the step file, we are mapping the steps from the feature file. In simple words, we are making a connection between the steps of the feature file and with step file. While mapping the steps we have to take care about the format of mapping the steps in step definition. We need to use the below format to map the steps for the feature we had created in the features file.
package Steps;
import Pages.CalculatorPage;
import Utilities.TestContext;
import io.cucumber.java.en.And;
import io.cucumber.java.en.Given;
import io.cucumber.java.en.Then;
import io.cucumber.java.en.When;

import java.awt.*;

public class CalculatorStep extends TestContext {

   CalculatorPage calculatorPage;

   public CalculatorStep() throws AWTException { calculatorPage = new CalculatorPage(driver); }

   @Given("User clicks on the extension icon")
   public void User_clicks_on_the_extension_icon() throws InterruptedException {
       calculatorPage.User_clicks_on_the_extension_icon();
   }
   @And("User clicks on the calculator extension")
   public void userClicksOnTheCalculatorExtension() throws InterruptedException {
       calculatorPage.userClicksOnTheCalculatorExtension();
   }
   @When("User clicks on number {int}")
   public void User_clicks_on_number(int number) throws InterruptedException {
       calculatorPage.User_clicks_on_number(number);
   }

   @And("User clicks on {string} operator")
   public void userClicksOnOperator(String operator) throws InterruptedException {
       calculatorPage.userClicksOnOperator(operator);
   }

   @Then("User sees the result {int}")
   public void userSeesTheResult(int result) throws InterruptedException {
       calculatorPage.userSeesTheResult(result);
   }
}
5.3: Creating Page Object Design Pattern
Till now we have successfully created a feature file and a step file. Now in this step, we will be creating a page file. Page file contains all the logic of the test cases. Generally, in Web automation, we have page files that contain the locators and the actions to perform on the web elements but in this framework, we are not using the locators because as we know extension is not in the DOM(Document Object Model) element as it is outside the DOM element. So we will only create the methods and for those methods, we will be using Robot class and X and Y coordinates.
Here in this code, we are performing the activities that are hovering by the mouse actions(move, press, release), clicking on the calculator extension, clicking on the two numbers from the calculator, clicking on the calculator’s “+” addition operator, and obtaining the result of the addition of those two numbers.
What is the Robot Class in Selenium?
Robot Class in Selenium is used to enable automated testing for implementations of the Java platform. It generates input events in native systems for test automation, self-running demos, and other applications where users need control over the mouse and keyboard. Selenium Webdriver was unable to handle these pop-ups or applications and extensions. So a robot class was introduced in Java versions 1.3 and above, that can handle OS pop-ups or applications and extensions.
Robots help in managing all the activities like performing the task within the specified time, handling the mouse functions and the keyboard functions, and many more
While we are using the robot class, it requires the x and y coordinates of the element of the screen on which we will be performing the actions i.e hovering the cursor and then performing click actions.To find the coordinates we are using the Mofiki’s Coordinate finder.
What is Mofiki’s Coordinate Finder?
Mofiki’s Coordinate Finder finds out the present x and y coordinates of our cursor by hovering the mouse anywhere on the screen with the help of the application Mofiki’s Coordinate Finder, which is available for free download.
Steps to download and use Mofiki’s Coordinate Finder:-
Download the zip file of Mofiki’s Coordinate Finder application
Extract the Mofiki’s Coordinate Finder zip file and install the application setup.
Now open the Mofiki’s Coordinate Finder application. Use the image below as an illustration.
Now to find the x and y coordinates move the cursor to the point and just press the space bar we can get the x and y coordinates
package Pages;
import Utilities.TestContext;
import org.openqa.selenium.WebDriver;
import java.awt.*;
import java.awt.event.InputEvent;
import java.util.Objects;
public class CalculatorPage extends TestContext {
   public CalculatorPage(WebDriver driver) throws AWTException {
       TestContext.driver = driver;
   }
   public Robot robot = new Robot();

   public void User_clicks_on_the_extension_icon() throws InterruptedException {
       Thread.sleep(5000);
       robot.mouseMove(1250, 48);
       Thread.sleep(2000);
       robot.mousePress(InputEvent.BUTTON1_DOWN_MASK);
       robot.mouseRelease(InputEvent.BUTTON1_DOWN_MASK);
   }

   public void userClicksOnTheCalculatorExtension() throws InterruptedException {
       Thread.sleep(3000);
       robot.mouseMove(1000, 190);
       Thread.sleep(2000);
       robot.mousePress(InputEvent.BUTTON1_DOWN_MASK);
       robot.mouseRelease(InputEvent.BUTTON1_DOWN_MASK);
       Thread.sleep(10000);
   }

   public void User_clicks_on_number(int number) throws InterruptedException {
       Thread.sleep(3000);
       if(number == 0){robot.mouseMove(964, 450);}
       else if (number == 1) {robot.mouseMove(969, 390);}
       else if (number == 2) {robot.mouseMove(1020, 391);}
       else if (number == 3) {robot.mouseMove(1087, 395);}
       else if (number == 4) {robot.mouseMove(964, 334);}
       else if (number == 5) {robot.mouseMove(1023, 336);}
       else if (number == 6) {robot.mouseMove(1080, 334);}
       else if (number == 7) {robot.mouseMove(965, 282);}
       else if (number == 8) {robot.mouseMove(1023, 278);}
       else if (number == 9) {robot.mouseMove(1089, 278);}
       else { System.out.println("Number Invalid"); }
       Thread.sleep(2000);
       robot.mousePress(InputEvent.BUTTON1_DOWN_MASK);
       robot.mouseRelease(InputEvent.BUTTON1_DOWN_MASK);
       Thread.sleep(10000);
   }

   public void userClicksOnOperator(String operator) throws InterruptedException {
       Thread.sleep(3000);
       if(Objects.equals(operator, "+")){robot.mouseMove(1139, 446);}
       else if (Objects.equals(operator, "-")) {robot.mouseMove(1137, 386);}
       else if (Objects.equals(operator, "*")) {robot.mouseMove(1137, 331);}
       else if (Objects.equals(operator, "/")) {robot.mouseMove(1138, 272);}
       else if (Objects.equals(operator, "=")) {robot.mouseMove(1199, 446);}
       else {System.out.println("Invalid Operator");}
       Thread.sleep(2000);
       robot.mousePress(InputEvent.BUTTON1_DOWN_MASK);
       robot.mouseRelease(InputEvent.BUTTON1_DOWN_MASK);
       Thread.sleep(10000);
   }

   public void userSeesTheResult(int result) {
       System.out.println("Result should be "+ result);
   }
}
5.4: Creating TestContext File.
Now, In the Utilities package we have to create a TestContext file in which we can declare a webdriver. Declaring the webdriver as public allows initialization in every class file after inheriting the TestContext class. The step file and page file inherit the testContext class file. Also, we have declared Robot class here.
package Utilities;

import org.openqa.selenium.WebDriver;

import java.awt.*;

public class TestContext {
   public static WebDriver driver;

   public static Robot robot;
}
5.5: Creating BaseStep File:
This step is very important because we will be creating an environment file (i.e. Hooks file) and also we are using Chrome Options to add Calculator extensions.
Before moving ahead let’s understand about Before and After Hook and Chrome Options
What is Before and After Hooks?
Hooks allow us to better manage the code workflow and help us reduce code redundancy. We can say that it is an unseen step, which allows us to perform our scenarios or tests.
@Before – Before hooks run before the first step of each scenario.
@After – Conversely After Hooks run after the last step of each scenario even when steps fail, are undefined, pending, or skipped.
What are Chrome Options?
For managing different Chrome driver properties, Selenium WebDriver has a concept called the Chromeoptions Class. For modifying Chrome driver sessions, the Chrome options class is typically combined with Desired Capabilities. Eventually it enables you to carry out numerous tasks, such as launching Chrome in maximized mode, turning off installed extensions, turning off pop-ups, etc.
At this instant we have to create Before and After Hooks. At the same time each hook should contain a void method as shown in the below code.
In the Before Hook, we have to initialize the webdriver. Also, we have to add simple lines of code to add extensions to the webdriver. To add the extensions we are using Chrome Options to Automate Chrome Extension. Then in the After Hook, we are closing the webdriver.
Now, we have to create a Base Step which should have driver configuration and hooks
package Utilities;
import io.cucumber.java.After;
import io.cucumber.java.Before;
import io.github.bonigarcia.wdm.WebDriverManager;
import org.openqa.selenium.chrome.ChromeOptions;

import java.io.File;

public class BaseStep extends TestContext{
   @Before
   public void initCucWeb()
   {
       ChromeOptions options = new ChromeOptions();
       options.addExtensions(new File("src/test/Resources/CalculatorExtension.crx"));
       options.addArguments("--remote-allow-origins=*");
       options.setCapability(ChromeOptions.CAPABILITY,options);
       driver = WebDriverManager.chromedriver().capabilities(options).create();
       driver.manage().window().maximize();
   }
   @After
   public void closeWeb()
   {
       driver.quit();
   }
}
Please find attached the GitHub repository link. I have uploaded the same project to this repository. I have also attached a Readme.md file that explains the framework and the different commands we have used so far in this project.
It is a very difficult task to add an extension to a web driver and perform an action on extension icons. So basically, in this article, we have found a solution to add an Automate Chrome Extension to Webdriver and to perform a Click action on the extension icon apart from learning to Automate Chrome extension using the Selenium Webdriver.
The software testing landscape has evolved towards automation to meet the demands for quick and frequent deployments, adapting efficiently to constant updates and tight deadlines in a dynamic development environment.
I am an SDET Engineer proficient in manual, automation, API, Performance, and Security Testing. My expertise extends to technologies such as Selenium, Cypress, Cucumber, JMeter, OWASP ZAP, Postman, Maven, SQL, GitHub, Java, JavaScript, HTML, and CSS. Additionally, I possess hands-on experience in CI/CD, utilizing GitHub for continuous integration and delivery. My passion for technology drives me to constantly explore and adapt to new advancements in the field.